Last updated on April 11, 2025
I’ve finally gotten around to creating drive images for using an Asanté Desktop EN/SC (1996 version), SCSI to Ethernet converter with a Macintosh Plus (once I bought a keyboard from Herb Johnson to replace the ones I had that were lost in a move). I have one of the later versions that draw’s it’s power from the SCSI bus, which caused some issues with the Macintosh Plus.
I’ve created my typical System 6.0.8 and System 7.5.5 images, both with the minimal version of each system on them that you can upgrade to full versions.
In addition to the applications that I include in my other images, I’ve also pre-installed and pre-configured settings for connecting your Mac Plus to your network via FTP. You can also try to surf the net using a browser, but you will likely only get minimal success.
The images contain all the typical software I include, but I’ve also installed:
- Asanté EN/SC 5.6.1 drivers
- MacTCP 2.06, the last official version from Apple (not installed)
- MacTCP 2.1, an unofficial patched version by Glen Anderson (installed)
- And configured MacTCP 2.1 with some default settings
For the System 6.0.8 images, I also installed:
1. My Asanté Desktop EN/SC adapter
The adapter I have appears to be one of the final releases. The box includes the Asanté adapter, a 25pin cable, a manual (April 1996), and an EtherTalk Installer Version 5.6.1 disk. Looking at the Wayback machine, I found it last mentioned on Asante’s site was in 1998, with only the driver listed after that, they seemed to stop producing these SCSI adapters sometime in late 1998 or early 1999 and instead focus on internal cards and USB vs. slotless SCSI devices.
The version I have has the following limitations:
- it does not have a port for external power, but instead draws power from the SCSI connection
- it has been assigned SCSI ID 6, and that ID can not be changed
- it terminates the bus and therefore must be the last device in my SCSI chain.
Because of limitation 1, for the Macintosh Plus, I had to include a old external drive* enclosure in my SCSI chain between my Macintosh Plus and my Asanté adapter. The Macintosh Plus doesn’t provide terminator power, which is what I assume powers my Asanté adapter. This would likely impact other systems that lack terminator power. If your Asanté adapter has a port for external power, you will hopefully not have this issue.
Because of limitation 3, I can’t use both my Asanté adapter and my SCSI2SD adapter with my Macintosh Plus at the same time (on internal SCSI), so I instead use a FoppyEMU adapter with a HD20 image (see above, or my downloads page).
* I tried a 100MB zip drive, but it did not seem to provide enough power, so I ended up using an old external hard drive.
2. How I created these images
I did most of the work in Basilisk II, following a process similar to what I use to upgrade one of my images from the minimal system files to the full system files.
2.1. On your modern system
- Basilisk II cannot boot System 6.0.8, so to update my FoppyEMU‘s System 6.0.8 image file, I need to boot from my one of my System 7.5.5 image files.
- I set the 7.5.5 image as the first drive in Basilisk II‘s config settings, my System 6.0.8 image file as the second drive
- I made sure that the “enable my computer” icon is checked
- I boot basilisk (should load System 7.5.5)
- I used the “this PC” icon to access the files on my local PC and copy the needed files on the the System 6.0.8 drive
- Asanté EN/SC 5.6.1 drivers
- MacTCP 2.06, the last official version from Apple
- MacTCP 2.1 by Glen Anderson
- Network Software Installer 1.4.5 (description)
- I used Stuff-it Expander 5.5 found in the image utilities folder to uncompressed everything
- I updated the minimal version of System 6.0.8 to the full version
- I them ran the Network Software Installer 1.4.5, making sure I was installing to the “drive” representing my System 6.0.8 image file
- I then exited Basilisk II,
- I then copied the System 6.0.8 image file on to an SD card for use in my FloppyEMU (if you’re using a SCSI2SD you’ll need to raw-write the file vs. just copy)
2.2. On my Macintosh Plus
If you don’t want to use a modern system, you can do the installation directly on your Macintosh Plus assuming you have the correct disks etc.
- Install/connect your bootable FloppyEMU/SCSI2SD/ZipDrive etc. with one of my images
- Install/connect your Asante EN/SC (and provide external or terminator power)
- Turn on your Macintosh Plus
- Ruu the Asante EtherTalk installer found in the network folder of my images.
- Once that is installed I looked in the System 6.0.8 folder, if you see a file called MacTCP, delete it.
- Copy the MacTCP 2.1 file from the network folder in to your System 6.0.8 folder
- Reboot your Macintosh Plus.
3. Default network settings
I currently using an older Trendnet TEG-S800g gigabit switch with my wired Macintosh Systems, it seems to be able to work with these older devices. I have not tested them with newer switches.
Note: When using MacTCP, the DHCP feature will not work with Modern routers so you will have to manually configure everything.
For my router uses what I think is the typical configuration for home networks:
- IP Address range: 192.168.1.1 to 192.168.1.255
- DHCP assign range 192.168.1.100 to 192.168.1.255 (will not automatically assign IPs below 100)
- Subnet mask of 255.255.255.0
- DNS Server, for this tutorial I’m using Googles free DNS server, 8.8.8.8, not that I’ll be surfing the web much with this setup.
- You might have something different, but if you don’t know, feel free to try my defaults first.
My router (which is also my gateway), by default, uses 192.168.1.1 for it’s IP, and, by default, it only assigns 192.168.1.100 and up using DHCP, so I can assign fixed IP addresses using anything other than 1 for numbers below 100. So I decided to use 68 (figure 1) for 68k of course. Your router may use other settings, you can typically find out what settings to use by looking at your network settings on a modern system.
On my Macintosh Plus I opened the MacTCP 2.1 control panel (Figure 1)
I next had to change the settings to manual instead of server, and set the sub mask, router address (called gateway in some versions of MacTCP), and set the Domain Name Server information, I used google’s as it’s available to most people (figure 2). Note MacTCP 2.1 is a unofficial patch, and the author has greatly simplified the interface, so this may look different from other guides.
Once you updated your MacTCP settings for your network, reboot your Macintosh Plus
3. Using your network connection
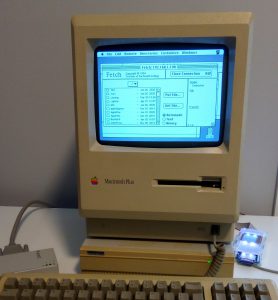
In the network folder on your drive (if you used one of my images), you’ll find and FTP program called Fetch that you can use to transfer files from one of your more modern systems on your network to you Macintosh. I have a windows 10 laptop with FileZilla installed that I use for my server, and add an exception to Windows firewall so that my Macintosh could connect to FileZilla. If there is interest I’ll add some more details on how to setup FileZilla and connect via Fetch.
Thanks for sharing this. I have a Plus as well and had been looking around online to see if it was possible to use my mini EN/SC with a SCSI/SD adaptor (ideal scenario). But it seems as though your post answered the question in stating that they both lack throughput for the SCSI chain. It seems unfortunate, but at the same time it’s already such a stretch to do why we are doing with these machines. For whatever it is worth, the Mini EN/SC uses its own power supply does work in a chain with Iomega Zip drive(s).
Great stuff! I will be trying this with my Apple Lisa computer which can run system 6.0.8 through 7.5.5.