Last updated on June 26, 2025
Back in the early 2000s I managed to buy a couple of Apple IIe PDS cards (at a price far less then they go for now). Over the years I’ve learned several tricks for how to use these cards as a way of bridging the old Apple II systems, through a classic Macintosh to modern systems. A lot of what I’ve discovered is less useful now with things like ADTPro, and FloppyEMU, but I’ve decided to start documenting what I’ve discovered in case someone else is setting up one of these cards.
1. Does your system support an Apple IIe card?
Before you spend money or time on one of these cards, please check that you own one of the supported systems. The Apple IIe card is only compatible with computers that have the LC style processor direct slot (PDS) and can work in 24-bit addressing mode.
1.1. Supported Systems
The following table lists the systems where the cards do, or “should” work.
Many of these systems are duplicates with different names. For example the Macintosh LC 475, Quandra 605 and Performa 475 are all the same specifications, just release for different markets.
| System | Works? | Confirmation from |
|---|---|---|
| Macintosh LC | Yes | TA46886 |
| Macintosh Color Classic | Yes | TA46886 |
| Macintosh Color Classic II | Should | Has LC PDS/24bit mode (KB SP208) |
| Macintosh LC II | Yes | TA46886 |
| Macintosh LC III | Yes | TA46886 |
| Macintosh LC III+ | Should | Has LC PDS/24bit mode (KB SP210) |
| Macintosh LC 475 | Yes | TA46886 |
| Macintosh LC 520 | Yes | TA46886 |
| Macintosh LC 550 | Yes | TA46886 |
| Macintosh LC 575* | Yes | TA46886 |
| Macintosh Quadra 605 | Yes | TA46886 |
| Macintosh Performa 250 | Should | Has LC PDS/24bit mode (KB SP218) |
| Macintosh Performa 275 | Should | Has LC PDS/24bit mode (KB SP219) |
| Macintosh Performa 4xx | Yes | TA46886 |
| Macintosh Performa 55x | Yes | TA46886 |
| Macintosh Performa 56x | Yes | TA46886 |
| Macintosh Performa 57x* | Yes | TA46886 |
* Note: According to TA31483 the 68040 versions of the Macintosh LC 5xx and Performa 5xx series do not recognize the Apple IIe Card when there is a communication card occupying the Communication Slot. BUT, qubitz on 68kmla.org was able to get have both his Apple IIe card and Asante Tech ethernet card working at the same time.
1.2. Software for the Apple IIe Card
The following table lists the released versions of the Setup Software for the Apple IIe card that I’ve managed to verify:
| Release | Supported Systems | Release Description(s) |
|---|---|---|
| 1.0 | System 6.0.8 (perhaps 6.0.7) | TA46108 |
| 2.0 | System 6.0.8 (perhaps 6.0.7) | TA47275 |
| 2.1 | System 6.0.8, 7.1 | TA46597, TA42072 |
| 2.2 | System 6.0.8, 7 Pro, 7.1 | TA30421 |
| 2.2.1 | System 6.0.8, 7 Pro, 7.1, 7.1P, 7.5.5* | TA30134, TA28525, TA37820 |
| 2.2.2d1 | System 6.0.8, 7 Pro, 7.1, 7.1P, 7.5.5* | TA33463 |
* Works with 7.5.5 on my Colour Classic, LC III, and LC 475 systems.
2. Getting an Apple IIe Card
If you don’t already have an Apple IIe Card your best bet is Ebay.
If you plan to use the card to read / write to an Apple II floppy drive (the A9M0107 or A2M2053) or with disk images on FloppyEMU, you’ll also need what’s called the “y-cable” (Figure 2)
If the card you purchased doesn’t have a y-cable, and you can’t find one on ebay, you still have several options:
- Use the Apple IIe Card to run ProDOS applications off ProDOS partitions on your hard drive, some Dos 3.2 applications off disk images, or Dos Applications/Games coveted to run under ProDOS.
- Use ADTPro and a serial null modem cable to connect the Macintosh System that is hosting your Apple IIe Card to a real Apple II
- Buy a y-cable built by Option 8, or from MacDoogie if he still has any, I bought one from him as a backup
- Create your own y-cable (see section 5)
3. Before you use your Apple IIe Card
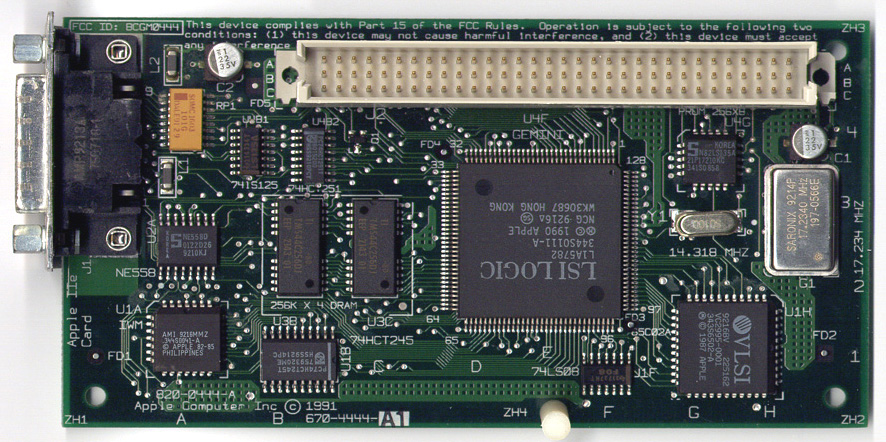
You will likely want to get the two silver capacitors replaced, because these cards are typically mounted face down, if these capacitors leak they can really cause havoc to your system, it’s best to replace them before using your card too often, or could be the reason why your card doesn’t work.
The 2 silver capacitors in Figure 3 need to be replaced. They are both: 22uf 35v 0.236″ L x 0.126″ W (6.00mm x 3.20mm). You can buy them from Console5.com, or you can get someone else to do the work. I had mine replaced by Amiga of Rochester.

4. Setting up your Apple IIe Card
The Apple IIe card’s manual provides most of the information you need to do the setup. But there were a few things I’ve learned that you’ll want to know:
- Your boot drive/disk must have the ProDOS file system enabler installed to be able to create and work with ProDOS partitions. The enabler is include with the Apple IIe Card software version 2.2.1, and on my premade drive images.
- You have to use the patched version of HD SC Setup 7.3.5 to create your ProDOS partitions. When I tried LIDO the Apple IIe Cards software could not see the partitions… that might just be something I’m doing wrong… let me know.
- It’s best to start with a blank drive (TA31420) so you can partition your drive to include two ProDOS partitions (or use one of my premade drive images).
- Using HD SC Setup, you are limited to two 32MB (32767KB) ProDOS partitions per drive. SCSI2SD’s ability to treat a single SD card as multiple drives gets around this limitation, giving you the option for up to 8 ProDOS partitions…. I have 4, the most that my Apple IIe card can use at the same time.
- Do NOT copy Apple II files on to your HFS partition, this can lead to weird issues where the resource fork is added to your files. I get around this by using ShrinkWrap Version 2.1 to create mountable (and editable) 32MB ProDOS disk images that I use to backup my Apple IIe files.
- If you have accidentally corrupted your Apple II files with a macintosh resource fork, you may be able to fix them using ProDOSTyper by Ivan X or UnForkIT by Ivan X.
To save yourself some time, feel free to download one of my starter drive images that includes a minimal version of OS 7.5.5 ready for use with your Apple IIe card. You can write my images to your SD or CF card, or use the image as an emulated drive in an emulator to copy it’s contents on to your own drive images.
I personally have a 32 GB card in my SCSI2SD adapter, setup as two drives so I can have a total of 4 ProDOS partitions. I created the first 2GB drive image using SoftMac, then wrote the image on to my SD card, inserted the card in my Macintosh LC 475, booted, then initialized the 2nd drive how I wanted.
I also have two OS 7.5.5 folders on my boot disk, one with 32bit mode enable and all the extensions I use for network, CD, midi etc. and a second with 32bit mode disabled (24-bit mode) with all extensions removed other than the ProDOS file system extension. I switch between them using System Picker by Kevin Aitken.
5. Creating a Y-Cable
I have not created my own cable to verify this information (I already have one). But I am thinking of making one as a backup (if I can’t buy one), I may only create a single cable so a floppy drive can be connected, which is more important to me than a mouse or joystick…. I wonder how hard it would be for BMOW to create a 26 pin to 19 pin adapter for the floppyEMU….
To create your own cable you’ll need the following 3 types of connectors (linked to some sources I’ve found):
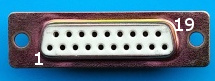
- DB19 Female connector (Floppy) these are hard to find.
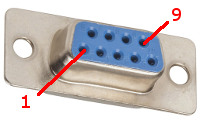
- DB9 Female connector (Joystick/Mouse/Paddle) these are easy to find.
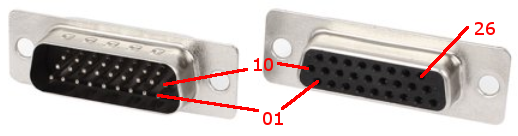
- DB26 Male connector (Apple IIe Card) these connectors seem to be still in use for some auto diagnostic tools.
5.1. Connecting the Connectors
The information on how to wire these 3 parts together was found on http://www.vintagemacworld.com, a now defunct site, still available on the internet archive by Phil Beesley. Phil is not clear on the pin layout for the joystick and floppy, so I’m assuming (I haven’t done my own trace) that he used the same orientation and numbering approach as the image he provided for the IIe card connector for the other two connectors:

(Joystick/Mouse/Paddle)
The following table was created based on Phil’s work and pin layout diagram (figure 4, above) to make it easier for me to see how the connections are grouped and how the D26 pin male connector’s pins are connected through the Y-Cable to the ports of the female D9 (Joystick) and female D19 (Floppy) connectors:
| Floppy (F) (figure 6) | Joystick (J) (fig. 7) | ||||||||
|---|---|---|---|---|---|---|---|---|---|
| 26 | 25 | 24 | 23 | 22 | 21 | 20 | 19 | ||
| 17 F | 14 F | 11 F | 08 F | 07 F | 02 J | 04 J | 06 J | ||
| 18 | 17 | 16 | 15 | 14 | 13 | 12 | 11 | 10 | |
| 19 F | 16 F | 13 F | 10 F | 04 F | 03 F | 05 J | 09 J | 07 J | |
| 09 | 08 | 07 | 06 | 05 | 04 | 03 | 02 | 01 | |
| 18 F | 15 F | 12 F | 09 F | 06 F | 01,02 F | 08 J | 03 J | 01 J | |
For some reason the Joystick connections appear to be more randomly organized, while the Floppy connections are mostly sequentially grouped, I’m hoping that the information is correct. I will likely need to get the tools to do my own trace.
5.2. The DB9 (Joystick etc.) Connector
The following table combines information from the apple II faqs pinout and from wiki.apple2.org for the DB9 pin Joystick connector.
| Apple IIe Card | Joystick | Function |
|---|---|---|
| 01 | 01 | Mouse ID / Joystick Button 1 |
| 02 | 03 | GND |
| 03 | 08 | YDIR / Game Control 1 / PDL1 / Joystick Y-axis |
| 10 | 07 | Mouse Button / Joystick Button 0 |
| 11 | 09 | YMOVE1 |
| 12 | 05 | XMOVE / X-Axis |
| 19 | 06 | No function? |
| 20 | 04 | XDIR2 |
| 21 | 02 | +5V |
- No Game Port function on //c, IIc+; this TTL-compatible input can be read at $C067
- No Game Port function on //c, IIc+; this TTL-compatible input can be read at $C066
5.3. The DB19 (Floppy) Connector
I used information from BigMessoWires.com and wiki.apple2.org for the DB19 pin floppy connector.
| Apple IIe Card | Floppy | Function |
|---|---|---|
| 04 | 01,02 | GND |
| 05 | 06 | +5V |
| 06 | 09 | /DRIVE2 |
| 07 | 12 | PH11 |
| 08 | 15 | /WREQ |
| 09 | 18 | RDDATA |
| 13 | 03 | GND |
| 14 | 04 | /EN3.5 |
| 15 | 10 | WRPROT |
| 16 | 13 | PH21 |
| 17 | 16 | SEL |
| 18 | 19 | WRDATA |
| 22 | 07 | +12V |
| 23 | 08 | +12V |
| 24 | 11 | PH01 |
| 25 | 14 | PH31 |
| 26 | 17 | /DRIVE1 |
- PH0 to PH3 = stepper motor phases
6. Recommended tools / applications / links
In addition to the ProDOSTyper by Ivan X or UnForkIT by Ivan X tools I mention in section 4, I’ve also found the following tools very useful for working with my Apple IIe card:
- CiderPress by Andy McFadden: I use CiderPress to create 32MB ProDOS formatted image files, then use CiderPress to copy files on to those image files, then on my Macintosh system, I can mount those ProDOS files using ShrinkWrap2.1 by Chad Magendanz (see my downloads page), then copy the files on to my ProDOS partitions. It will also open ShrinkIt archives (.shk) allowing you to copy the files more easily.
- ProDOS 2.4.3 by John Brooks: an updated version of ProDOS including several new features.
- i’m fEDD up by Antoine Vignau and Olivier Zardini: for creating .nib images of your disks, and write .nib images back to your disks (can backup and copy “some” copy protected games this way)
- FloppyEMU by Big Mess o’ Wires: lets you read and write image files in .DSK, .DO, .PO, or .2MG formats as if they are actually disks. You can currently only read .NIB, and .WOZ, files.
- Games in the .WOZ format that you can run from your FloppyEMU. Created using AppleSauce, the .WOZ format allows people to create working copies of copy protected games (with the copy protection intact).
- Internet Archive: Apple Sauce Images
- Internet Archive: WOZ a Day
- Games that can run from your ProDOS partitions (useful if you don’t have a Y-Cable)
- ProDOS game bundle by Alex Lee: a collection of games that work on ProDOS either natively or by using DosLauncher.
- Total Replay Collection 1 and Collection 2 by qkumba and 4am: a collection of games that have been cracked and ported to ProDos. Still waiting for 4am’s Sierra Mega Pack for 8-bit Apple II, a ProDOS conversion of Apple II sierra games.
- I have created a guide on how to get these games on to your ProDOS partitions for your Apple IIe card
Documents and advertisements
Mainly articles from Apple’s Technical Information Library
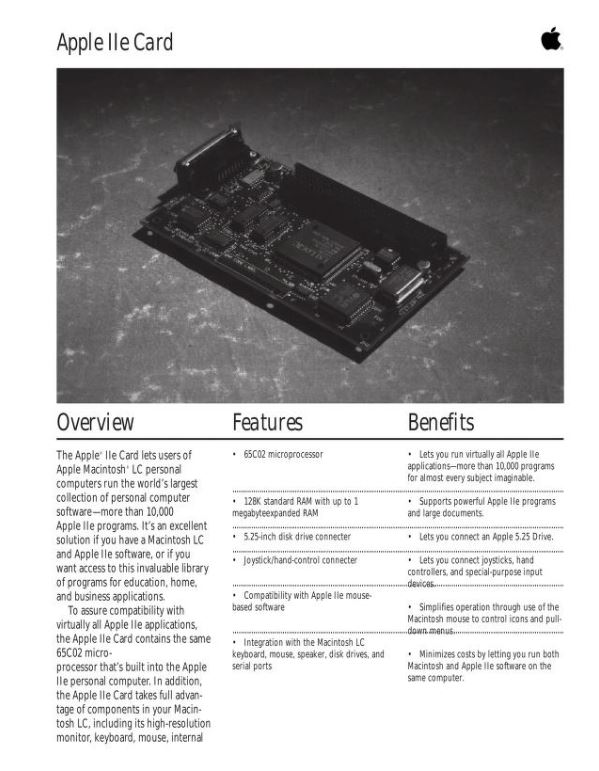
- Apple IIe card’s manual (1992) (1991)
- Apple II Workstation Card User Guide (emulated as the Apple Share card)
- AppleShare Server 3.0 Administrators Guide, the last server to support Apple systems
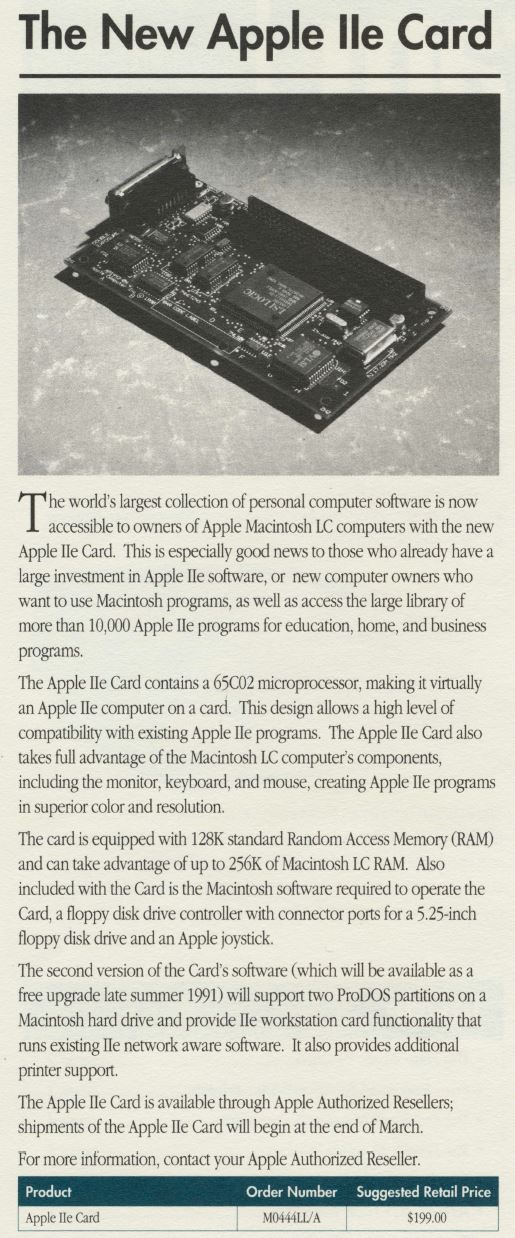
- AppleGram Product Announcement March 1991
- Apple IIe Card (2.2.1) (TA37820)
- Apple IIe Card Doesn’t Support IIGS Software (TA46908)
- Apple IIe Card Software v2.0: Not Tested with System 6.0.7 (TA47275)
- Apple IIe Card Software v2.1 for Macintosh LC (TA42072)
- Apple IIe Card: A/ROSE Causing Error Running IIe Startup (1/95) (TIL11362)
- Apple IIe Card: Booting Directly Into ProDOS (1994-07-01) (TA32036)
- Apple IIe Card: Can’t Use Apple II Memory Expansion Cards (TA47057)
- Apple IIe Card: Can’t Use Comm slot device With Card (1996-09-01) (TA31483)
- Apple IIe Card: Compatible Monitors and Projection Pads (TA47359)
- Apple IIe Card: Control Panel vs. Option Panel (TA47830)
- Apple IIe Card: Doesn’t Support Pascal Partitions (TA47194)
- Apple IIe Card: Effect of Video RAM in Macintosh LC (TA4713)
- Apple IIe Card: Hardware Specifications (7/93) (TIL06571)
- Apple IIe Card: How to Install in Macintosh (10/94) (TIL12319)
- Apple IIe Card: How To Partition the Hard Drive (1996-07-01) (TA31420)
- Apple IIe Card: How to Save Information to a Hard Drive (TIL11086)
- Apple IIe Card: Includes Applesoft BASIC (TA47072)
- Apple IIe Card: Joystick Support (TA46466)
- Apple IIe Card: Macintosh Compatibility (TA46886)
- Apple IIe Card: Memory Card Only Supports 1 MB (TA46467)
- Apple IIe Card: No Support for Parallel Printers (TA46468)
- Apple IIe Card: ProDOS 1.9. Corrects AppleWorks Date Errors (TA46465)
- Apple IIe Card: Red Text May Be BASIC’s FLASH Command (TA47832)
- Apple IIe Card: Requires SW Ver. 2.2.1 with System 7.1 (1994-07-01) (TA28525)
- Apple IIe Card: Software Version 2.0.x Features & Changes 1994-05-01 (TA46597)
- Apple IIe Card: Software Version 2.2.1 Available (1993-09-01) (TA30134)
- Apple IIe Card: Sound Level Control (TA47842)
- Apple IIe Card: Troubleshooting Apple IIe Applications (TA46469)
- Apple IIe Card: Using with Apple High Resolution 13-inch Monitor (TA47171)
- Apple IIe Card: Which Drives are Supported (TA47189)
- Apple IIe Startup Disk 2.0 for Apple IIe Card (TIL10079)
- ImageWriter LQ: Using with Apple IIe Card (TIL10253)
- Instant Pascal: Compatibility with Apple IIe Card (TA46967)
- LaserWriter: Apple IIe Card Only Prints 11-inch Page (TA47970)
- Macintosh 630 Family Computers: Apple IIe Card Not Compatible (TA32099)
- Macintosh LC Apple IIe Card version 1.0: Software Compatibility (TA46108)
- Macintosh LC w/Apple IIe Card: SCSI Ethernet Box & AppleTalk (TA48214)
- Macintosh LC with Apple IIe Card: Copying ProDOS Disks and Files (TA48209)
- Macintosh LC, IIe Card: “Printer Port already in use” Message (TA46464)
- Macintosh LC: Apple IIe Card Enables Network Printing (TA46665)
- Macintosh LC: Jumpers are for Apple IIe Card (TA46772)
- Macintosh LC: No NTSC Video-Out with Apple IIe Card (TA48061)
- Macintosh LC: Print, Copy, or Save Apple IIe Card Screen (TA47430)
- Partitioning a Hard Disk with the Apple IIe Card 2.0 in the Macintosh LC (TA41789)
- StyleWriter II: Compatibility with Apple IIe Card (3/93) (TIL11614)
- StyleWriter: Printing from Apple IIe Card (TA47304)
- System 7 Pro: Read Me Incorrect About Apple IIe Card SW (TA30421)
Hi, your article caught my attention! I have a number of Macs and even a real Apple iigs and iic…and an Apple iie card in an LC 475. I was thinking of trying to get an image like Total Replay to convert/transfer to a real 32MB prodos partition on the LC’s internal scsi hard drive. What do you think is the best way to do this? ADT? I have never been able to get the iie card to see the Prodos partitions…but I was using Lido too back then, maybe that was the problem? Also, once on the HD, how can the iie card boot from the HD prodos partition? Again, I have not been able to do that! (I have been successful booting from a BMOW floppy emu and a real drive attached to the Y cable).
Thanks for your help in advance!
Hi Jason, I’ve copied both the ProDOS game bundle and the Total Replay bundle on to my LC475 ProDOS partitions, part of the reason why I created partitions. I actually planned to write a “how to”, and will try to do so this week. If I remember the steps correctly I think I was able to mount the files as a “drive” under Basilisk, you need to make sure the ProDOS extension is enabled in your boot “drive” for Basilisk. In Basilisk, I then created a 32MB ProDOS file using ShrinkWrap (editable), mounted that, copied the drive contents in to the mounted file on the boot “drive”. I copied the boot drive file on to my SD card, put in my SCSI2SD, booted, then mounted the ShrinkWrap file again and copied the contents on to my ProDOS shares…. My guide will be more step by step with details. The key was using the ShrinkWrap file to make a virtual 32MB ProDOS drive.
Just came across this now! Time flies! Any updates of a guide? Thanks!
Any chance you got around to creating your guide?
If it helps any- I have an LC with the apple iie card, A real IIgs with a CFFA 3000 (that has Total Replay!), and an apple iic and an apple iic+. I also have a scsi ext drive enclosure. I have the cables to connect a usb mac/pc to the apple iic+/LC via ADT pro. I’m almost tempted to conncect the lc int scsi HD to the scsi port (card) in the iigs to copy the total replay ‘drive’, but I’m thinking there’s something easier? I actually have one prodos partition on the LC HD now that seems to be viable to put it on. Didn’t think it would be this tricky! Thanks in advance!
I have an entry in drafts that I haven’t finished yet, will try to finish this weekend.
What software did you use to mount the .2mg on your Mac?
I didn’t mount the image on my mac, I mounted them as “drives” under Basilisk II.
The bootable images I have on my downloads page include the prodos extension. As long as you boot Basilisk with one of my images it can read Prodos formatted images.
In the folder “Drivers (non-Network)” there is a folder “Apple IIe card”, Inside of that is a ProDos formatted image file. You can mount that, then copy the files from the mounted “drives” on to the image.
I’m writing up the steps now. Should have it posted this weekend, perhaps tonight.
Thank you, sir!
Guide now online https://www.savagetaylor.com/2020/12/12/total-replay-collection-on-my-apple-iie-card/
Been a little tied up- just saw this now- I’ll check it out! Thanks, and happy holidays!
You can buy the DB19 female connector in the following URL (while stock lasts):
https://a2heaven.com/webshop/index.php?rt=product/product&product_id=157
All links to UNFORKIT in your article are now dead because that website has been offline for over 2 years. Please consider replacing them with archive.org links: https://web.archive.org/web/20200508215256/http://ivanx.com/ivanx/unforkit/
Next, while you could at one time buy a custom-made Y-cable, that version doesn’t appear to be sold anymore. And while the information provided in your article is useful for daring people to try and make their own cable, it needs to be pointed out that the Apple stock Y-cable has a large ferrite choke affixed to the 9-pin joystick connector end, which none of the third party Y-cables provide. Without that, there is a higher risk of noise entering the joystick port which could impact proper interpretation of joystick movement by the IIe Card (and therefore by games). A choke really does need to be added there, whether you buy a custom cable or make one yourself.