Last updated on August 10, 2021
Recently I pickup a few Macintosh Plus systems, so I’ve decided to play around with the FloppyEMU’s HD20 support with the hopes of writing some future blog posts for maxing out a Macintosh Plus. This guide will also work for the SE, Classic, Classic II, Portable, IIci, IIsi, or LC.
1. Setting up the FloppyEMU for external use with the MacPlus
I was an early adopter and have version 1.3 (revision A) of a FloppyEMU, from Big Mess o’ Wires, that I planned to use with my Apple IIe card in my Macintosh Colour Classic… not long after the Colour Classic died, and it and the adapter got shelved (I now have an LC475 that I use with my Apple IIe card).
Since my purchase the creator has added HD20 support for a drive size of up to 2GB. Using a 2GB image, I plan to experiment with my recently acquired Novy Systems accelerators and my Asante Destop EN/SC scsi to ethernet adapter (without pass-through so I can’t use both it and my SCSI2SD adapter on the Macintosh Plus at the same time) to get a Macintosh Plus to browse the internet or at least FTP to/from my Windows machine.
1.1: Get the latest firmware for your FloppyEMU
- Download the latest firmware from Big Mess o’ Wires (scroll down the page for a bit and you’ll find the links). For this I’m guide, I’m using Macintosh and Lisa firmware for all Floppy Emu models: hd20-0.8E-F14.
- On your modern system, format an SD/MicroSD as FAT32
- Copy the files femu.bin and firmware.xvf on to the SD/MicroSD card.
- (Optional, copy disk images on to the card at this time, see section 2 below)
- Eject the card, then insert it in to your FloppyEMU
1.2: Connect your FloppyEMU to your Macintosh Plus’s external Floppy Port
Because I’m working with revision A, I need to use the Universal Adapter with the toggle switch set to “other mode” for 3.5 mode. Revisions B and C don’t have this switch..
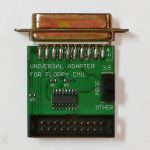
To use the Universal Adapter, set its slide switch to the appropriate position, depending on the selected emulation mode of the Floppy Emu. If the Emu is set to 3 1/2 inch floppy disk mode, then set the switch to the “3.5” position. If the Emu is set to any another mode (5 1/4 inch floppy, HD20 hard disk, Smartport hard disk), then set the switch to the “other” position. Setting the switch to the wrong position won’t harm anything, but it may cause disk-related errors.
Big mess of Wires – Universal Adapter for FloppyEMU (only needed for revision A)
1.3: Update the Firmware
The BMOW instructions confused me a bit, so here is my version:
- My Macintosh Plus is powered OFF
- Connect the FloppyEMU to the external floppy port of the Macintosh Plus
- Turn on the Macintosh Plus
- The FloppyEMU light should be lit
- Begin PART 1 from the instructions
- On the FloppyEMU hold down the NEXT and PREV buttons
- With the NEXT and PREV buttons still held down, press and hold the FloppyEMU’s RESET button until the update process begins. On mine the screen when black. Note, if you have the case the RESET button is labeled like a power button.
- When done the screen will display a message asking you to “Please install part 2”
- Begin PART 2 from the instructions
- On the FloppyEMU hold down the SELECT and PREV buttons
- With the SELECT (square on the case) and PREV buttons still held down, press and hold the FloppyEMU’s RESET button until the update process begins.
- According to the instructions everything “should” be done now, but I got an error saying that the CPLD firmware was still the Apple II version… so I had to repeat steps 6 and 7 and then it worked… That may just be an issue because I’m using such an old version of FloppyEMU.
- Turn off your Macintosh Plus
- Remove the SD/MicroSD card
- You can delete the femu.bin and firmware.xvf files.
2. Creating my HD20.dsk image
There are three main differences for working with FloppyEMUs hard drive emulation vs. using SCSI2SD, with FloppyEMU:
- You are limited to a single 2GB drive emulated HD20 drive vs. SCSI2SD’s four “drives”
- You do not need to use DD or another tool to do a bit by bit write, instead you just copy the file HD20.dsk as a file to your SD card.
- The HD20.dsk file is a partition file, not a drive file, it is not pre-pended with the drive’s boot and partition information.
You can follow the steps below to create a custom image, or you can just grab one I’ve already created from my downloads page.
2.1: Creating the blank 2GB image
Because I could not reuse my SCSI2SD images, I used DD to create a new, blank image:
dd if=/dev/zero of=HD20.dsk bs=1M count=1880 results in an ~ 2GB image.
2.2: Copying files to the new image
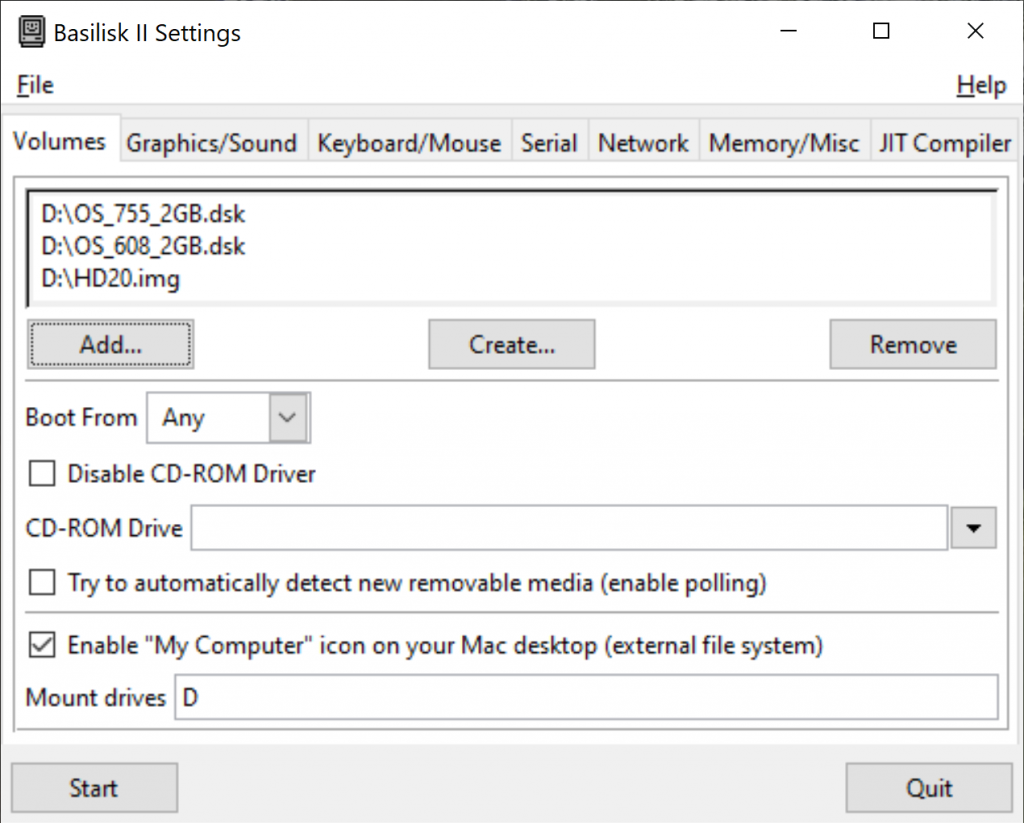
I then used Basilisk II, and followed a process similar to what I document in how to update one of my images to the full system software to:
- mount one of my System 7.5.5 SCSI2SD images as disk 0 (Basilisk can’t boot System 6.08)
- mount one of my System 6.08 SCSI2SD images as disk 1
- mount the HD20.dsk image as disk 1 (see figure 2 below)
- boot Basilisk II,
- Macintosh will ask if you want to initialize the “disk”, I named mine HD20
- Since I wanted to boot from System 6.08, I copied all the files from that drive (see figure 3) on to the HD20.dsk.
- I’ve also included on my images an application called “system picker” so I can select which system folder I want to boot from.
- All my images contain the minimal version of System 7.5.5 and System 6.0.8, that can be updated to the full versions, so I updated to the full version of 6.0.8
- Shutdown/exit Basilisk II

3. Using the HD20.dsk image
Now that you’ve created an image using the above steps, or downloaded one of mine, you need to:
- Copy the HD20.dsk file with System 6.08 on to your SD/Micro Card for your FloppyEmu
- Insert in to your FloppyEMU (I’m assuming it’s still connected to your Macintosh Plus)
- Turn on your Macintosh Plus
- On the FloppyEMU navigate to the location of the HD20.dsk
- Select the HD20.dsk
- You should see a message on the FloppyEMU saying that the “startup disk has been saved”
- Restart your Macintosh Plus.
- Your Macintosh Plus should now boot a minimal version of System 6.0.8 from the HD20.dsk image (if you used my image).
- Select the Apple icon, and Select about the finder
- If the finder reports that you have total memory of 2,048KB or greater, you can try to boot using System 7.5.5.
- You can now use System Picker (found in Utilities) to “bless” the System 7.5.5 folder (if you used my image)
- Reboot
- When I did this it rebooted part way through loading System 7.5.5
- It did load on the second try, but it had to do a desktop rebuild
Now that you know everything is working, you can use Basilisk II and the steps from section 2.2 above to add additional applications/files to the HD20.dsk file, or use some other option. Remember Basilisk II cannot boot your HD20.dsk image if you’ve set the image to boot from System 6.0.8. That’s why I typically set my HD20.dsk image to be a secondary drive under Basilisk II (figure 2 and 3)
Thanks for this great tutorial.
Unfortunately, after downloading your preconfigured HD20.dsk and copying it to it’s own subdirectory, if I select it in floppy emu in step 6 I get a “file not contiguous” vs FloppyEMU saying that the “startup disk has been saved”. FloppyEMU can load the default HD20.dsk supplied on the FloppyEMU SD card.
Any ideas?
The file has to be written to the SD card as a single continuous file. The best way to do that is to format the SD card and make sure that the HD20.dsk file is the first thing you write to the freshly formatted card. If you’ve added and then deleted files the HD20.dsk file might be “broken up” on your card and that will give you this error.