Last updated on March 9, 2025
Booting your classic 68k Macintosh from a 3.5 inch floppy disk was the most common and the easiest way to get most classic macs working when your starting with a more modern machine (most, but not all, more on that in a bit).
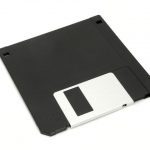
This post focuses on 3.5″ High Density (HD) disks that can be created using modern USB floppy drives.
Unless you already have a 3.5″ drive and some floppies, I suggest looking at one of the other storage options that you could use with your 68k or PPC Macintosh.
Assumptions
- You have a working Macintosh that supports 1.44MB floppy disks (not all do)
- You have a working 1.44MB 3.5″ floppy drive
Step 1: Determine if you can use this method
This method will work for the majority of 68k Macintosh computers except:
- The 128K, 512K, 512Ke, and Plus do NOT support this method.
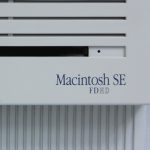
- The SE and II, likely do not, BUT both could be upgraded to support a SuperDrive, so these may support this method. Note: Starting in August 1989, Apple began equipping the SE with a SuperDrive, those systems will have a label on the front “Macintosh SE FDHD”
| Macintosh Model | 400k | 800k | SuperDrive |
|---|---|---|---|
| 128K | |||
| 512K | |||
| 512Ke | |||
| Plus | |||
| SE | if upgraded to an SE FDHD | ||
| II | if upgraded (TIL07561) |
Step 2: You have a modern system with a 1.44 MB floppy disk
For this post, I used an external 3.5 inch, USB 1.44MB floppy drive I picked up in 2014 when I retired the last of my “more modern” computers with a built in floppy drive. You can typically purchase a USB floppy drive for $30 or less, but it is becoming difficult to find a source of new floppy disks. At the cost of the drive plus the disks, totalling nearly $60 you can buy a SD card based Hard Drive replacement solution for the same price.
Step 3: Selecting the system version you want on your boot disk
I’ve made 2 main types of boot disks, both formatted using the Hierarchical File System (HFS):
- An OS 6.0.8 Boot disk for older 68k systems that may only have 1MB of memory installed. The SE/30, Classic, Classic II, Portable, II, IIx, IIcx, IIci, IIsi, LC typically shipped with only 1 MB of memory. I’ve managed to track down a scan of the Apple Memory Guide from November 2000 (pdf) that shows how to upgrade the memory for these and other 68k systems.
- An OS 7.5.0 Boot disk for most of the 68k systems (should work for all except the Powerbook 190 and 2300) that have 2MB or more memory installed.
Each disk contains:
- The system folders for either System 6.0.8 or System 7.5.0, containing the “minimal” files to boot.
- A patched version of HD SC Setup 7.3.5 for formatting your SCSI HD or equivalent once you’ve booted your Macintosh (patched to support non-Apple SCSI Drives)
- An application called DropDisk that allows you to quickly mount and use other disk images
I’ve created 4 different versions of each image, the first .dsk format can be used with emulators and floppy-emu, and is the default version for the methods described in step 3 to write to a physical floppy disk. The other versions are in Disk Copy 4.2 formatted, and if you know what that is, you already know how to used these.
The table below is a subset of the images I have created, I have a separate page with a complete list of image files I have created for use with floppy disk, CD-ROMs and Hard drives and SD card based hard drive replacements.
Step 4: Creating your bootable HFS Floppy Disk
You will need to use balenaEtcher or dd to raw-write the floppy disk images to your floppy disk. A raw-write does a bit-by-bit copy of the disk images to the floppy disk, completely copying over whatever was on the disk.
Step 5: Using your Macintosh
I suggest using an internal or external hard drive (or equivalent), to actually make use of your 68k Mac (all versions except the Macintosh 128k support some form of external or internal hard drive). If you do not have a hard drive or equivalent, there are other options such as: using a RAMDisk, a CD-ROM, or running applications off another system using Apple Share over Local Talk, or Apple Share over Ethernet.
Step 6: Relevant Technical Information Library articles
As part of my effort to create a mirror of Apple’s Technical Information Library / Knowledge base I found a few articles related to the use of floppy disks:
- System 7.x: Limitations on Use of 400k Disks (KB009502): MFS vs HFS formatted disks
- Double-Density Versus High-Density Disks (TIL03802)
- Don’t format HD disks as LD disks (TIL04637)
- Macintosh: External Floppy Drive Connector Pinouts (TIL00966)
- Macintosh: How to Copy or Initialize (Format) a Floppy Disk (TA21583): You can stop the copying process at any point by pressing “Command-.” (Command-period).
- Macintosh: Support for External Floppy Drives (TA44069): No Macintosh computer can work with more than one external floppy drive.
- Macintosh: Using High-Density Disks in 800K Drives (TIL12960)
- Troubleshooting a Rejected Disk (TA29966)
Hi Steve,
First of all thank you for your blog.
I have Macintosh SE FDHD M5011 1988.
I ordered via ebay floppy disks: Macintosh Utilities Disk 1 and 2, Macintosh System Tools and Macintosh Printing tools.
Now I’m trying to use those disks in order start up with my Macintosh.
Only disk Mac accepts to be inserted is Macintosh Utilities Disk 1.
Not sure what would be the very first step to choose for the installation.
If I choose app ‘Installer v2.6’ I get a list of installers e.g. ‘Minimum Macintosh SE (v6.0) but I cannot select ‘Install’ button on the right hand side. The button is greyed out.
Do you have any idea how to proceed with the installation?
Kind regards,
Pekka
Hi Pekka, is you internal hard drive working? If you can’t select install it likely means the installer can not see your internal hard drive.