Last updated on March 9, 2025
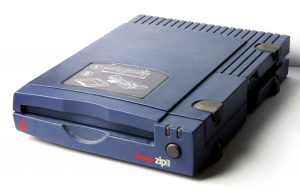
I’ve recently been experimenting to see if I could somehow use of my old Iomega Zip drives (a 250MB USB version, and a 100MB SCSI) to move files between my Windows PC and my various 68k Macintosh Systems. After a bit of experimentation I discovered how I could not only move files, but also create a disk image that would allow me to use my Windows PC to make fully bootable Zip disks for use with any of the SCSI capable 68k Macintosh systems.
So, similar to my entry on setting up using a floppy disk, I created boot images for System 6.0.8 and System 7.5.5.
Assumptions
- Your classic 68k Macintosh turns on, and is prompting you to insert a disk. If your 68k Macintosh does not turn on, or does not show the insert disk icon, you may need to do some repair work before you proceed.
- Your classic 68k Macintosh supports and is connected to an external or an internal Iomega Zip drive.
- You have a working SCSI 100MB Iomega Zip drive attached to your 68k Macintosh System, set with a valid SCSI ID and with the terminator enabled if it is at the end of the chain.
- You have a working USB 100MB or 250MB Iomega Zip drive to connect to your Windows, OS X or Linux System using USB, SCSI or IDE.
- You have at least one, 100MB Zip disk that you plan to use
Step 1: Determine if you can use this method
This method will only work for 68k Macintosh computers that have an internal Iomega Zip drive, or have a working SCSI or PCMCIA connector for an external Iomega Zip drive. Otherwise, you will need to use one of the other setup methods I’ve previously identified.
I’ve used this method to write an 100MB image file to both:
- a USB 250 Zip drive attached to my Windows 10 PC, and
- a 100 MB SCSI Zip drive attached to my Windows 10 PC using a SCSI controller card.
Step 2: Selecting your boot disk image
You can use one of mine, or create your own (I’ve created another blog entry to explain what drive images are, how to create them and with a summary table of all the drive images I’ve created).
First determine which operating system you can, or want to run on your classic Macintosh.
For Iomega Zip drives I’ve made 2 types of bootable drive images, both formatted using the Hierarchical File System (HFS):
- A 100MB OS 6.0.8 Bootable image (zipped, 5MB) for older 68k systems that may only have 1MB of memory installed. The SE/30, Classic, Classic II, Portable, II, IIx, IIcx, IIci, IIsi, LC typically shipped with only 1 MB of memory. I’ve managed to track down a scan of the Apple Memory Guide from November 2000 (pdf) that shows how to upgrade the memory for these and other 68k systems.
- A 100MB OS 7.5.5 Bootable image (zipped, 5MB) for the remaining 68k systems that have 2MB or more memory installed.
For information on the content of these images and how to edit these images see my entry on creating a bootable disk starting with a disk image.
For other images I’ve created a separate page with a complete list of image files etc. I have created for download.
Step 3: Creating your bootable HFS ZipDisk
I’ve created a separate blog entry for how I write the images back to physical drives and how to create your own images if you do not want to use one of mine.
Step 4: Booting your 68k Macintosh from your SCSI Zipdrive
Depending on your setup, your 68k Macintosh System may try to boot from a different drive than your Zipdrive. On some Macintosh Systems, you can use the following keyboard combination to specify the boot drive:
| Command-Option-Shift-Delete-# | Boot from a specific SCSI ID, where # is 0 through 6 |
Step 5: Relevant Technical Information Library articles
As part of my effort to create a mirror of Apple’s Technical Information Library / Knowledge base I found a few articles related to the use of Iomega Zipdrives:
- Iomega Jaz/Zip: Do Not Format with FWB Formatting Tools (KB036398)
- Iomega Zip Drive (SCSI): Specifications (KB020766)
- Iomega ZIP Drive: Delays When Drive is in Sleep Mode (KB030379)
- Iomega Zip Drive: Troubleshooting FAQ (KB020881)
- Iomega Zip Drive: Tools FAQ (KB020877)
- Mac OS 8.5: Iomega 6.0.1 Driver and Virtual Memory (KB030792)
- Power Macintosh: Troubleshooting Iomega Zip Drives (KB030380)
Hi guys,
great site, very useful, complete approach and instructions are very clear – really nice.
I am trying to install LC III via a SCSI-ZipDrive (250Mb) with a 100Mb-ZipDisk but only get “No disk” found.
This “No Disk found” error was also blocking the installation of the Iomega Tools 4.2.2 – the installer does not even start for this reason.
SCSI-Probe does list the drive correctly.
Only having a FloppyDrive otherwise, I have not much possibilities to vary drivers and and systems.
Do you have any idea why this happens? Is the drive broken?
Regards
Odd. I’m assuming you have a Hard Drive in your LC III? I found I didn’t need to have iomega tools installed, just the iomega extension, which I thought was on the disk image, if it isn’t I’ll added it and post here once I’ve updated the image.
Hi,
thanks for your answer. Where can I find this “extension”. Just to check whether this could help me out.
Thanks in advance.
I’ve added the extension to the image file.
Firstly, thanks for all the work you put into documenting this tutorial.
I have gone through the tutorial, but I at stuck at booting the SCSI zipdrive on my macintosh plus.
I used your 100MB OS 6.0.8 Bootable image as as the disk image for my zip drive. I have downloaded the .zip, extracted its contents, and performed the dd command on the correct storage volume.
However when I connect my zip plus (scsi or parallel port) to my macintosh plus (via 25 pin port), the macintosh plus boots up, and displays the icon for a floppy disk insertion.
Do you have any idea on what step I messed up in your guide? Is there any way I can check if I did something incorrect?
Thanks!
firstly thank you so much for putting together such a comprehensive guide!
I am stuck on the 4th step, and I cannot get my macintosh to boot via the scsi zip drive.
I have downloaded your 100MB OS 6.0.8 System image, and have used the dd command to fully write it to one of my zip disks.
However when I attempt to boot up my macintosh plus using zip plus (supports parallel and scsi) the mac immediatly boots to the floppy disk screen.
Any chance that you can possibly try and help me find where I went wrong?
Any help would be greatly appreciated!
Thanks!
Hi Tommy, I’ll take a look at the image this weekend to see what’s going on. Unfortunately I no longer have a Plus and last tested the image on an SE.
In the mean time you could try https://blog.rekawek.eu/2016/12/29/macos-images-for-iomega-zip/, or if you’re adventurous you could try creating your own image using an emulator. E.g. the Mame option on my site. https://www.savagetaylor.com/2018/12/26/setting-up-your-vintage-classic-68k-macintosh-using-mame/
Also I assume you’ve double checked that your connecting to your Plus using a SCSI cable, not a parallel cable? I know I’ve made that mistake before 🙂
Hi, thank you this has been enormously helpful. I am still waiting to test is, waiting for my scsi Zip drive to arrive from the US.
I have written an image to a zip disk already in anticipation.
My question is, once I have it installed on my HDD etc, how can I reformat the zip disk to be used as a normal disk again. My modern MacBook Pro can no longer see the disk, as it is written as a disk for the vintage macintosh.
Thanks! Really enjoying your posts.
Yes, you should be able to, I have a USB Zip Drive and a SCSI Zip Drive, I’ve written my image and then reformatted back with windows.
Thank you for providing these! I have a Performa 550 with a missing drive connector adapter and a bad SCSI CD drive so I was able to use your disk image + a USB ZIP 100 drive + a SCSI ZIP 100 drive + a modern Mac (by using dd command since Catalina Disk Utility removed a lot of older functions) to verify the machine boots, and play some games. 😉