Last updated on January 20, 2021
One of the most popular features of my site is my ready made System 6.0.8 or System 7.5.5 bootable images for use with 68k Macintosh systems. This entry describes how you can use SoftMac XP 8.2 or 9.0 beta to edit my images and create your own drive and volume images (up to 2.74GB) on Windows 10 (I did experience glitches if you switch from SoftMac to another window and switch back, SoftMac often locks up and has to be killed in task manager)
SoftMac has a few benefits over Basilisk II for helping you set up your Classic Mac:
- SoftMac supports System 1.1g to 8.1 (with the correct bios for emulating the correct system). Basilisk II only supports System 7.0 to 8.1
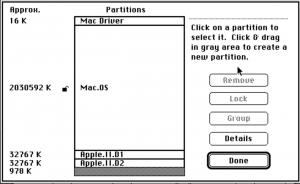
- SoftMac supports true hard drive emulation, meaning that you can use SoftMac to initialize drive images (2.7GB or less) that contain the Macintosh Boot Driver and Partition Map and other information in their first 48k that would be found on a real bootable drive or disk (see Figure 1). Basilisk II works best with volume images (file contains a single volume/partition), but can work with drive images that contain a single volume, but will corrupt drive images that have more than one volume.
The main weakness of SoftMac is that it’s only available for Windows Systems (perhaps Mac/Linux with WINE?)
Because SoftMac is already well documented on sites like Emaculation, I’m only going to describe the basics of how to setup Basilisk II and focus on how you can use it to add or remove files from the System 6.0.8 or System 7.5.5 bootable images available to download on my site.
Quick start
I’ve most recently tested SoftMac on Windows 10 build 19041.685, 2020/12/20 using Plus, IIfx and Quadra 610 emulation
- Download and install SoftMac 8.2 or the 9.0 beta (description)
- Create or download a Macintosh Rom file, e.g. the Macintosh Plus v3 bios, Macintosh IIfx bios or Macintosh Quadra 610 bios from the internet archive
- Download one of my System 7.5.5 drive images or partition images
1. Download and install SoftMac
The latest versions for Windows and Dos (not native MacOS and Linux support) can be found on Emulator.com’s website.
- Create a destination folder on your system that you will install SoftMac in.
- Download version 8.2 or the 9.0 beta
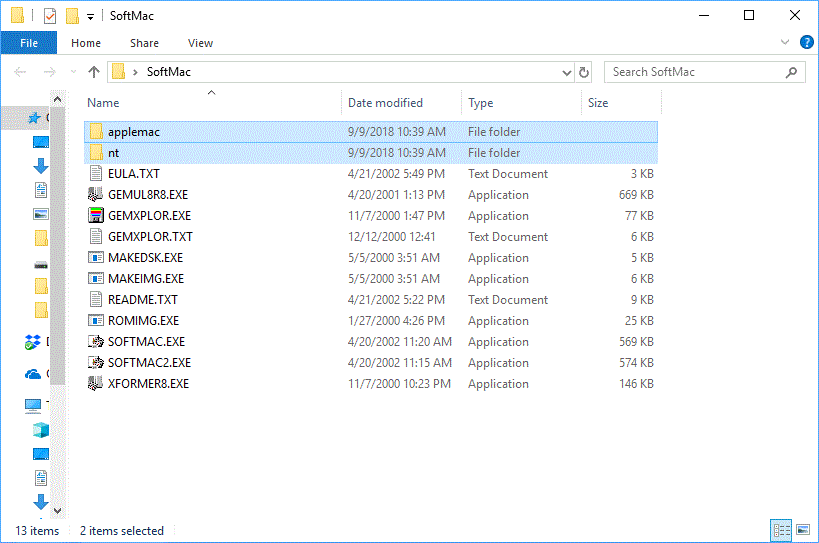
- Unzip the selected version in to the installation folder you created (Figure 2)
SoftMac 8.2 is now installed, but not quite ready to run.
2. Download and select a ROM file
SoftMac can emulate a fairly large number of Macintosh Systems and comes pre-configured for the Macintosh Classic series, Macintosh II series and Macintosh Quadra series. I’ve personally tested SoftMac with the following ROM files from the internet archive:
- Macintosh Plus v3 bios with the Classic series profile
- Macintosh IIfx bios with the Macintosh II series profile
- Macintosh Quadra 610 bios with the Macintosh Quadra profile
If you are downloading the bios files from the internet archive, I found I had to edit the file names for them to work with SoftMac, e.g. 06684214 – Quadra 630.ROM became Quadra630.ROM, and I suggest putting the ROM file in to the same installation folder as the SoftMac application unless you plan on running multiple emulators.
3. Selecting an drive or partition image file
SoftMac can be used with files containing a binary image of a hard drive partition/volume (.HFX), it can also be used with drive images up to 2.7GB (.DSK).
You can boot from any of my drive or partition images, and you can also create your own from a real hard drives, removable drives (zip, jazz) using tools like DD on Linux, or on Windows 10 with a SCSI card installed, or a USB bridge device, e.g. you have both a USB Zip Drive and SCSI Zip Drive, or USB to SCSI adapter.
4. Configure SoftMac
The first time you run SoftMac it will launch an auto-configuration wizard that will step you through the setup process:
- Run
SOFTMAC.exe - SoftMac will prompt you that it is running the Auto-configure program (Figure 3), select OK.
- SoftMac will then prompt you asking if you want to use a ROM file or a ROM card (Figure 4), select OK
- SoftMac will prompt you to select the location of the ROM BIOS file(s)
- The ROM BIOS Setup window (Figure 5) will appear:
- Press the path button if you need to change the path that you want SoftMac to look in for Bios files
- Press the Scan button, the list of available ROM BIOS image files should appear in that list.
- Select Close
- The SoftMac profile selector (Figure 6) should now be displayed.
- Select the profile you want to edit or copy, I’m going to select the Classic profile with a Macintosh Plus BIOS for this example.
- Select the properties button.
- The Properties Window (Figure 7) let’s you:
- Change the resolution: only 512×342 is available in the classic profile (higher resolutions are available under the other 2 profiles)
- The amount of memory: select 4M (more memory is available under the other 2 profiles)
- The BIOS file: I’ve selected the Macintosh Plus file v3 from the internet archive.
- Check the Windows file access check box
- Press Disk Properties
- The Disk Properties Window (Figure 8) let’s you:
- Map the emulated MAC’s drive to a floppy drive or image file. If you don’t intend to use this, I suggest disabling it. I found SoftMac started significantly faster with floppy drive emulation disabled.
- Map your CD-ROM or Hard drive images. For this example I’m mapping 2 image files:
- SCSI 0, my boot drive, my 2GB OS 7.5.5 image that I created for use with SCSI2SD, and
- SCSI 1, a second “blank” file that I created that I’m going to initialize under SoftMac.
- Select Close
- On the Properties Window (Figure 6) select Save, and then Ok
- On the profile window (Figure 5) select the profile you just edited, and press the Restart button.
- If you followed my guide, and you should now see the Mac Desktop in SoftMac (Figure 8)
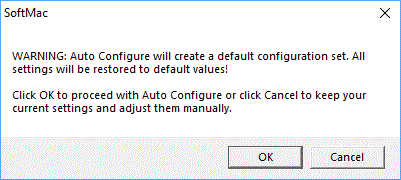
Figure 3: Auto-configure warning 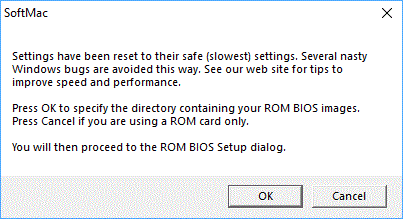
Figure 4: ROM file or card 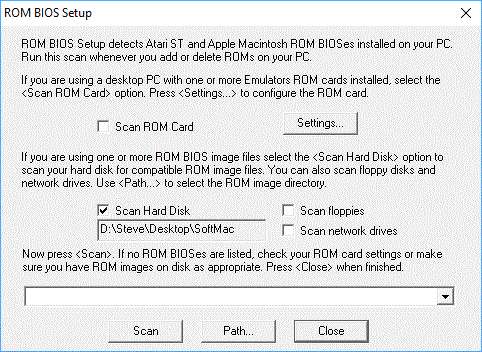
Figure 5: ROM setup 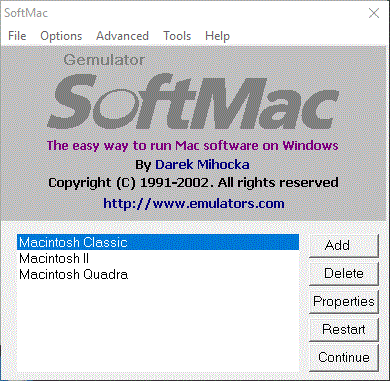
Figure 6: Profiles 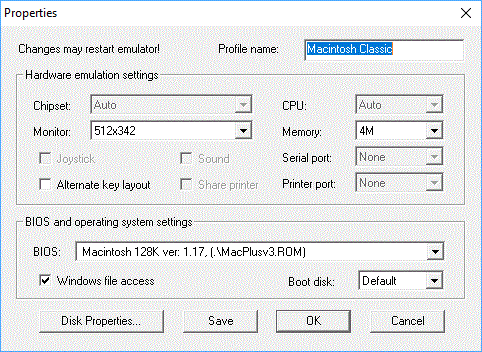
Figure 7: Profile Properties 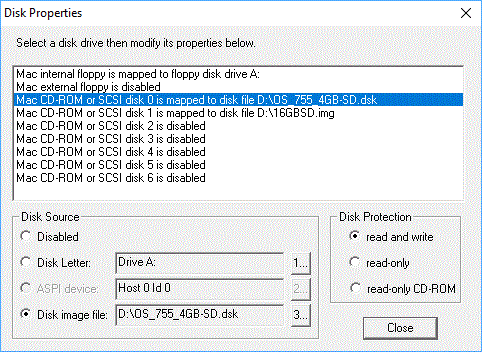
Figure 8: Disk Properties
5. Using SoftMac to edit image files
If you are using one of my drive images as your boot disk under SoftMac, under the Setup and Repair folder you’ll find a folder called Softmac, inside the SoftMac folder is an application called Transfer that will let you move files to and from your Emulated Mac and the host system.
6. Using SoftMac to initialize image files
Assuming you’ve used one of my image files as your boot drive for that emulator and the drive image you want to initialize is the secondary drive:
- Under Setup and Repair (was Utilities) folder you will find a copy of a patched version of HD SC setup 7.3.5 (Figure 9)
- Run HD SC setup 7.3.5 (Figure 10), SCSI Device 0 will be selected
- Press the Drive button to select SCSI Device: 1 (or whichever Device you mounted your image under) (Figure 11)
- Press the initialize button to initialize the device, a warning message will appear (Figure 12), followed by a prompt to provide a name for the drive
- Press the partition button to partition your initialized drive.
- Wait, may take some time depending on the size of the image file (especially for MAME)
- Select custom (Figure 13)
- HD SC setup will show you the default partitions it set up when it initialized the drive (Figure 14).
- Remove/edit the partitions as you see fit. Remember that System software before 7.5 has a 2GB size limit for partitions..
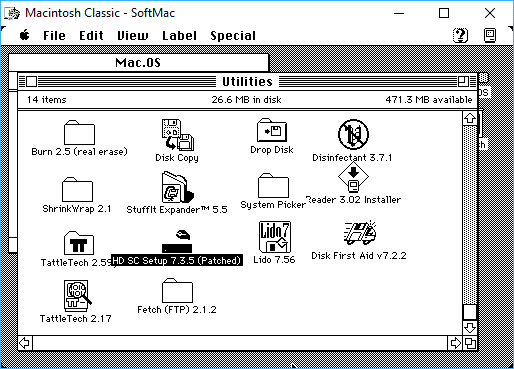
Figure 9: HD SC Setup 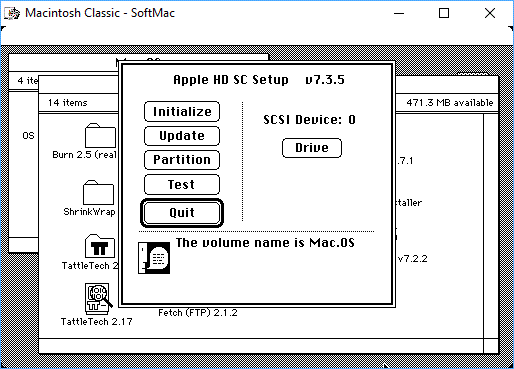
Figure 10: HD SC setup, device 0 
Figure 11: HD SC setup, device 1 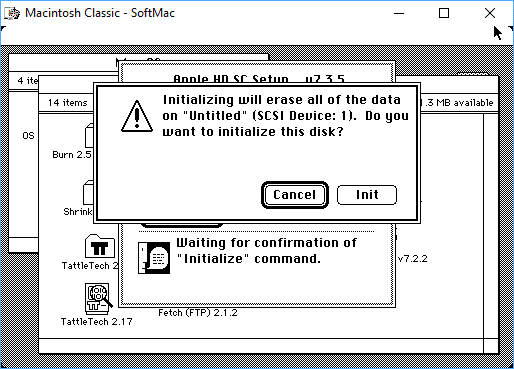
Figure 12: Warning message 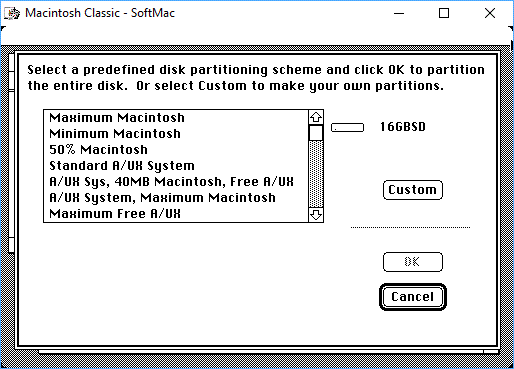
Figure 13: Partition Options 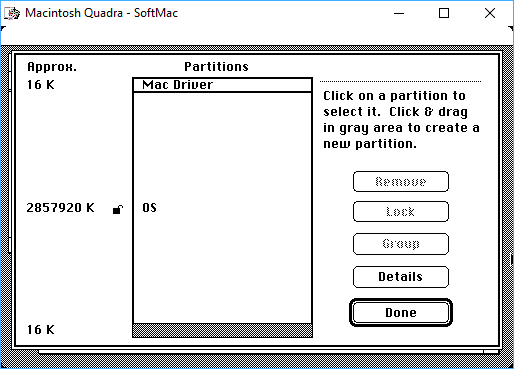
Figure 14: Partition Custom
Hello Steve ,
I had problems downloading the System 7.5.5 4GB and 16GB image files. Somehow the links you have on this page https://www.savagetaylor.com/2018/09/10/setting-up-your-vintage-classic-68k-macintosh-using-softmac/ does not work. Can you relink them ?
Thanks
Al
Hi Al, I need to fix some issues with this post, in fact I plan to rewrite most of it. Because SoftMac can only initialize drive images that are 2857952 KB (2791 MB) or smaller, the 16 GB image file doesn’t make any sense. If you are working with a SCSI2SD card I suggest you use one of my pre-created images as your drive 1 and then initialize your drive 2 as you want vs. trying to initialize your own image…. unless it is smaller than the 2791 MB limit.
Hi Steve, The reason I was interested in the 4GB and 16GB images is because I was not able to create additional devices using SCSI2SD on my Powermac 7500. Hence I thought maybe try to use your larger images. Yes, I am working with SCSI2SD v6 and initially used your System 7.5.5. 2GB image and was able to boot fine on Device 1 (scsi id 0). Then I enabled Device 2 (scsi id 1) from the scsi2sd-util6 to be a second drive (also 2GB), but I am having a hard time partitioning the second device from System 7.5.5 HD using LIDO. Perhaps I am missing something but I followed your SCSI2SD guide and copied the System 7.5.5. 2GB image using dd onto my SD card and this gives me a bootable SCSI2SD. But once I am booted up on Device 1 and try to partition Device 2, LIDO or HD SC Setup keeps failing to partition it. The initialization of Device 2 works but not the partitioning. You don’t actually need to dd the image a second time to the SD card for Device 2 do you ?
Thanks Al
Hi Alvin, you should be able to initialize your Device 2 with the patched HD SC Setup on my image. You don’t need to use DD for your device 2.
Two things you can try:
First, in your SCSI2SD setup for device 2, check the size. The SCSI2SD setup using 1024bytes to calculate sizes, most SD cards only use 1000bytes, e.g. a 32GB card actually only holds about 29.7GB, you need to make sure your device 2 isn’t larger than the actual remaining capacity of your card. I realized this the first time I did my setup when I set device 1 as 2GB and device 2 as 30GB and ran in to problems.
Second, if the first option doesn’t work, your card may have issues. I’d suggest doing a full format (not a quick format), and then checking the formatted size of the card. If you just bought the card, there have been issues with counterfeits that are labeled (and report to windows) with a size larger than they actually are.
Hi Steve, Your suggestion worked. I made my partitions slightly smaller than the actual size defined for SCSI2SD and it worked. Whenever I used the predefined settings In HD SC Setup like Maximum Macintosh to partition it always errors out, until I took your advice and used Custom settings to make it just slightly smaller than the SCSI2SD size. Thanks Steve.