Last updated on March 11, 2023
For reference by my future self, and for anyone that might want to duplicate my setup, I’ve documented how I’ve setup the 32GB SD card for my SCSI2SD that I use with my LC 475 with my Apple IIe card. Currently I have my SCSI2SD set up as 3 devices, SCSI 0 to 2, this is for two reasons: so I don’t have to update my SCSI2SD settings when I want to test one of my drive images as device 0, and so I can have 4 ProDOS partitions (limit 2 per drive).
UPDATE: I have created a much easier way to use your SCSI2SD with your Macintosh system. The new image will setup your 32GB card with a FAT32 formatted partition that contains a set of volume files that you can easily mount and edit using Basilisk II, Mini vMac, or some other tool.
UPDATE: I am now using a MacSD in my LC475 for my internal drive instead of my SCSI2SD, the main reason is the MacSD’s composite drive feature lets me have more than 2 prodos partitions for a single drive so I can get away with only using 1 SCSI ID instead of multiple SCSI IDs.
What you need
- A 68k Macintosh that supports the Apple IIe Card
- A SCSI2SD adapter and an SD card
- Basilisk II. Note: I used a LCIII rom
- My bootable 7.5.5 volume image to use as your Basilisk II boot drive
- The drive image file you plan to use with your SCSI2SD adapter, ideally updated to the full version of System 6.0.8, 7.0.1, 7.1.3 or 7.5.5
- The installation for the Apple IIe Card on Apple’s Legacy Software Recovery CD from the Internet Archive.
Quick Start
- Setup and run Basilisk II with at least those 3 volumes: boot, legacy CD, and the drive/volume you’re updating.
- Install the Apple IIe Card software version 2.2.1 from Apple’s Legacy Software Recovery CD, and optionally install the 2.2.2d1 update.
- Optional: copy ProDOS games and DOS images on to your drive image file
- Configure your SCSI2SD adapter, optionally starting with one of my SCSI2SD v3/v4/v5.x config files
- Boot your Macintosh using your SCSI2SD and initialize the other “drives” on your SDCard
- Use your Apple IIe Card
- Backup and modify the contents of your SD Card
1. Setting up Basilisk II to install the Apple IIe Card software
For this guide I’m going to use Basilisk II to edit my images, my Macintosh downloads page lists other tools that can be used to edit my images if you don’t want to use Basilisk II. I use Basilisk II because it can edit both my drive and volume/partition images, and is my general “go to” emulator.
- Download Apple’s Legacy Software Recovery CD from the Internet Archive.
- Download my bootable 7.5.5 volume image
- Run BasiliskIIGUI
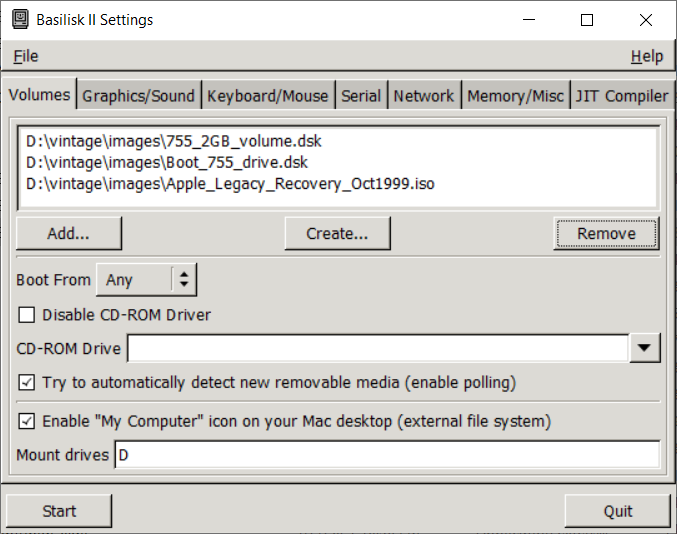
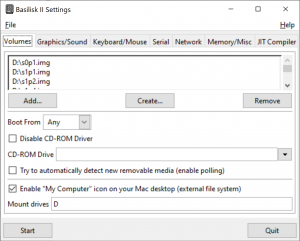
- On the volumes tab (Figure 1):
- add the System 7.5.5 volume image as the boot drive. For this example I’m using my volume image:
755_2GB_volume.dsk - add Apple’s Legacy Software Recovery CD
- add your drive image file
- enable “My Computer” icon on your Mac desktop (bottom left of Figure 1)
- add the System 7.5.5 volume image as the boot drive. For this example I’m using my volume image:
- Update any other settings you want to change
- Exit BasiliskII GUI
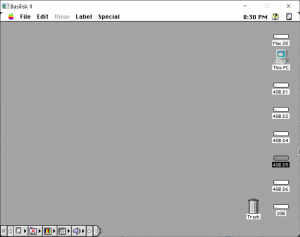
- Load Basilisk II (Figure 2)
2. Install Apple IIe Card software version 2.2.1
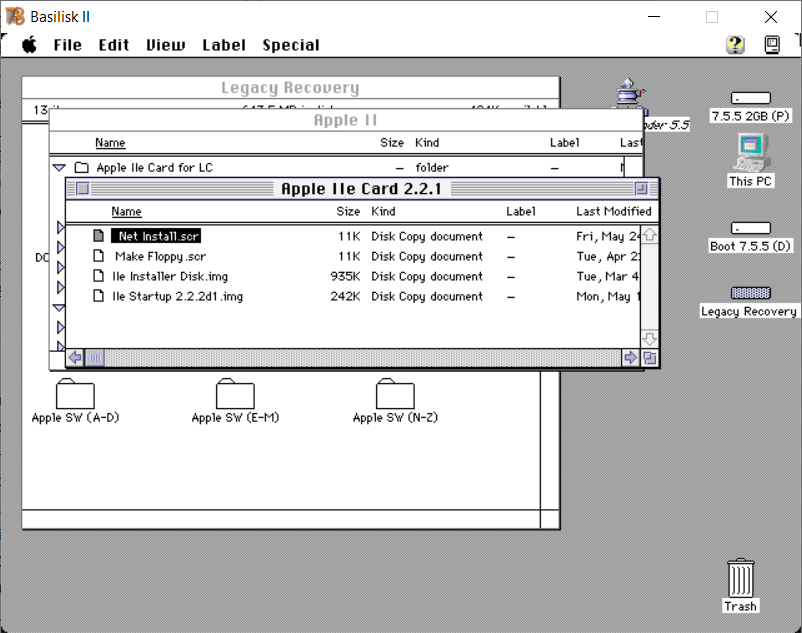
Apple’s Legacy Software Recovery CD contains the installation files for version 1.0 and 2.2.1 of the Apple IIe Card software (figure 2), this should work for most systems, but you will need to update 2.2.2d1 if you are using your Apple IIe card in a Macintosh LC 575/Performa 575 (KB TA33463).
- Open the Legacy Recovery Drive (figure 2)
- Open the Mac OS folder (figure 2)
- Open the Apple IIe Card 2.2.1 folder (figure 2)
- Run the Net Installer Script found the the folder (figure 2)
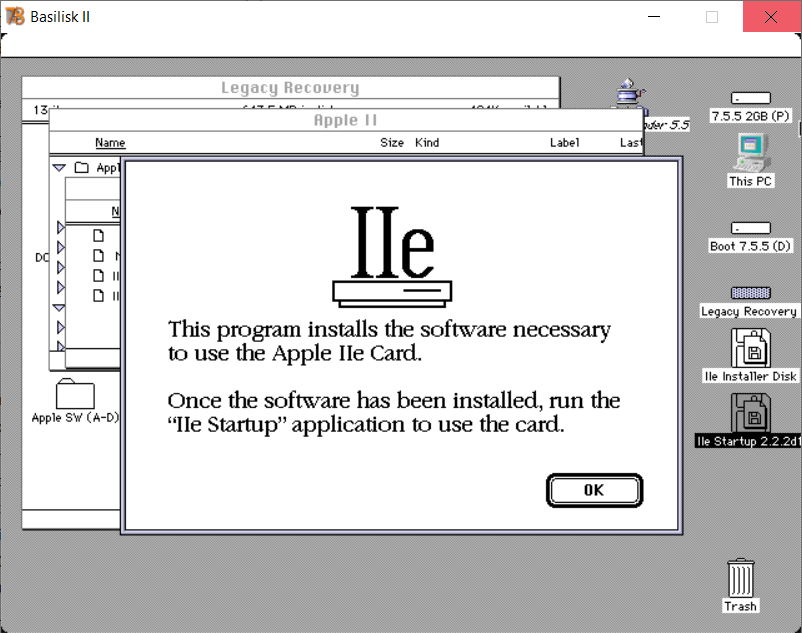
- The script will mount 2 disk images (figure 3)
- Select OK on the IIe window (figure 3)
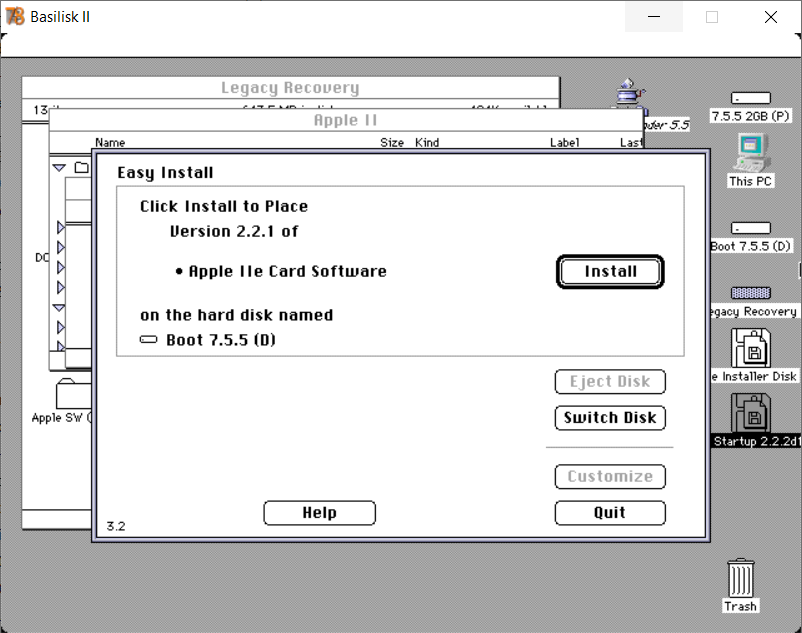
- On the Install Window (figure 4)
- You need to press the Switch Disk button until the drive image you want to use is selected, Boot 7.5.5 (D) in this example.
- Select Install
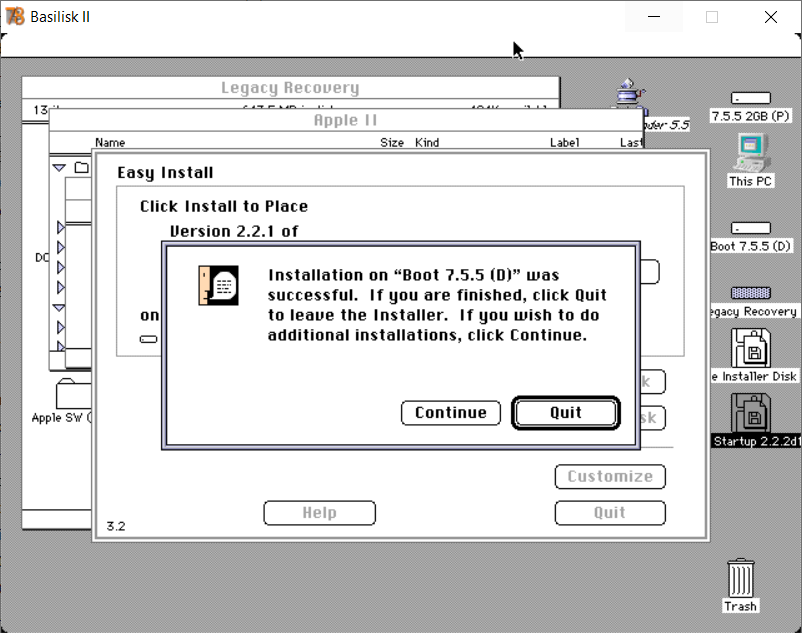
- When the install has finished press the Quit button (figure 5(
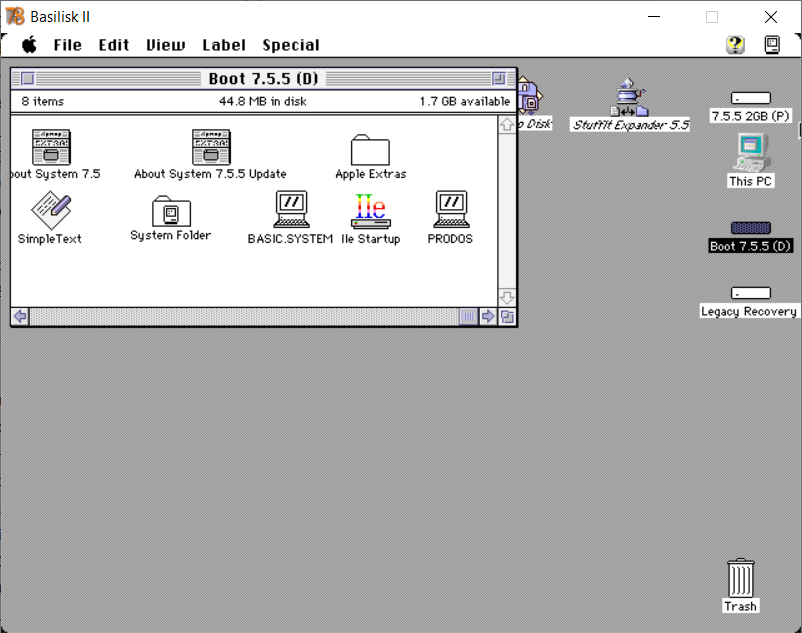
- The Apple IIe Software is not installed (figure 6)
3. Copying Apple IIe applications on to your drive
Do NOT copy Apple II files on to your HFS formatted partitions, this can lead to weird issues where the resource fork is added to your files. I get around this by using ShrinkWrap Version 2.1 to create mountable (and editable) 32MB ProDOS disk images that I use to backup my Apple IIe files.
For an example of how to do this, see my entry on how to copy 4am’s and Alex’s ProDOS Collections
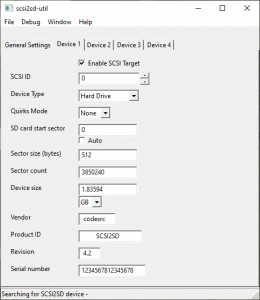
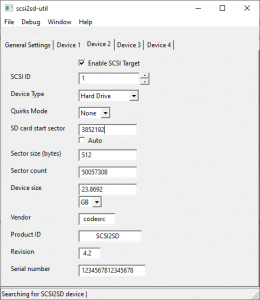
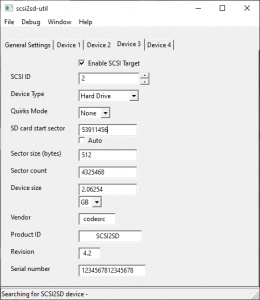
4. Configuring your SCSI2SD adapter
Currently I have my SCSI2SD set up as 4 devices, SCSI 0 to 3, this is for two reasons:
- I don’t have to update my SCSI2SD settings when I want to test one of my drive images as device 0, and
- I can have 6 ProDOS partitions, limit 2 per drive. This seems to be a limit of Apple’s HD SC Setup 7.3.5 software, and I found that ProDOS partitions created with other software could not be “seen” by the Apple IIe card. If you are using the MacSD adapter and a composite drive, you will not have this limitation.
5. Boot your Macintosh using your SCSI2SD and initialize the other “drives” on your SDCard
To do
| SCSI | Partition | Format | Blocks | Block size | Seek/Skip |
|---|---|---|---|---|---|
| 0 | SCSI2SD 1 | Drivers | 48KB | 1KB | 0 |
| 0 | 1 (Mac.OS) | HFS | 1925056KB | 1KB | 48 |
| blank 1 | 1984 | 512 bytes | 3850208 | ||
| 1 | SCSI2SD 2 | Drivers | 48KB | 1KB | 3852192 |
| 1 | 1 | HFS | 4063MB / 4160512KB | 1MB / 1KB | 1881 |
| 1 | 2 | HFS | 4063MB | 1MB | 5944 |
| 1 | 3 | HFS | 4063MB | 1MB | 10007 |
| 1 | 4 | HFS | 4063MB | 1MB | 14070 |
| 1 | 5 | HFS | 4063MB | 1MB | 18133 |
| 1 | 6 | HFS | 4063MB | 1MB | 22196 |
| 1 | 7 | ProDOS | 32767KB | 1KB | 26889216 |
| 1 | 8 | ProDOS | 32767KB | 1KB | 26921983 |
| blank 2 | 1956 | 512 bytes | 53909500 | ||
| 2 | SCSI2SD 3 | Drivers | 48KB | 1KB | 53911456 |
| 2 | 1 | HFS | 2040MB / 2088960KB | 1MB / 1KB | 26324 |
| 2 | 2 | ProDOS | 32767KB | 1KB | 29052928 |
| 2 | 3 | ProDOS | 32767KB | 1KB | 29085695 |
| blank | 4 | 512 bytes | 58236924 | ||
| Both | total (dd) | 28436MB | 1MB | ~27.77 GB |
6. Use your Apple IIe Card
To do
7. Backup and modify the contents of your SD Card
7.1. Copy the entire contents of your SD Card to a file
One of the best things about using a SCSI2SD adapter is how easy it is to backup all your 68k Macintosh’s emulated drives to a single file.
- Remove the 32GB card from my SCSI2SD adapter
- Insert the SD card in to my USB adapter / reader for my PC
- Open the terminal / command line window
- Type
dd --list(windows),diskutil list(linux and mac OS) and press return - You should see a list of all attached drives for your system with their names, you should see the name or your micro SD, SD or CF card, you want the identifier of the floppy drive eg.
- for linux or mac OS something like
/dev/disk2 - for windows something like
\\.\Volume{bc8eb0e4-a23d-11e8-9982-00e18c7bb83e}\
- for linux or mac OS something like
- Using the SD card as the input file, create a backup file: “
dd if=INPUTFILE of=OUTPUTFILE bs=BLOCKSIZE count=BLOCKCOUNT”:- INPUTFILE = {identifier from step 5}, e.g. /dev/disk2 or \\.\Volume{GUID}
- OUTPUTFILE = the location and name of the image you would like to create.
- BLOCKSIZE, this is why I created my drive to be in multiples of 1M, so I could use a 1M blocksize.
- BLOCKCOUNT, the number of blocks to read from the card. I’ve set up my 32GB card (actual 29.7GB) so that only the first 28436 1MB blocks are used (includes SCSI 0, SCSI 1 and 2)
- e.g:
- linux or mac OS type “
sudo dd if=/dev/disk2 of=LC475.img bs=1M count=28436 - for windows type “
dd if=\\.\Volume{bc8eb0e4-a23d-11e8-9982-00e18c7bb83e} of=LC475.img bs=1M count=28436 --progress”
- linux or mac OS type “
- press return
- wait….
7.2. Extract the “partitions” out of the file
Once I have the file that contains a bit by bit copy of all the “drives” on my SD card, I can then extract each partition from those “drives” to separate partition files so I can mount the partition files in Basilisk II (section 3.3).
Below are the contents of the .bat file I’ve created for Windows 10 to automate the process. Note, my batch file also contains the command from section 3.1. above to backup the SD card to file. I found the the performance is better on my system if I work with that backup file as the source for extracting the partitions vs. extracting directly from the SD card. It also gives me a file I can make a backup copy of before I edit anything.
dd if=\\.\Volume{bc8eb0e4-a23d-11e8-9982-00e18c7bb83e} of=LC475.img bs=1M count=28436 --progress
dd if=d:\LC475.img of=d:\s0p1.img bs=16384 skip=3 count=120317 --progress
dd if=d:\LC475.img of=d:\s1p1.img bs=1M skip=1881 count=4063 --progress
dd if=d:\LC475.img of=d:\s1p2.img bs=1M skip=5944 count=4063 --progress
dd if=d:\LC475.img of=d:\s1p3.img bs=1M skip=10007 count=4063 --progress
dd if=d:\LC475.img of=d:\s1p4.img bs=1M skip=14070 count=4063 --progress
dd if=d:\LC475.img of=d:\s1p5.img bs=1M skip=18133 count=4063 --progress
dd if=d:\LC475.img of=d:\s1p6.img bs=1M skip=22196 count=4063 --progress
dd if=d:\LC475.img of=d:\s1p7.img bs=1k skip=26889216 count=32767 --progress
dd if=d:\LC475.img of=d:\s1p8.img bs=1k skip=26921983 count=32767 --progress
dd if=d:\LC475.img of=d:\s2p1.img bs=1M skip=26324 count=2040 --progress
dd if=d:\LC475.img of=d:\s2p2.img bs=1k skip=29052928 count=32767 --progress
dd if=d:\LC475.img of=d:\s2p3.img bs=1k skip=29085695 count=32767 --progress
7.3. Editing the partitions
Once I have files for each partition, I can use Basilisk II to edit their contents
7.4. Writing Edited Partitions back to your “drive” file
Once I’ve finished making my changes and getting everything setup the way I want using Basilisk II, I write back the partition files to the file I created back in section 3.1. Below are the contents of the .bat file I’ve created for Windows 10 to automate the process:
dd of=d:\LC475.img if=d:\s0p1.img bs=49152 seek=1 conv=notrunc --progress
dd of=d:\LC475.img if=d:\s1p1.img bs=1M seek=1881 conv=notrunc --progress
dd of=d:\LC475.img if=d:\s1p2.img bs=1M seek=5944 conv=notrunc --progress
dd of=d:\LC475.img if=d:\s1p3.img bs=1M seek=10007 conv=notrunc --progress
dd of=d:\LC475.img if=d:\s1p4.img bs=1M seek=14070 conv=notrunc --progress
dd of=d:\LC475.img if=d:\s1p5.img bs=1M seek=18133 conv=notrunc --progress
dd of=d:\LC475.img if=d:\s1p6.img bs=1M seek=22196 conv=notrunc --progress
dd of=d:\LC475.img if=d:\s1p7.img bs=1k seek=26889216 conv=notrunc --progress
dd of=d:\LC475.img if=d:\s1p8.img bs=1k seek=26921983 conv=notrunc --progress
dd of=d:\LC475.img if=d:\s2p1.img bs=1M seek=26324 conv=notrunc --progress
dd of=d:\LC475.img if=d:\s2p2.img bs=1k seek=29052928 conv=notrunc --progress
dd of=d:\LC475.img if=d:\s2p3.img bs=1k seek=29085695 conv=notrunc --progress
7.5 Writing the “drive” file back to your SD card
Once the combined file is updated I write it back to my SD Card, typically using balenaEtcher, mainly because I’m having an occsional issue where using DD under windows to write to SD cards results in a file an emulated drive that doesn’t work, I’m still trying to sort out why.
[…] of which System OS is selected, maximizing the use of flash memory will require setting up multiple disk partitions on any single memory […]
Thank you very much for this. I’m getting a classic mac to restore and was trying to figure out how to get files on/off it with a SCSI2SD. I didn’t think to automate it all with batch scripts – how long does it take? Do you do this whole process every time you need to get a single file copied over?
I usually just edit the first partition, and then copy the files off that to the other partitions. So my batch file would only copy the first “drive” off the card, I’d load that drive in Basilisk II, edit it, then use balenaEtcher to write it back to the beginning of the card. That takes only a few minutes for the read and the write.