Last updated on March 9, 2025
One of the most popular entries on my site is my guide to setting up a SCSI2SD adapter with one of my ready made System 6.0.8 or System 7.5.5 images for use with 68k Macintosh systems. This entry describes the different ways to initialize your drive, or drive image.
Overview
This entry contains:
- A description of what a drive image is vs. a volume/partition image, and a description for how to use DD to covert between
- A list of tools that can be used to create, initialize and edit drive and volume/partition image files
- A description of how to initialize a drive image or real hard drive/removable drive using a patched version of HD SC setup 7.3.5
1. Drives, Drive images, Volumes and Volume (partitions) images
Through out my site I refer to my bootable image files as Drive or Volume images, depending on the tools you want to use to edit them with, or the devices you want to copy them on to, you’ll typically need to know which to use:
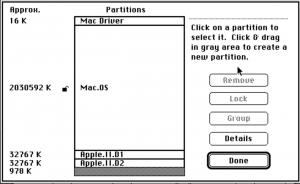
- A Hard Drive or Removable Drive Image : contains a binary copy of the complete contents of an initialized drive including the drive’s boot driver and partition information. Example, Figure 1 is the contents of a Drive Image viewed in my patched version of HD SC Setup 7.3.5 in SoftMac. This type of image is required for SCSI2SD, Hard Drives, Removable Drives such as Zip Drives, and Jaz Disks, and bootable CD-ROMs.
- A Volume or Partition Image: contains a binary copy of a single Macintosh volume or partition from a hard drive or removable drive. When most emulators refer to a hard drive file, a Partition/Volume Image is typically what they are actually referring to and support. These images lack both the boot sector, partition map. Used by FloppyEMU.
1.1 Converting a Drive image file in to one or more Volume/Partition images
You can use programs like DD to extract volume/partitions from a drive image to one or more separate files. To do so can be tricky and requires that you know exactly where each partition/volume starts and ends in the drive image. For my drive images you can use the following commands (a more detailed example can be found in my blog entry on how I setup my SCSI2SD drive for my LC475):
| Image Size | DD commands (Windows Examples) |
|---|---|
| 100 MB (Zip drive) | dd if=d:\OS_755_100MB.dsk of=d:\volume.img bs=49152 skip=1 –progress Total image size: 94,371,840 bytes, need to skip the first 48KB |
| 1GB (Jaz drive, SCSISD) | dd if=d:\OS_755_1GB.dsk of=d:\volume.img bs=16384 skip=3 –progress Total image size: 985,661,440 bytes, need to skip the first 48KB, and the block size must be a number that can divide both, so 16k. |
| 2GB (Jaz drive, SCSISD) | dd if=d:\OS_755_2GB.dsk of=d:\volume.img bs=16384 skip=3 –progress Total image size: 1,971,322,880 need to skip the first 48k, and the block size must be a number that can divide both, so 16k. |
1.2 Converting a Volume/Partition image back in to a drive image
The following examples show how you can merge the extracted volume/partition back in to the drive image:
| Image Size | DD commands (Windows Examples) |
|---|---|
| 100 MB (Zip drive) | dd of=d:\OS_755_100MB.dsk if=d:\volume.img bs=49152 seek=1 conv=notrunc –progress Need to skip the first 48KB (seek 1, bs=48k) |
| 1GB (Jaz drive, SCSISD) | dd of=d:\OS_755_1GB.dsk if=d:\volume.img bs=49152 seek=1 conv=notrunc –progress Need to skip the first 48KB (seek 1, bs=48k) |
| 2GB (Jaz drive, SCSISD) | dd of=d:\OS_755_2GB.dsk if=d:\volume.img bs=49152 seek=1 conv=notrunc –progress Need to skip the first 48KB (seek 1, bs=48k) |
2. Editing my Macintosh 68k bootable image files
The table below lists the different tools I’ve assessed and indicates if they can be used to edit drive and/or partition files. Personally I mainly use Basilisk II to edit my image files, and use DD to split larger drive images in to a set of partition images then merge them back together after I edit them.
- P: can read/write Partition files (also called Volume files)
- D: can read/write Drive files, D(1) indicates the software can only work with a drive file with a single partition
- I: can initialize new Drive files, these are files
- R: can read but not be used to add new files to an image
- E: can read and be used to add new files to the image (edit)
| Emulator/Tools | Features | Windows | Linux | Mac OS |
|---|---|---|---|---|
| My image files | Yes | Yes | Yes | |
| Basilisk II | P, D(1), E | Yes | Yes | Yes |
| Cockatrice III | ? | ? | ? | ? |
| HFSExplorer | P, D, R | Yes | Yes | Yes |
| HFVExplorer | P, E | Yes | No | No |
| MAME | D, I, R | Yes | Yes | Yes |
| Mini vMac | P, E | Yes | Yes | Yes |
| SoftMac | P, D, I, E | Yes | No | No |
| PCE / macplus | P, R | Yes | Yes | ? (untested) |
3. Initializing / partitioning a Drive or Drive image
To use a real hard drive, removable media or drive image you first have to initialize it to add the drive’s boot driver and partition information
3.1 Limitations when initializing/partitioning a drive under System 6.x and System 7.x.
- You can’t change the partitions on the drive you are currently booting from (which is why setting up your card as more than one “drive” when using SCSI2SD will make your life easier)
- HD SC Setup provided by Apple only works with apple drives, luckily a patched version of HD SC Setup was created that works with any drive.
- HFS has a limit of 65,535 files per logical disk (e.g. partition). A way around this is to use a tool like ShrinkWrap to create mountable disk images. (KB008647)
- System 4.1 to 6.08 can only support 2 GB partitions, System 7.5 introduced support for 4 GB partitions, and System 7.5.2 introduced support for 2 TB partitions for some systems (KB008647)
3.2 Deciding what types and sizes of partitions you plan to create
If you plan to use the Apple IIe card you will want to create at least one (max two) 32MB (yes MB) partitions that you’ll later initialize as ProDos partitions to use with your Apple IIe card. Otherwise, taking in to account the limitations above, and the “wasted space” if you have really large partitions filled with small files, it’s really up to you.
3.3 Initialize an image file
Assuming you’ve used one of my image files as your boot drive, or have a copy of the patched HD SC setup 7.3.5 on your image file:
- Under Setup and Repair (was Utilities) folder you will find a copy of a patched version of HD SC setup 7.3.5 (Figure 2)
- Run HD SC setup 7.3.5 (Figure 3), SCSI Device 0 will be selected (Device 5 on MAME).
- Press the Drive button to select SCSI Device: 1 (or whichever Device you mounted your image under, likely Device 5 on MAME) (Figure 4)
- Press the initialize button to initialize the device, a warning message will appear (Figure 5), followed by a prompt to provide a name for the drive
- Press the partition button to partition your initialized drive.
- Wait, may take some time depending on the size of the image file (especially for MAME)
- Select custom (Figure 6)
- HD SC setup will show you the default partitions it set up when it initialized the drive (Figure 7).
- Remove/edit the partitions as you see fit. If you plan to use an Apple IIe card I’d suggest setting up two 32Meg ProDOS partitions.

3.4 Options for getting your real world drive/removable media initialized and partitioned
There are two main methods for getting your drive initialized and partitioned:
- Connecting the drive you want to initialize and partition directly to your classic Macintosh system, then boot your system using one of the boot options I’ve previously listed (e.g. Floppy Drive, CD-ROM etc.) with the drive you want to initialize and partition attached as a secondary drive.
- Connect your drive to a modern system, create an image based on that drive, then initialize and partition the image file (3.3 above), then write the image file back on to your drive.
Hello Steve,
I’m trying to set up a SCSI2SD adapter, V5.1. I am using the patched version of HD SC Setup 7.3.5. and while it can find the drives, when I try to initialize, it acts like its starting to message says “initializing disk…verifying format” and “updating driver…in progress” then gives me an error message of ” the disk could not initialized. ” and “Unable to mount volume”.
Any suggestions on what to try next?
Mike
Sorry, just saw this now, did you get your adapter working? It might be an error with the sd card you are using, or the cable.
HI Steve, I have followed all your steps and when I put the SD in the SCSI2D adapter on the SE/30 I can only see SCSI 0 with your image. I click on Drive and it does not change. Also tried LIDO 7 with the same result. However, when plugging to SCSI2SD in my Mac and run SCSI-Util Load from the device I see that I have 2 devices set up Device 1 and Device 2., I have tried it several times and partitions work but not setting up a second Device any ideas?
I communicated with Matias directly, turned out he had swapped SD cards and hadn’t updated his SCSI2SD settings, once he did that everything worked.
Hi Steve,
I’ve an SE/30 and a Floppy Emu. I would like to partition my SE/30 drive (a non-original SCSI), format it so it’s clear of any exiting files, and then install a clean 7.5.3 to then upgrade to 7.5.5.
I’ve tried using your HD20 image to boot the Mac and do everything from there (specially run the patched version of HD setup to format the non-Apple SCSI drive), but as soon as the computer tries to boot it gives an error and I just need to turn it off.
Any advice on what do I need to do differently?
HI Gustavo, what error message are you getting?
Is the error on you Mac or on the FloppyEMU?
Hi,
I just want to say thank you for creating such a helpful and great website with all these instructions, they have been such an enormous help in reviving my Mac SE/30. It would have been totally impossible without your help.
I have managed to use your disk image with system 7 and transferred it to an SD card and then run the OS on the SD card and a SCSI2SD on my SE/30. However I wanted to try transferring downloaded games and software to the disk image. So I got Softmac running on my PC, opened the disk image from your website and imported files to the disk image via the transfer program, all within softmac. Then I closed that all down and transferred the disk image that I had used in softmac on to an SD card and put it in to my SE/30. Everything works fine but none of the software that I transferred in via softmac is there? It would seem the disk image isn’t saving the changes that have occured within the emulator. What could be the cause of this? and how might I go about fixing this?
Kind regards,
William
Hi William, when you “Transferred” the files, did you put them on the desktop or did you put them in the drive’s window? (click drive icon, window opens), I’d have to check, but if you put them on the mac desktop, you may have only created shortcuts to the files vs. copying them to the drive. The only other thing I can think of is you are somehow copying the unmodified file to your SD card instead of the one you edited. Check the date time stamp to make sure it was modified.
Thanks for putting together such great blogs. I’m having an issue still though. I have a Mac Classic Ii that I am trying to run via a SCSI2SD card as the original HD is starting to fail. I created a disk image using Basilisk II running OS7.5.3. I followed your guides to DD the image to my SD card and to configure my SCSI2SD, but when I insert the card into the SCSI2SD and connect it, I just get the disk with the ? icon flashing on my Mac Classic II. Any suggestions? If I put the SD card back into my “modern” Mac running 10.6.8, it recognizes the 2Gb disk image on the card.
Hi Michael, when you say you “created an image” using Basilisk II, do you mean you created a brand new image? Or you edited one of my drive images? Basilisk II can only create volume images, not disk images. Volume images are what most emulators use, they don’t simulate an entire drive, they only simulate a single volume/partition of a drive. The drive images I have on my downloads page are binary copies of what a real drive would contain. SCSISD needs to use drive images.