Last updated on September 19, 2024
In my previous blog entries I mentioned that I could not include the full version of System 7.5.5 with my drive images due to copyright restrictions, but you can install the full version of the North American version of 7.5.5 using Apple’s Legacy Software Recovery CD, if you want to install one of the other versions you need to use either disk images from Apple’s FTP site the Internet Archive, or from Apple’s Developer CDs.
What you need
- A Macintosh System that will run System 7.5.5
- A device/drive/media you can write/copy a bootable drive image or volume image to. My Macintosh Downloads page describes the differences between volume images and drive images and lists what media or adapters work with each.
- Basilisk II. Note: I used a LCIII rom, I suggest you do the same. I found that I had issues with setting up AppleShare using ARA with the Mac IIci rom)
- My bootable 7.5.5 volume image to use as your Basilisk II boot drive
- One of my blank 2GB drive image or blank 2GB volume image, or some other image file that you plan to use with your device/drive/media.
- The installation files for System 7.5.5 on Apple’s Legacy Software Recovery CD from the Internet Archive.
- (Optional) Apple’s Applications Recovery CD from the Internet Archive, contains updates for AppleShare and some other useful applications (there are some issues with this CD image where some of the floppy images it contains are corrupted, I’m trying to find a clean copy).
Quick Start
- Setup and run Basilisk II with at least those 3 volumes: boot, legacy CD, and the drive/volume you’re updating.
- Decide if you want to do a universal installation, or do a machine specific installation
- Install the full version of 7.5.3 then 7.5.5 from the Legacy Software Recovery CD.
- Optional: additional applications
- Optional: enable AppleShare
- Optional: enable TCP/IP
- Write / copy the updated drive image or volume image following the guidance on my Macintosh Downloads page.
1. Setting up Basilisk II to copy the System files on to one of my drive or volume image files
For this blog entry I’m going to use Basilisk II to edit my images, my Macintosh downloads page lists other tools that can be used to edit my images if you don’t want to use Basilisk II. I use Basilisk II because it can edit both my drive and volume/partition images, and is my general “go to” emulator.
- Download Apple’s Legacy Software Recovery CD from the Internet Archive.
- Download one of my bootable 7.5.5 image files
- Run BasiliskIIGUI
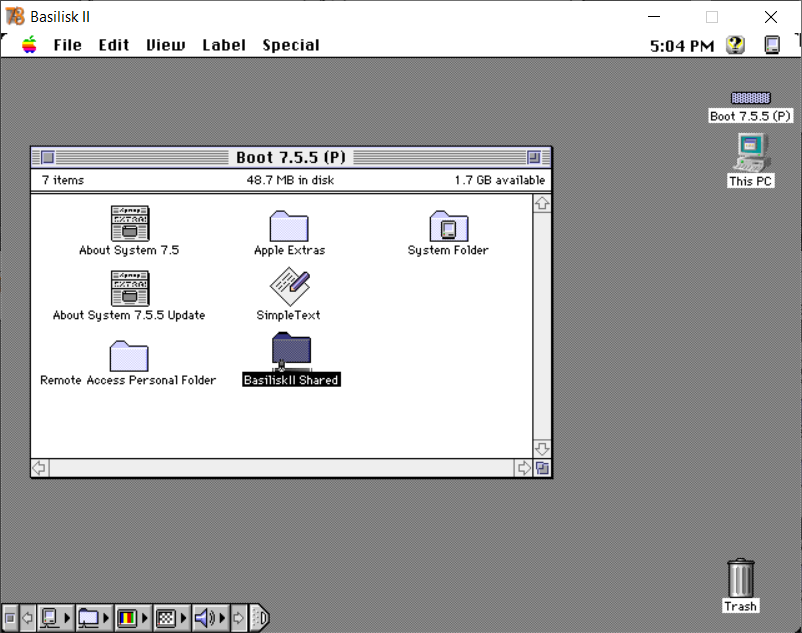
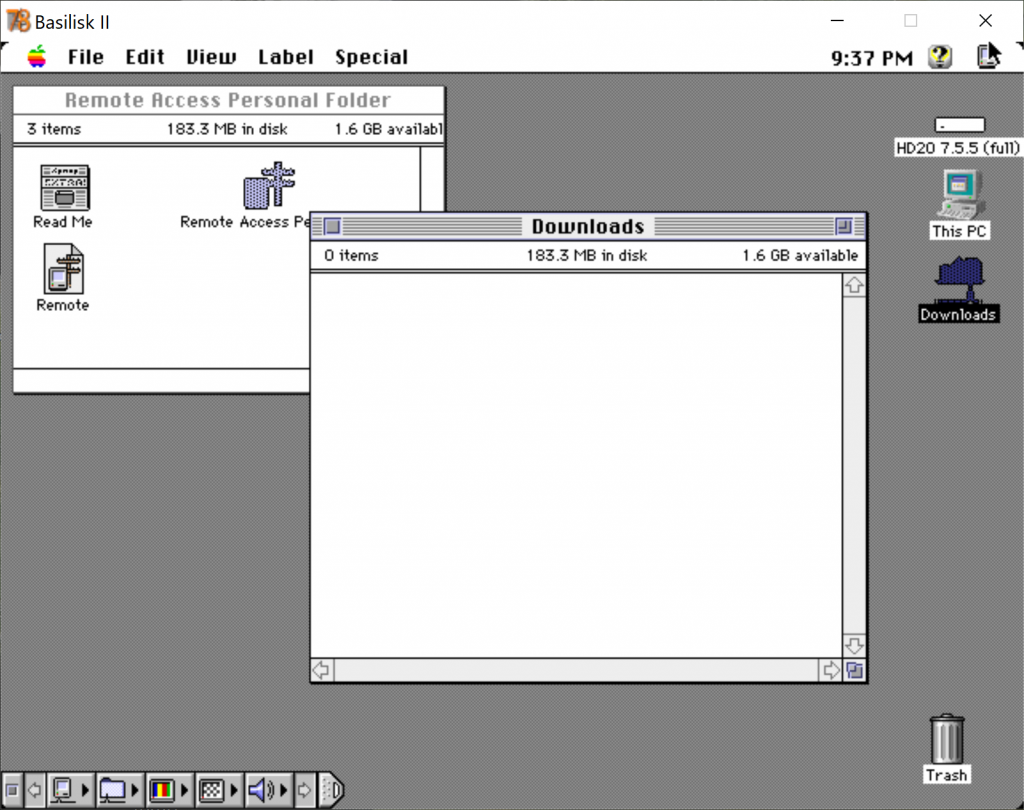
- On the volumes tab (Figure 1):
- add the System 7.5.5 image file as the boot drive. For this example I’m using my volume image:
755_2GB_volume.dsk - add Apple’s Legacy Software Recovery CD
- add Apple’s Applications Recovery CD (optional)
- add my blank 2GB drive image or blank 2GB volume image or other blank image depending on what media, adapter or emulator you want to boot from. For this example I’m using my blank 2GB drive image:
blank_2GB_HFS_drive.dsk - enable “My Computer” icon on your Mac desktop (bottom left of Figure 1)
- add the System 7.5.5 image file as the boot drive. For this example I’m using my volume image:
- Update any other settings you want to change
- Exit BasiliskII GUI
- Load Basilisk II (Figure 2)

2. Machine specific installation
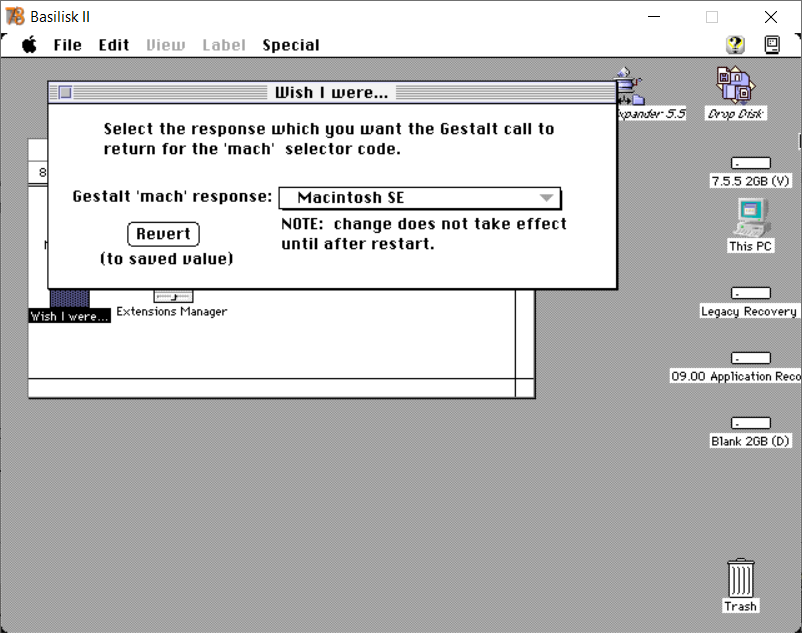
I typically use universal installations for booting my systems, this lets me reuse my images across all my 68k machines (that what is on each of my images that you download). But, you may want to do a machine specific installation to reduce the amount of memory being used by your System software. If so, the easiest way I’ve found for doing a machine specific installation in Basilisk II is to use an extension called Wish I were….
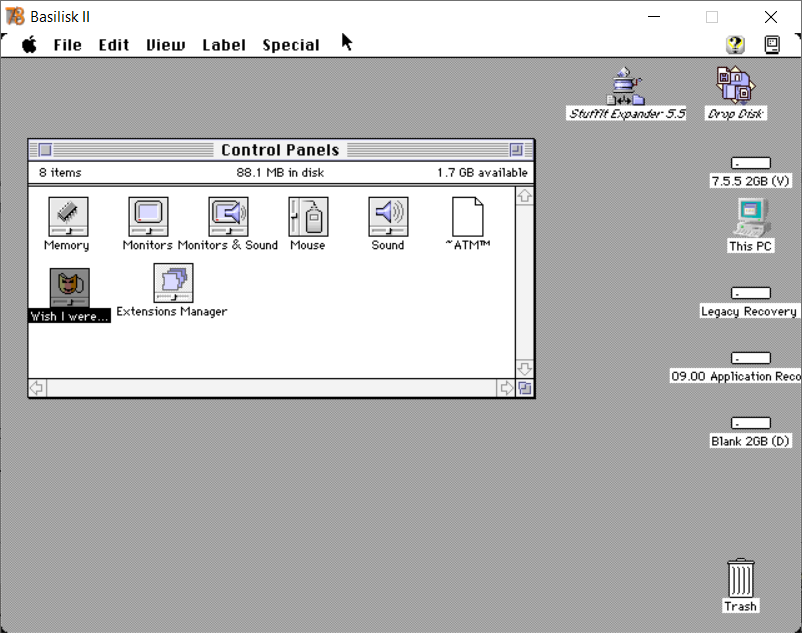
- Open your control panels window (figure 3)
- Open the Wish I were… control panel (figure 4)
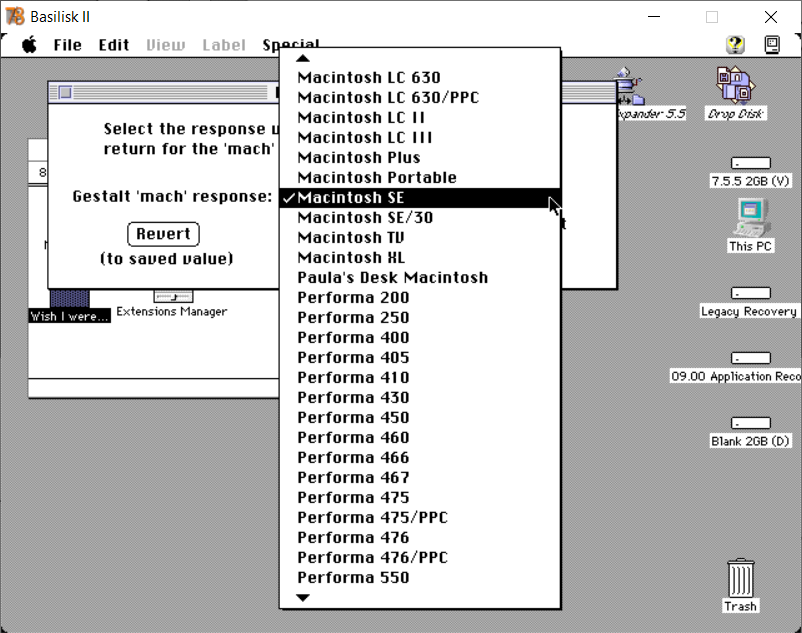
- From the drop down list select which system you want to create a machine specific install for (figure 5 and 6)
- Close the Wish I were… window
- Close the control panels window
- Restart (special restart)
3. Install the full version of 7.5.5
To install 7.5.5 you first have to install 7.5.3 and then upgrade it to 7.5.5
3.1 Install the full version of 7.5.3
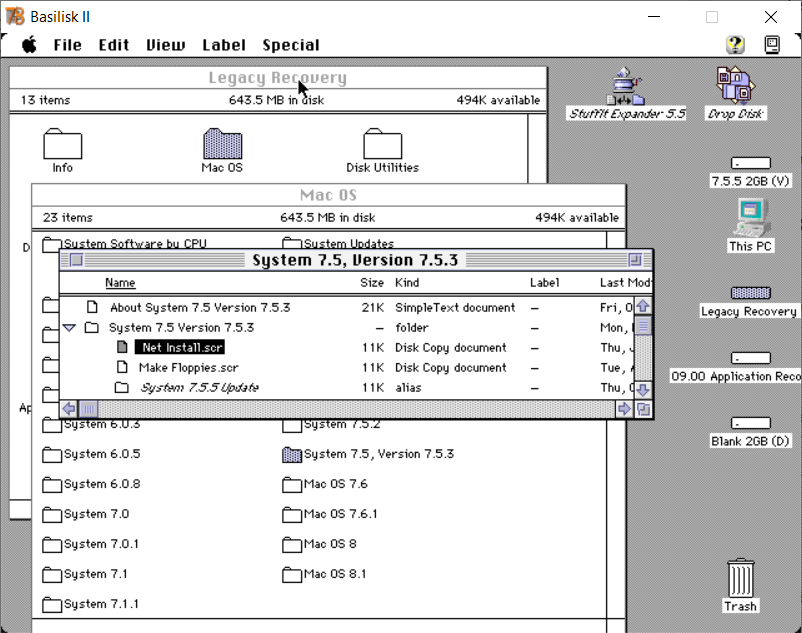
- Open the Legacy Recovery Drive (figure 7)
- Open the Mac OS folder (figure 7)
- Open the System 7.5, Version 7.5.3 folder (figure 7)
- Run the Net Installer Script (figure 7)
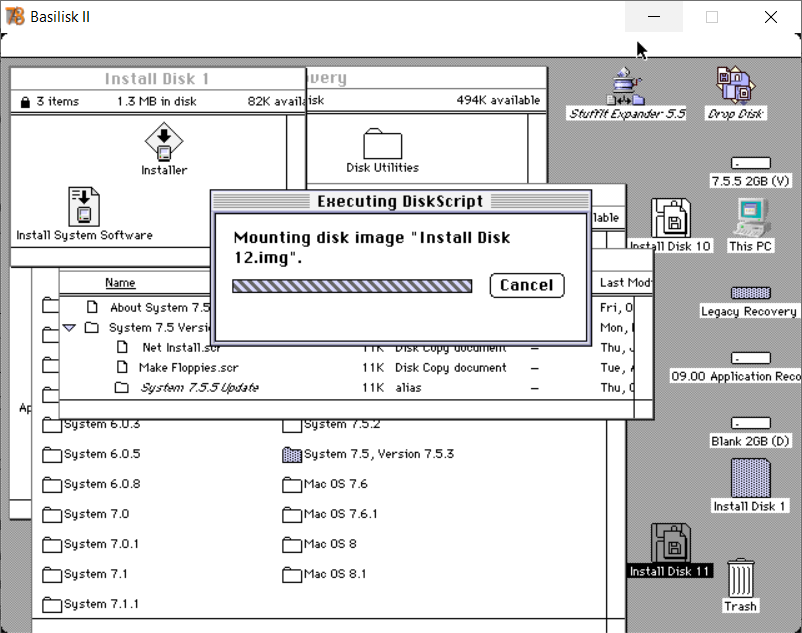
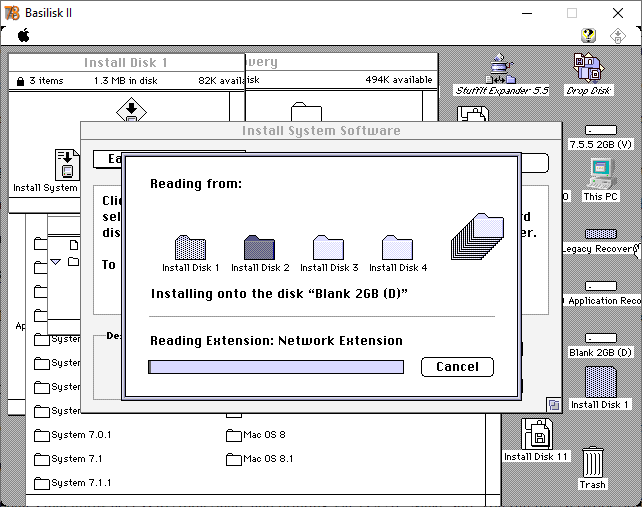
- The script will mount a large number of disk images (figure 8)
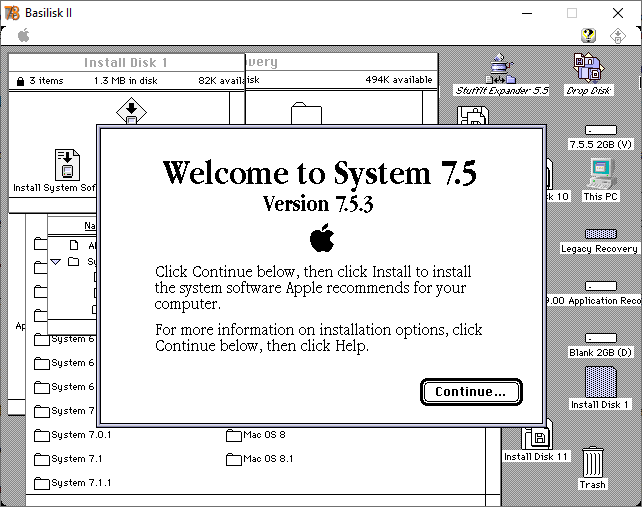
- Select continue on the Welcome to System 7.5 window (figure 9)
- On the Install System Software Window (figure 10)
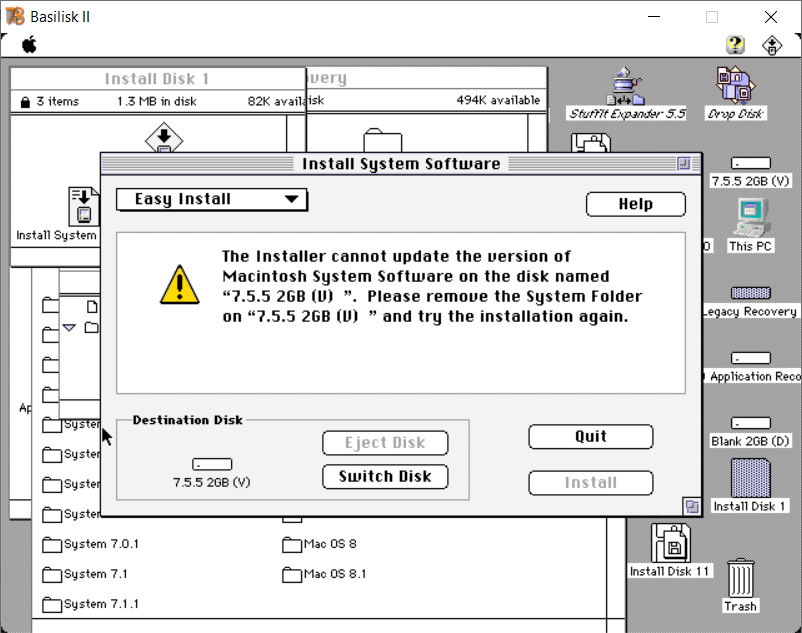
- You will see a message:
The Installer cannot update the version of Macintosh System Software on the disk named "7.5.5 2GB (V)". Please remove the System Folder on "7.5.5 2GB (V)" and try again. - You are seeing that error because the current selected destination drive is your boot drive
- You need to press the Switch Disk button until the Blank 2GB (D) drive is selected (or whatever size of blank drive or volume image you selected at the start)
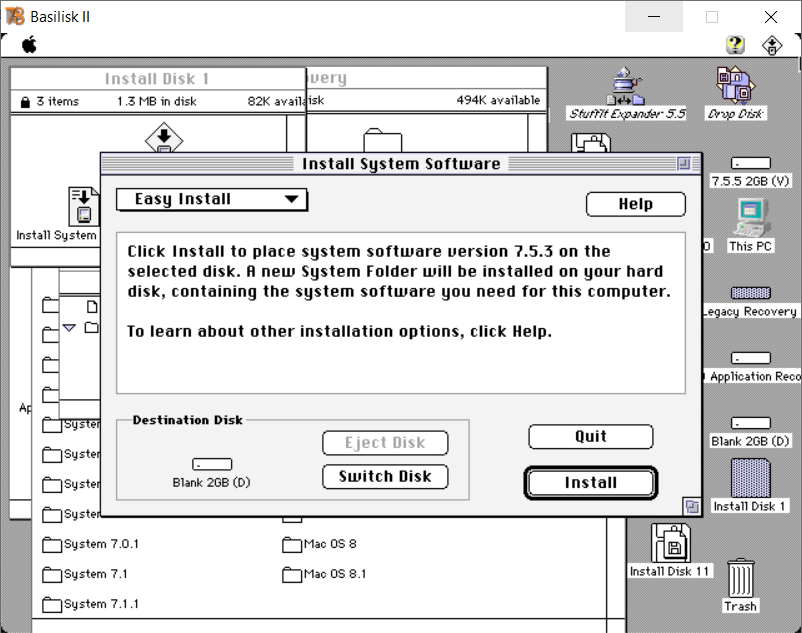
- You will now see a message: Click Install to place system software version 7.5.3 on the selected disk. (figure 11)
- Leave the drop list as Easy Install, press the Install button, wait… (figure 12)
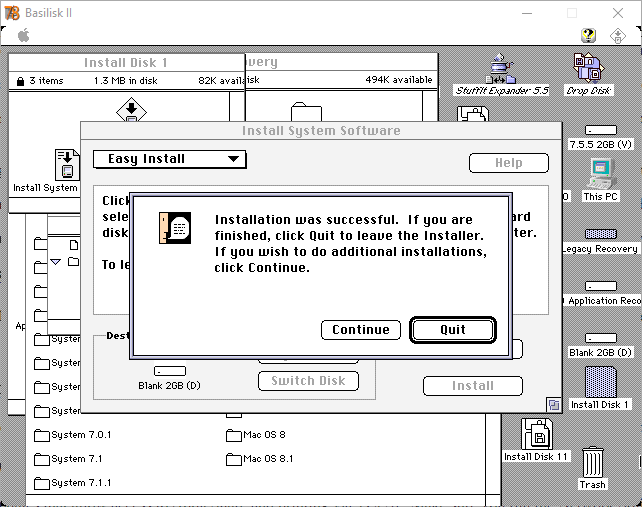
- If you used I wish I were in Step 2 above and you do not want the universal install, you are done and can press the Quit button (figure 13, and go to step 3.2), otherwise press the Continue button
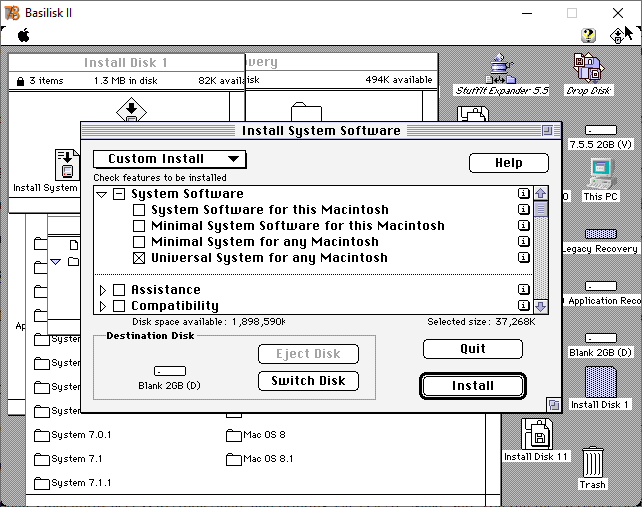
- Change the drop list from Easy Install to Custom Install and select the Universal System for any Macintosh, press the Install button, (figure 14) wait… (figure 12)
- When the install has finished press the Quit button. (figure 13)
- You will see a message:
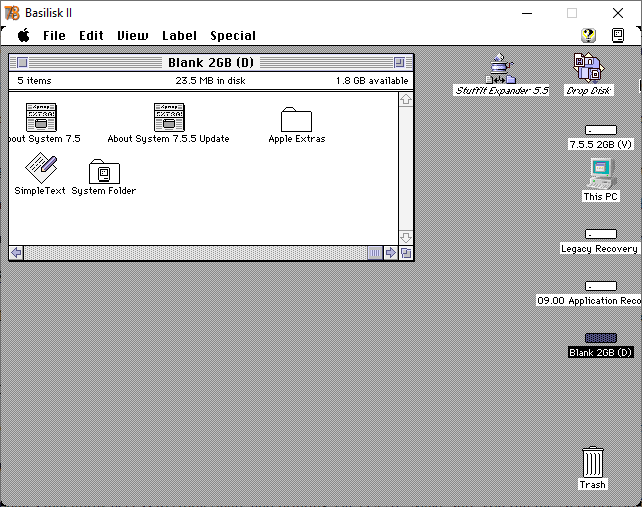
- The Blank 2GB (D) drive is now updated with the full version of OS 7.5.3
3.2. Upgrading from 7.5.3 to 7.5.5
These instructions assume you’ve just installed the full version of 7.5.3 following the instructions above.
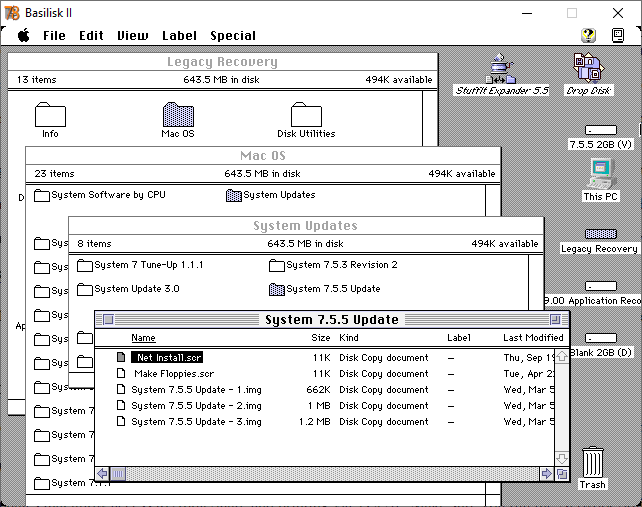
- Open the Legacy Recovery Drive
- Open the Mac OS folder
- Open the System Updates folder
- Open the System 7.5.5 Update folder
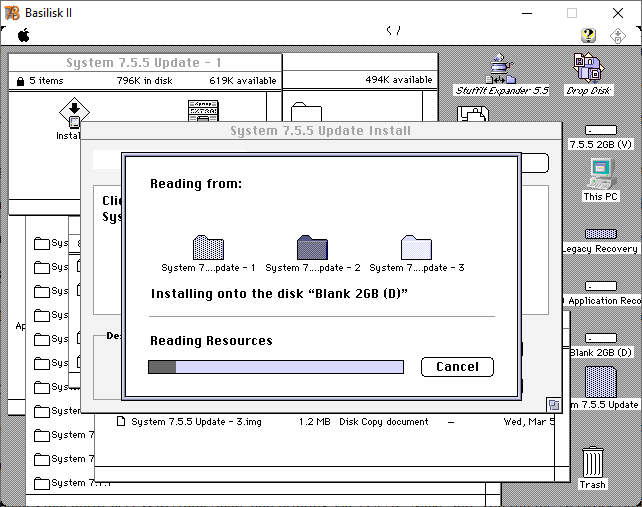
- Run the Net Installer Script
- The script will mount 3 disk images
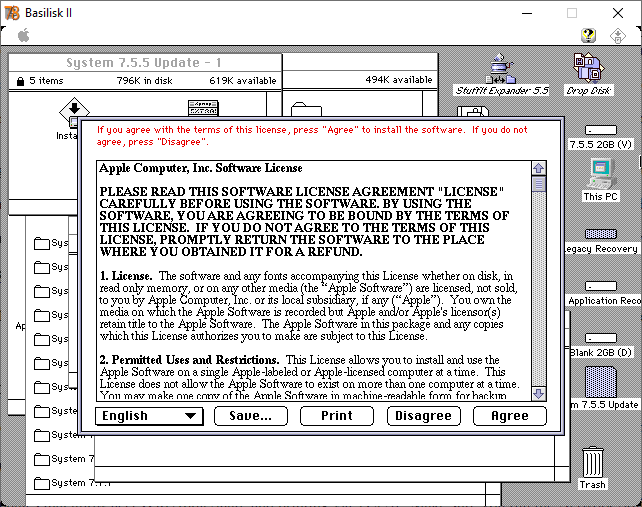
- Select Agree on the License agreement window
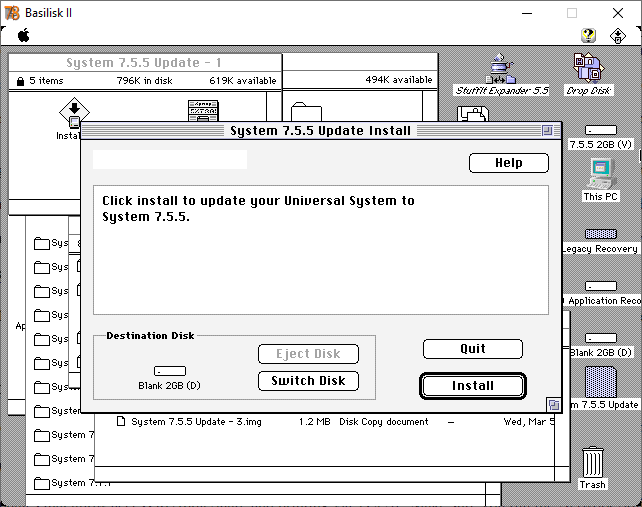
- On the Install System Software Window
- You need to press the Switch Disk button until the Blank 2GB (D) drive is selected (or whatever size of blank drive or volume image you selected at the start)
- You will now see one of two messages:
- Click Install to update your Universal System to System 7.5.5 (if you did a universal install in Step 3.1)
- Click Install to updated to System 7.5.5 (if you did not do a universal install in Step 3.1)
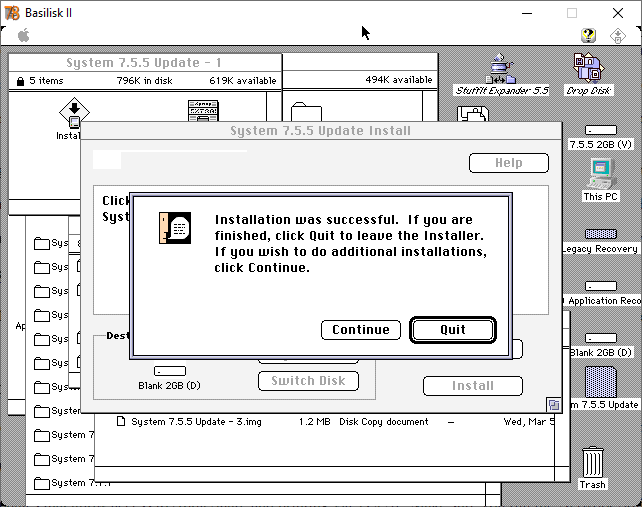
- Press the Install button, wait…
- When the install has finished press the Quit button.
- System 7.5.5 is now installed.


4. Optional Updates and Applications
On my bootable system 7.5.5 image files I have a collection of utilities and applications that can be useful to help you work on your 68k Macintosh system, see my Macintosh Downloads page for the latest list and descriptions. I also suggest that you take a look at the contents of the Apple’s Legacy Software Recovery CD and Apple’s Applications Recovery CD.
5. Enabling AppleShare
If you have more than one 68k or other older Macintosh you may want to track down some AppleTalk/LocalTalk connectors so you can network them together. You can also use Basilisk II with Apple Remote Access 1.0, 2.1 or 3.0 and a null modem cable to connect your 68k Macintosh to your Modern System
5.1 Last supported versions of AppleShare Workstation
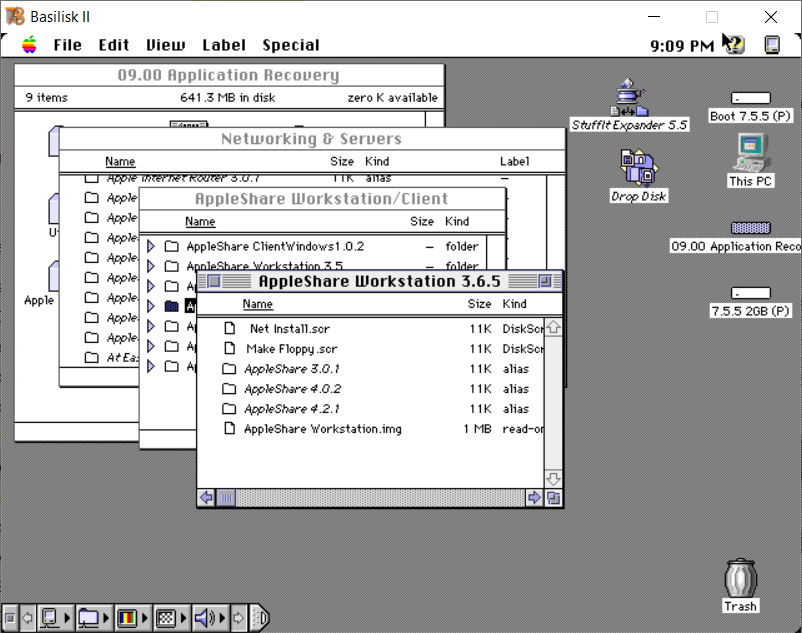
- If you don’t want to use Open Transport, install Apple Share Client 3.6.5 (figure 23) from the network folder of the Apple’s Applications Recovery CD
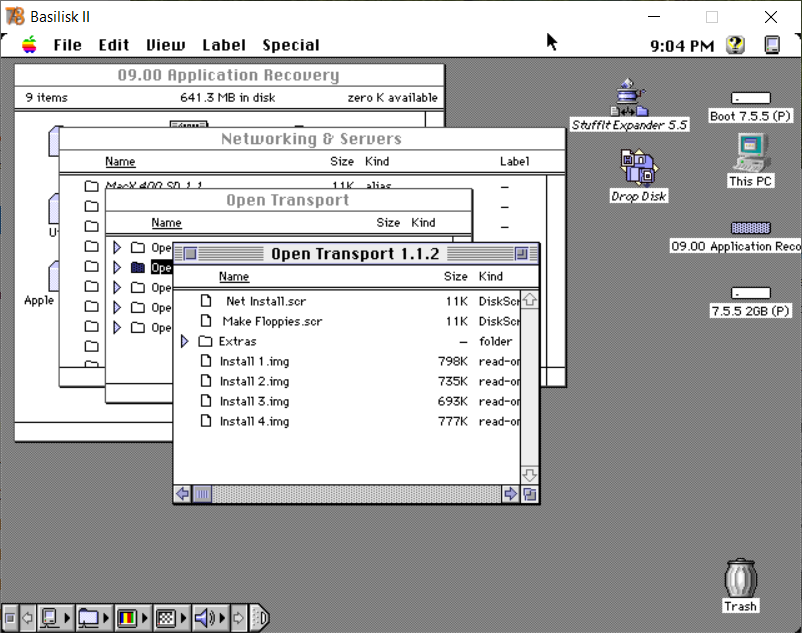
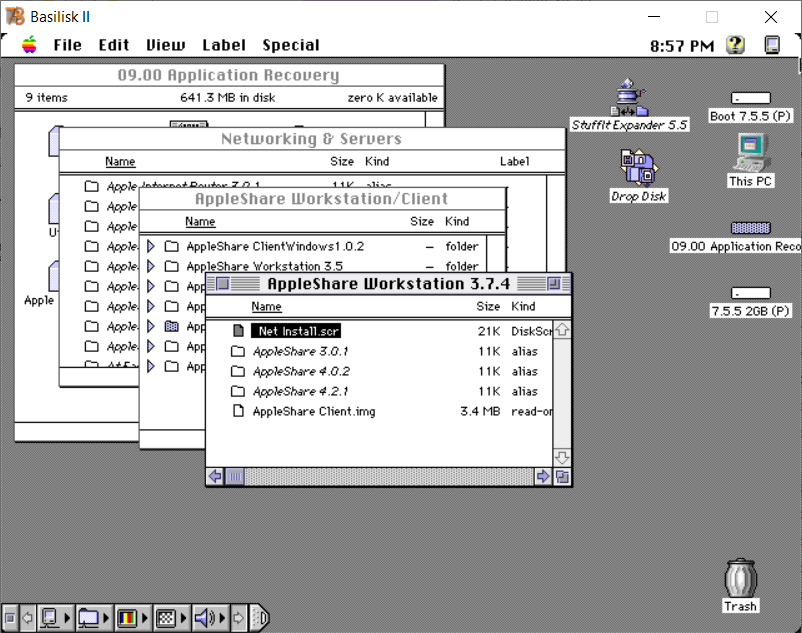
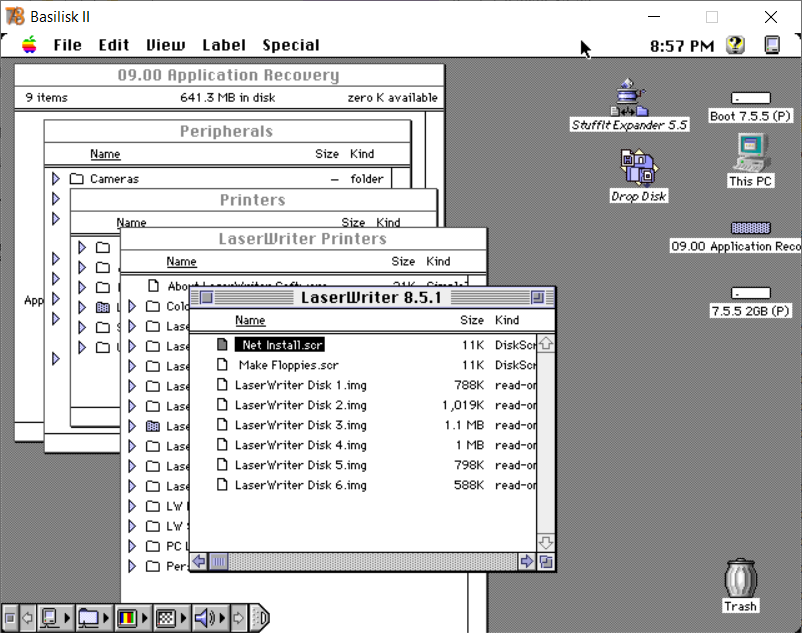
- If you do want to use Open Transport, install Open Transport 1.1.2 (figure 24), then AppleShare Client 3.7.4 (figure 25), and then optionally the LaserWriter 8.5.1 update (Figure 26), from the network folder and Peripherals folders of the Apple’s Applications Recovery CD
5.2 Enable AppleTalk
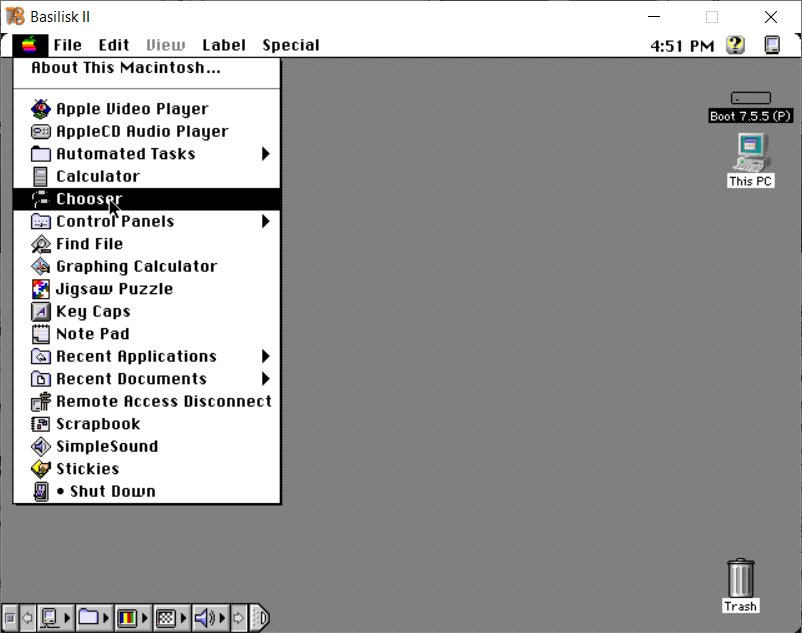
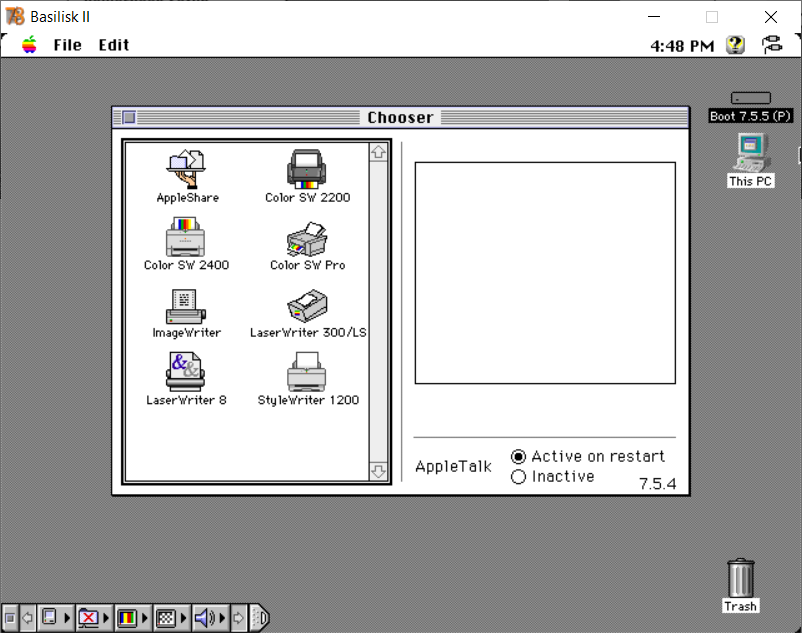
- Select the Apple Icon and select
Chooser(Figure 27), if you don’t see chooser listed, you haven’t installed the full version of System 7 or higher yet. - On the Chooser window:
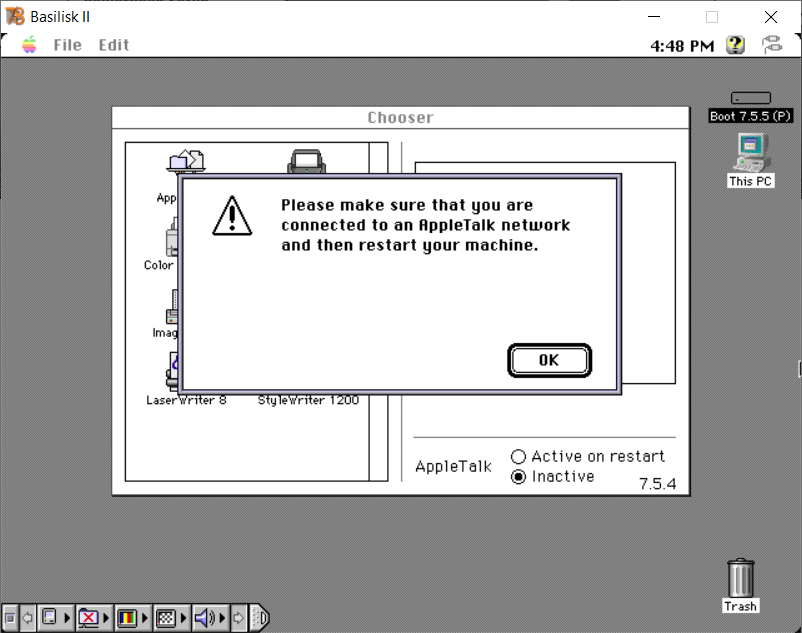
- AppleTalk will likely be inactive (Figure 28, radio button in the bottom left corner)
- Select Active, you will get a warning message (Figure 29), select OK
- AppleTalk is now active (Figure 30)
- Close the Chooser Window,
- Reboot Basilisk II (Menu->Special->Restart), I find it best to restart after making any changes with Chooser.

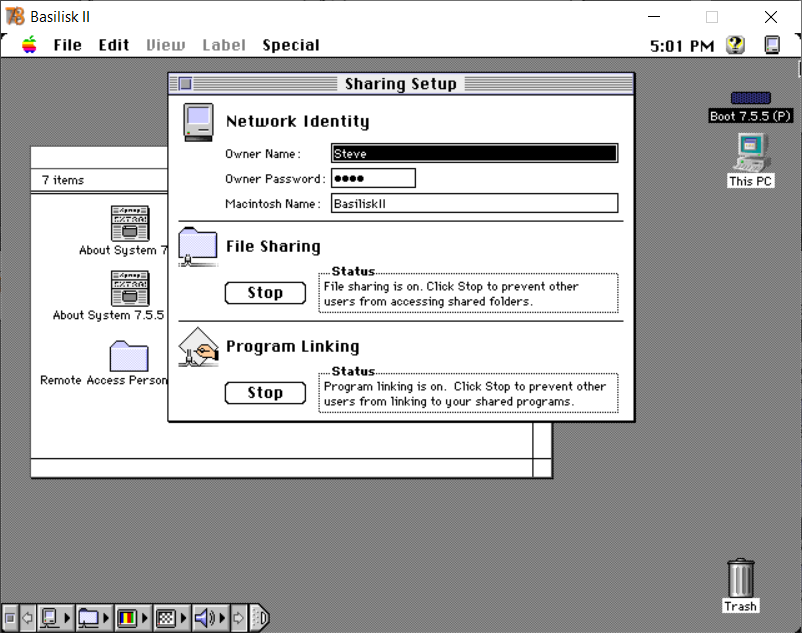
5.3 Enable file sharing
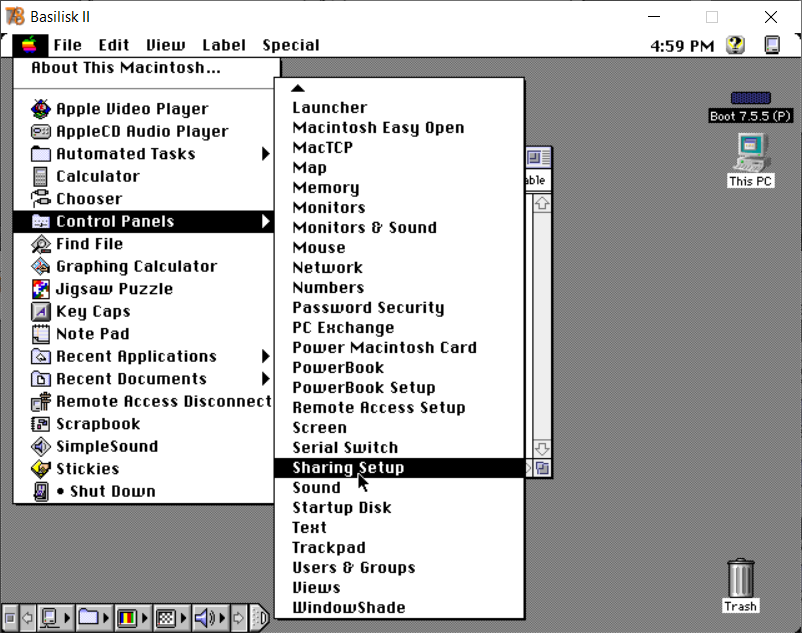
- Select the Apple Icon, select control panel and select
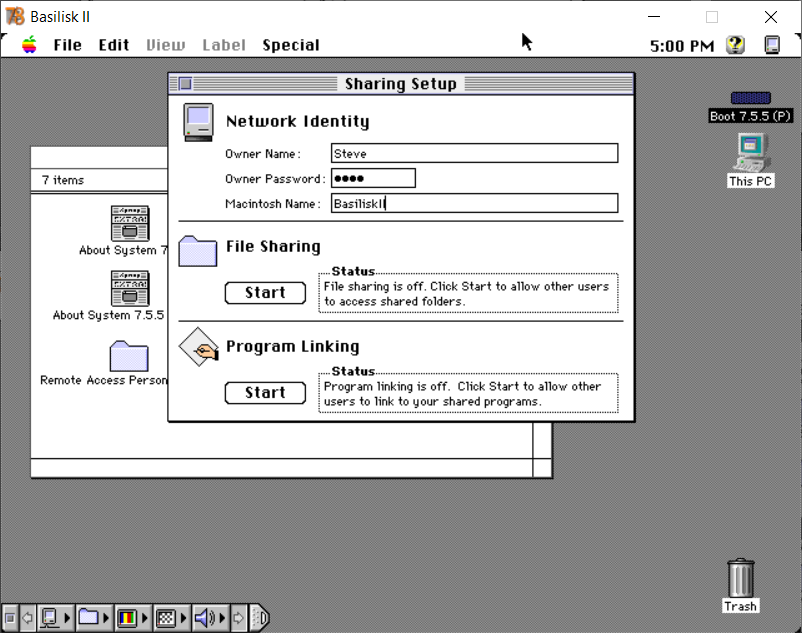
Sharing Setup(figure 31) - On the Sharing Setup window (figure 32):
- Add the Owner Name: Your name
- Add the Owner Password: Whatever you’ll remember
- Add the Macintosh Name: I use “Basilisk II”
- Press the “start button” to enable file sharing (figure 33)
- Optional: Press the “start button” to enable Program linking (figure 33)
- Close the Sharing Setup window
5.4 Setup your user accounts
The easiest way to use AppleShare is to enable Guest access, since it’s unlikely that you’ll be letting anyone other than yourself access your network.
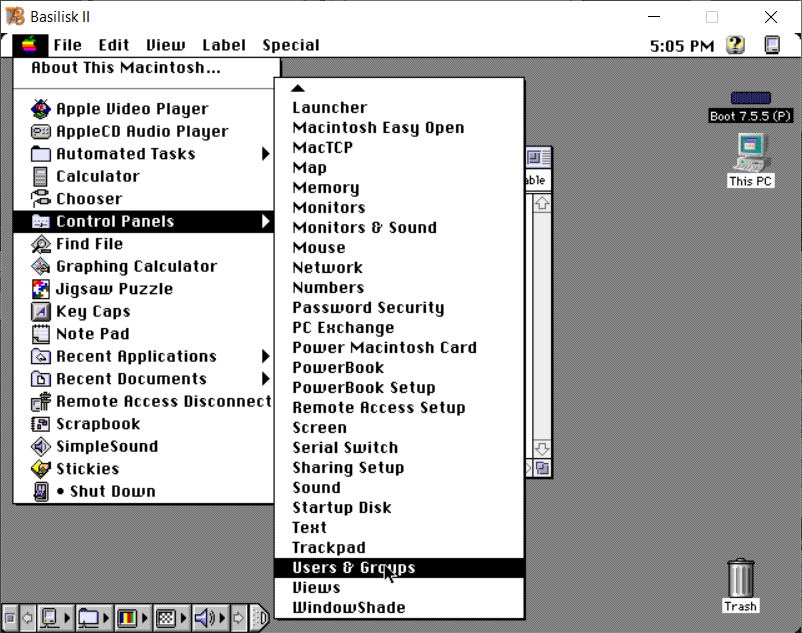
- Select the Apple Icon and select
Control PanelsthenUsers & Groups(figure 34) - On the Users & Groups window (figure 35):
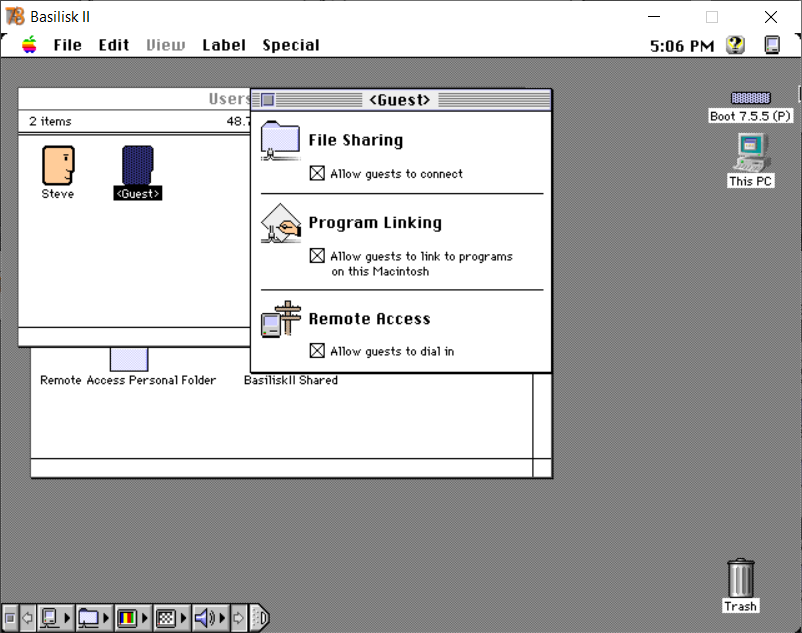
- Double click on the Guest Icon
- On the Guest window (figure 36):
- Enable: File Sharing
- Enable: Program Linking
- Enable: Remote Access (if you don’t see this option you haven’t installed ARA PS yet)
- Close the Guest window
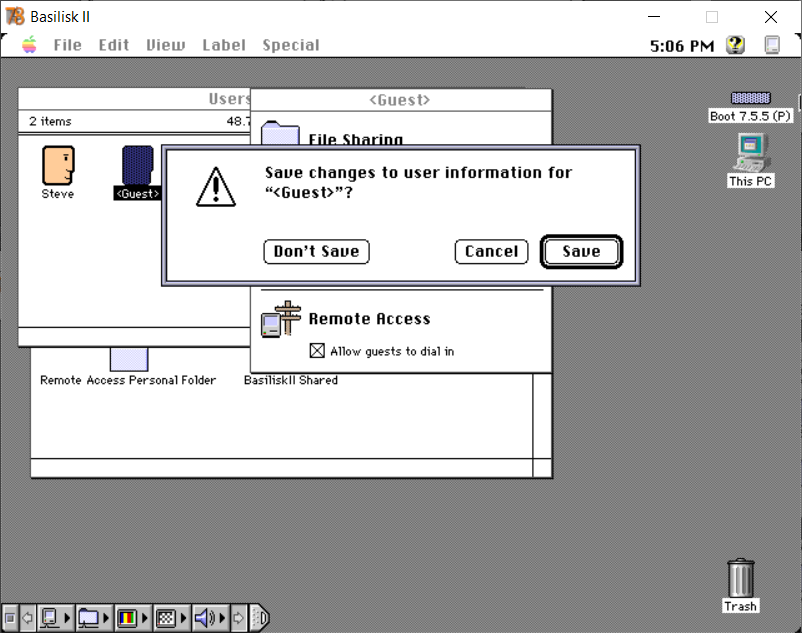
- Close the Users & Groups window,
- Save changes (figure 37)

5.5 Share one or more folders
- Create and select the folder you want to share, I created a folder call Download on each of my systems that I use to exchange files (figure 38)
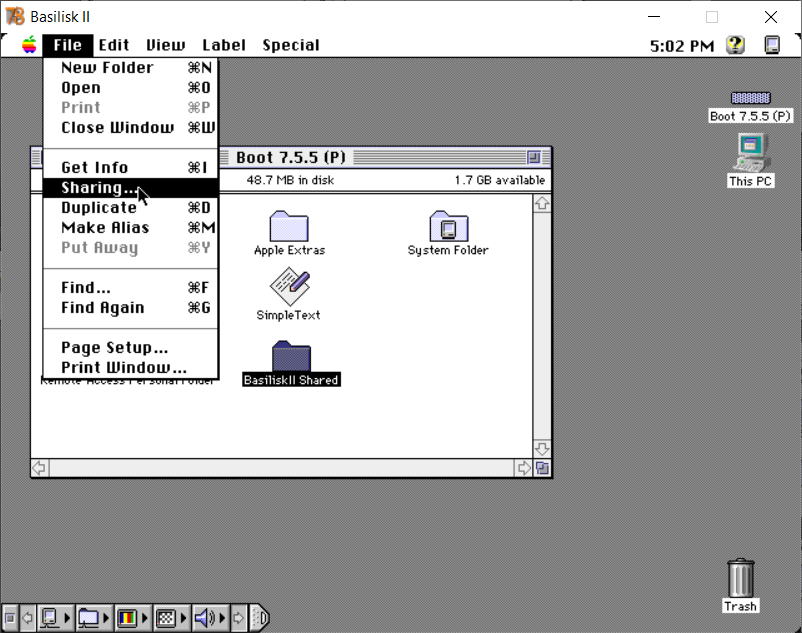
- Select Menu->File->Sharing… (figure 38)
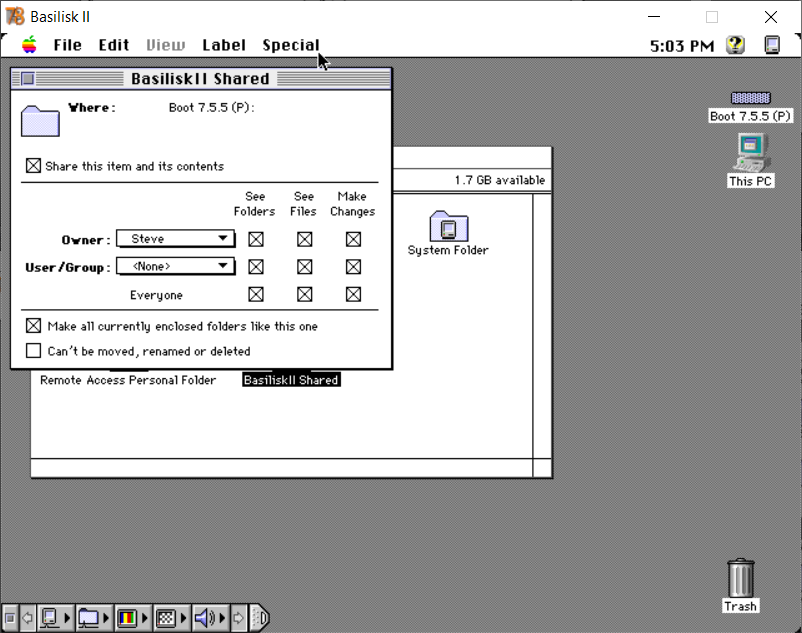
- On the {folder name} window (figure 39):
- Enable: Share this item and its contents (figure 40)
- Optionally Enable: Make all currently enclosed folders like this one (figure 40)
- Close the {folder name} window
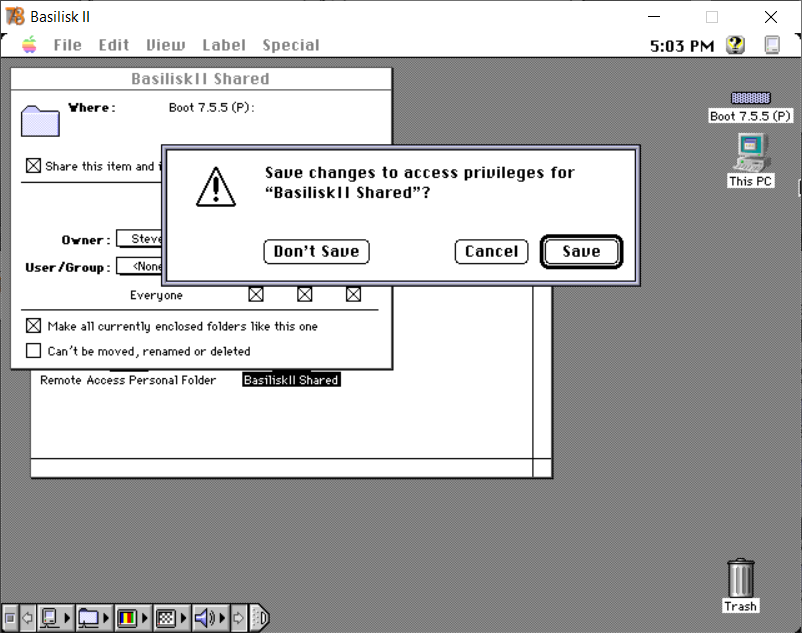
- Select “save” for the prompt to “Save Changes” (figure 41)
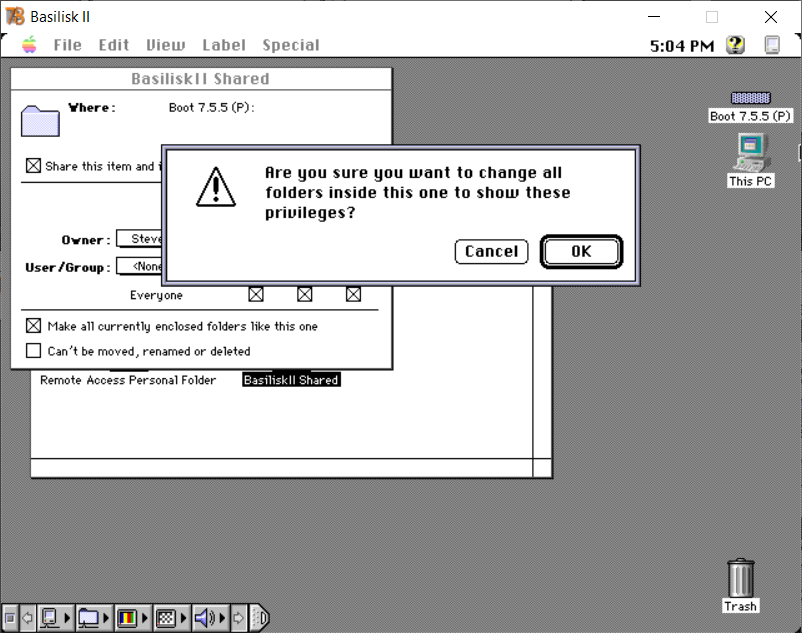
- Optional: Select “ok” if prompted to change all folders inside this one to show these privileges (figure 42)
- Your folder’s icon should be updated to show that the folder is now shared (figure 43)

5.6 Mount a Shared Folder
So the purpose of all the above steps was to get to here
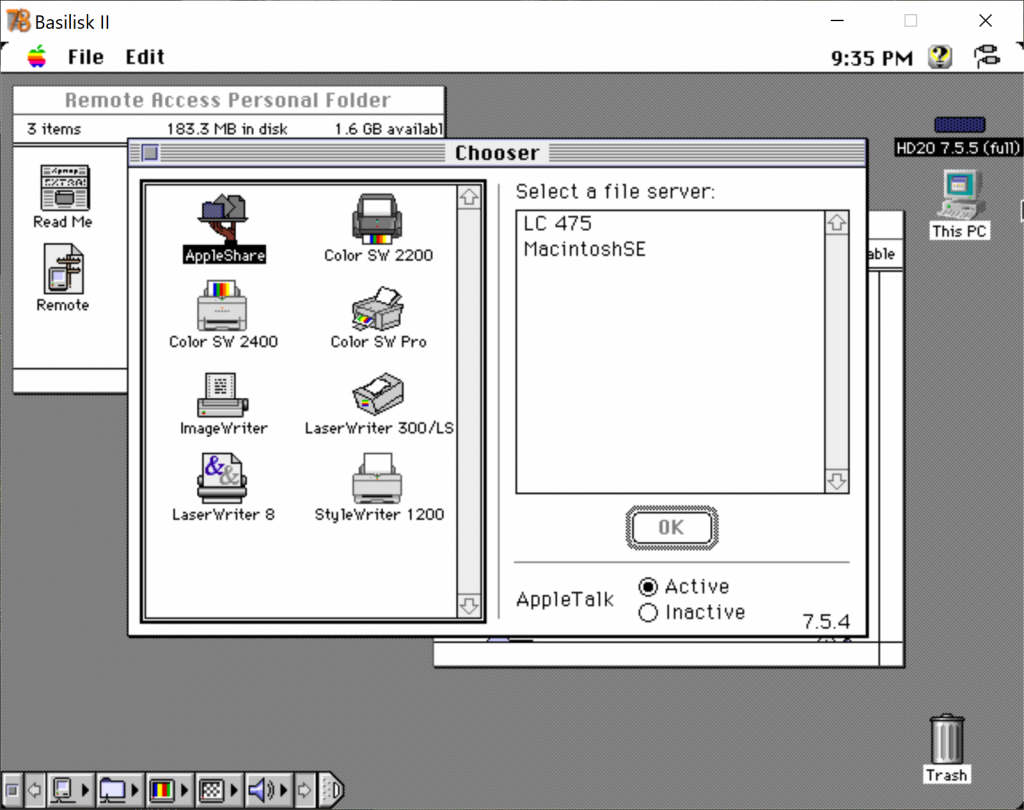
- Select the Apple Icon and select
Chooser(figure 27, way way above) - On the Chooser window (figure 44):
- AppleTalk will be active
- Select AppleShare, and you should see one or more systems that are sharing folders. If you don’t see anything then you didn’t share any folders on your Macintosh system, and you likely want to have your Macintosh System call in to Basilisk II. (figure 44)
- Select a file server, for me I can select my LC 475 or my Macintosh SE… at some point I’ll the ones I have once I recap them all.
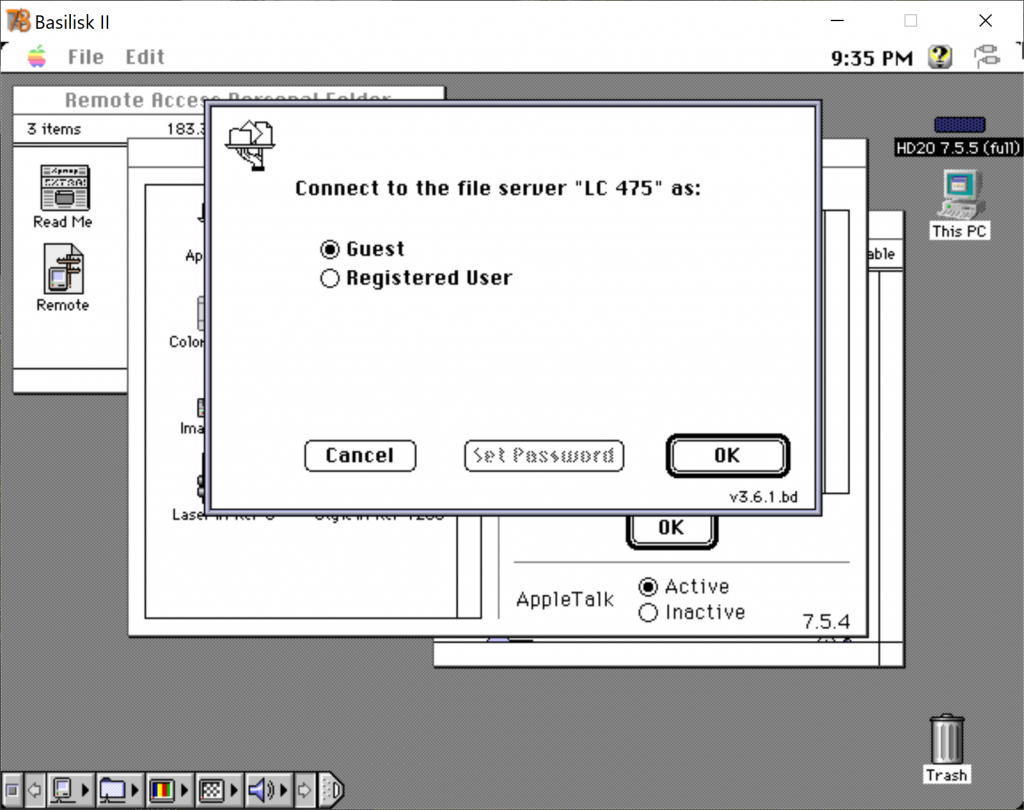
- You will be prompted what account you want to use, I used Guest (see step 7 above for managing accounts) (figure 45)
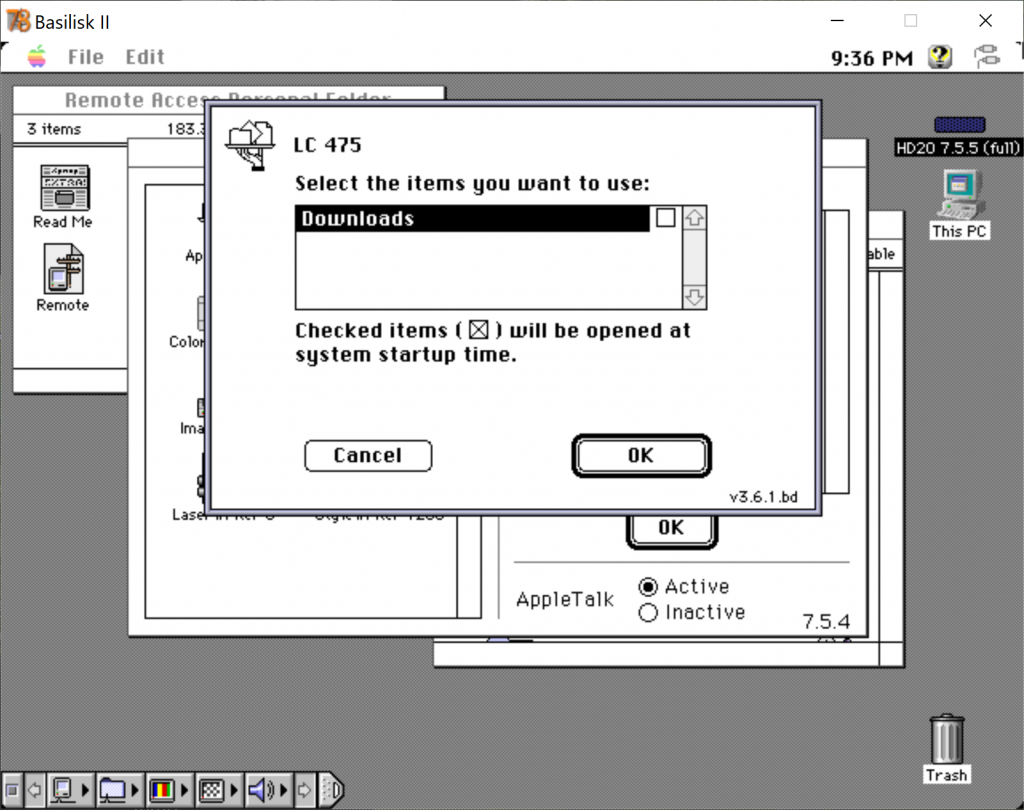
- You will be prompted for which items you want to use, this will be the shared folders and applications. (figure 46)
- close the chooser window
- The shared folder you selected is now mounted on Basilisk II’s desktop, ready for you to drop files in to, copy files out of. (figure 47)
6. Enabling TCP/IP using MacTCP or Open Transport
Under System 7.5.5 you have two options for connecting to the internet using TCP/IP, the original MacTCP and the newer Open Transport. Open I typically use MacTCP because it works for all 68k Macintosh systems and takes less memory, but there are some programs that require the use of OT, such as ARA 3.0 and IPNetRouter. You can only have MacTCP or OT active at any time, if OT is active the MacTCP extension is hidden, if MacTCP is active the OT extension is hidden.
- My router default IP Address range is: 192.168.1.1 to 192.168.1.255
- My router has the address of 192.168.1.1 and is my home networks gateway to the internet
- My router acts as a DHCP server and dynamically assigns IPs in the range 192.168.1.100 to 192.168.1.255 (it does not automatically assign IPs below 100)
- My subnet mask is 255.255.255.0
- For my Domain Name server I use Googles free DNS servers: 8.8.8.8 and 8.8.4.4
6.1. Enabling MacTCP
MacTCP 2.0.6 is installed by default as part of the full install of System 7.5.5, but you may want to update to MacTCP 2.1 using Glenn Anderson’s patch, or grabbing a copy from the network folder on my System 7.5.5 drive and partition images.
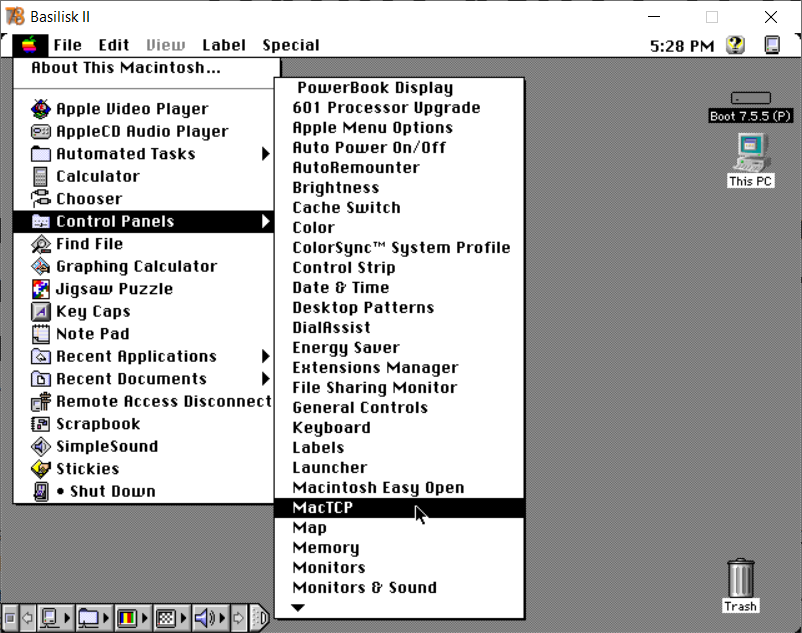
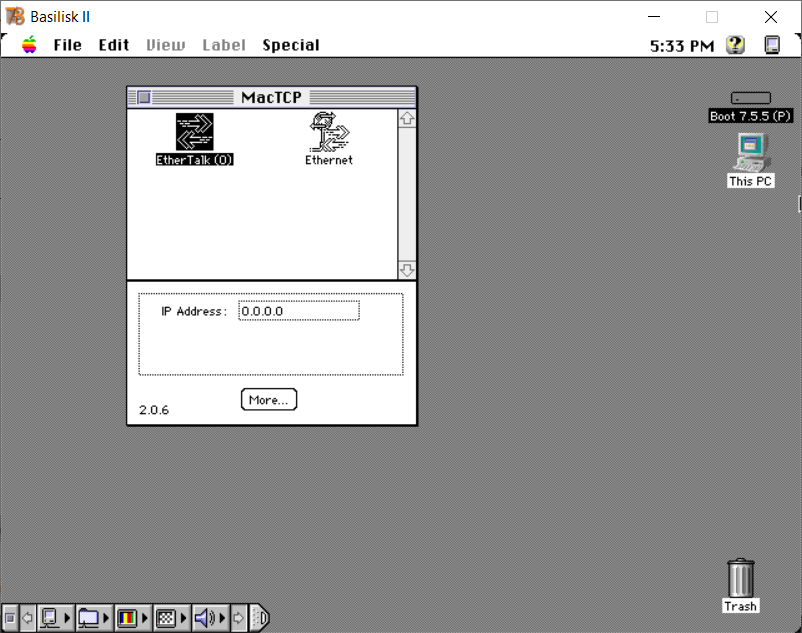
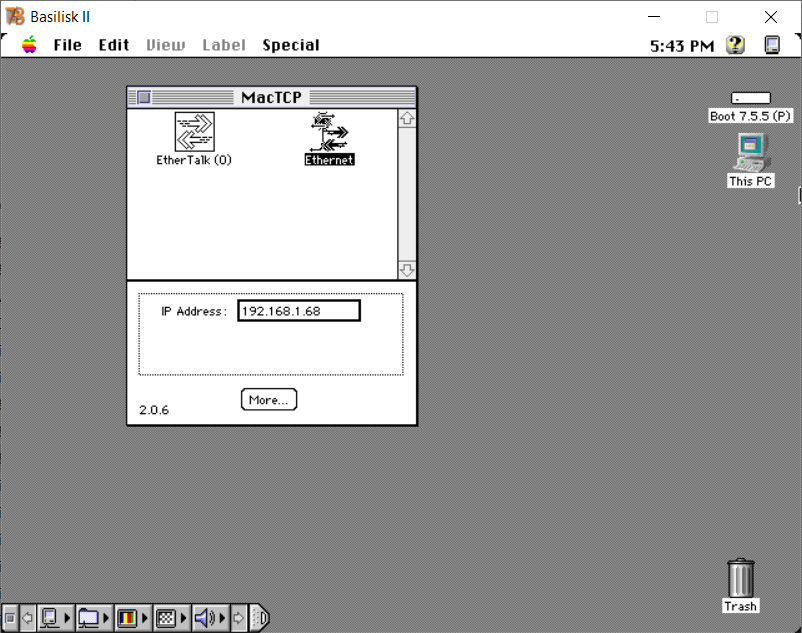
- Select the Apple Icon and select MacTCP (Figure 48)
- On the MacTCP window (Figure 48)
- Select either EtherTalk or Ethernet depending on what type of connection you are setting up. (Figure 49)
- Press More…
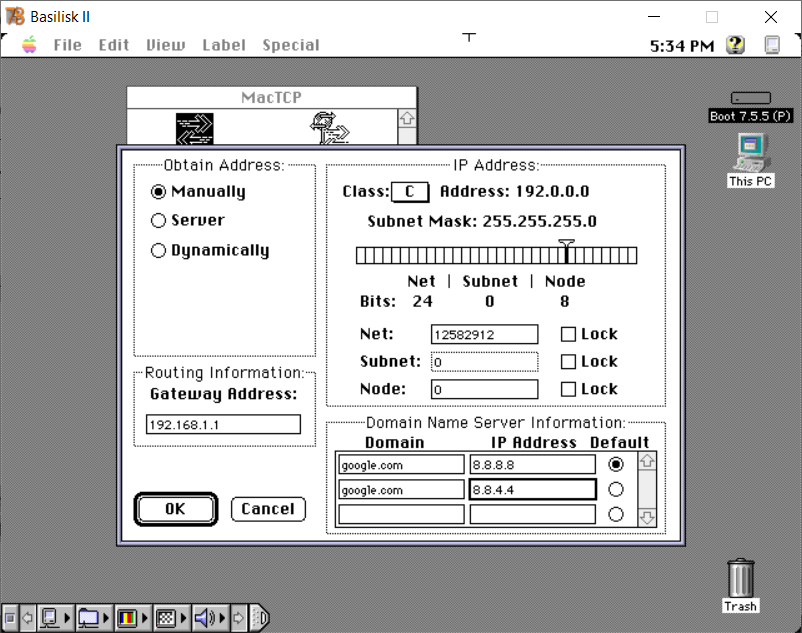
- On the configuration window (Figure 50)
- Select Class: C for the standard 255.255.255.0 subnet mask
- Select Manually for Obtain Address
- Enter 192.168.1.1 or whatever your gateway IP address is for Gateway address.
- Enter 8.8.8.8 and 8.8.4.4 to use Google’s domain name servers, or you can enter any other DNS address that you want to use, I set 8.8.8.8 as the default DNS.
- Press Ok
- Enter your IP Address, e.g. 192.168.1.68 (figure 51) or some other unique IP address for your system. For my internal network IP addresses are dynamically assigned in the range of 100 to 255, so I can manually assign IPs below 100 to my older systems that can’t use DHCP to dynamically get an IP address.
- Close the MacTCP window
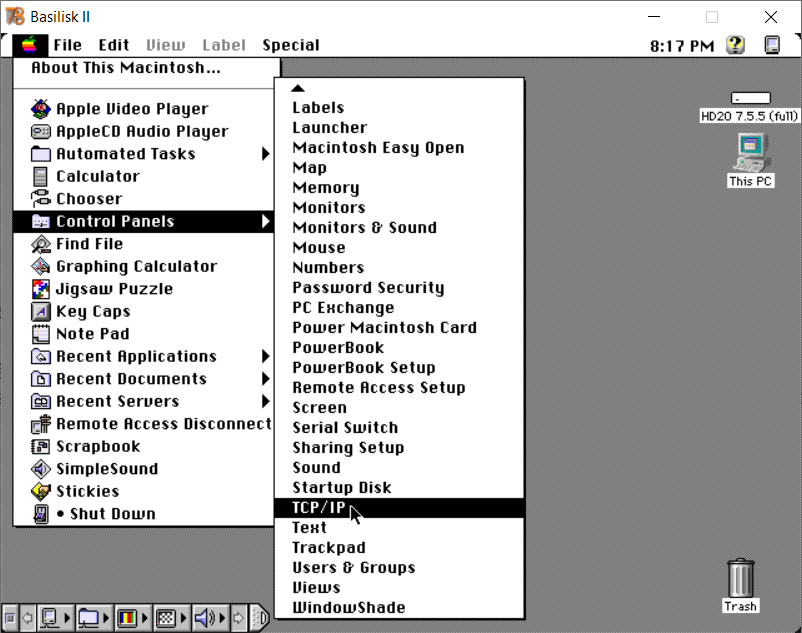
6.2. Enabling Open Transport
Install Open Transport 1.1.2, then AppleShare Client 3.7.4, and optionally the LaserWriter 8.5.1 update, from the Network & Servers folder and Peripherals folder of the Apple’s Applications Recovery CD
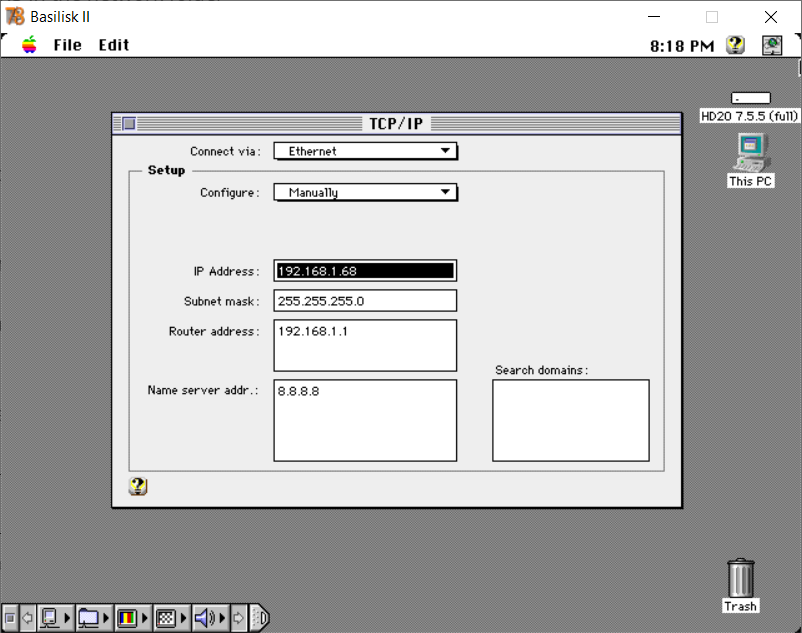
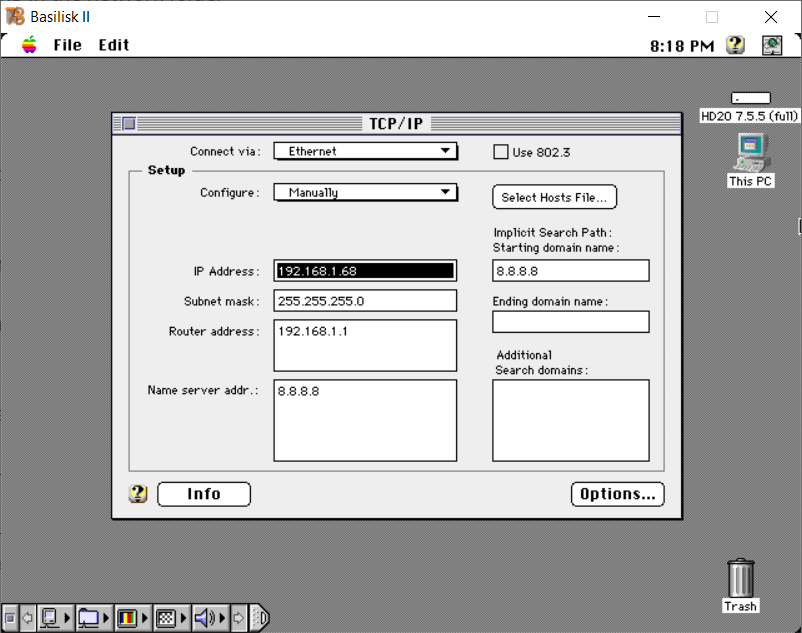
- Select the Apple Icon and select TCP/IP (figure 55)
- On the TCP/IP window (figure 56):
- IP Address: 192.168.1.68 or some other unique IP address for your system. For my internal network IP addresses are dynamically assigned in the range of 100 to 255, so I can manually assign IPs below 100 to my older systems that can’t use DHCP to dynamically get an IP address.
- Subnet mask: 255.255.255.0
- Router address: 192.168.1.1
- Name server address: 8.8.8.8 and 8.8.4.4
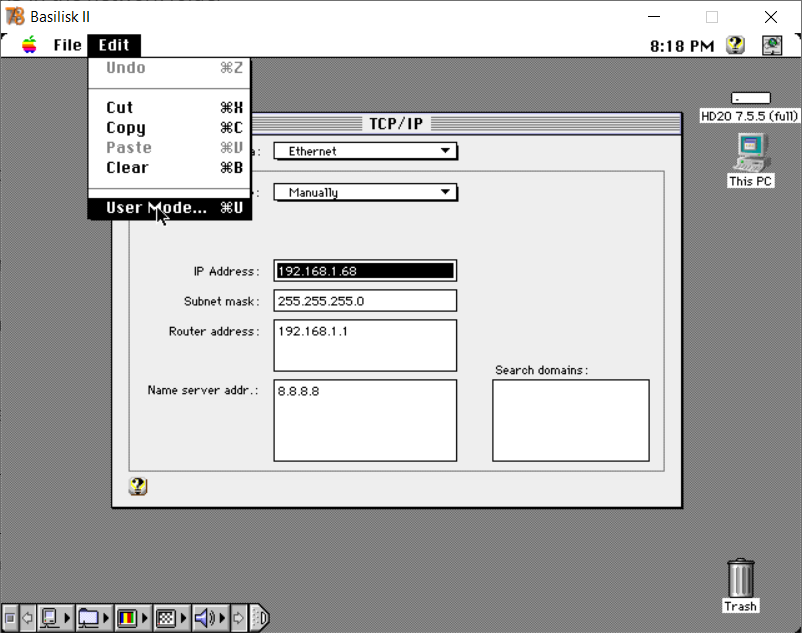
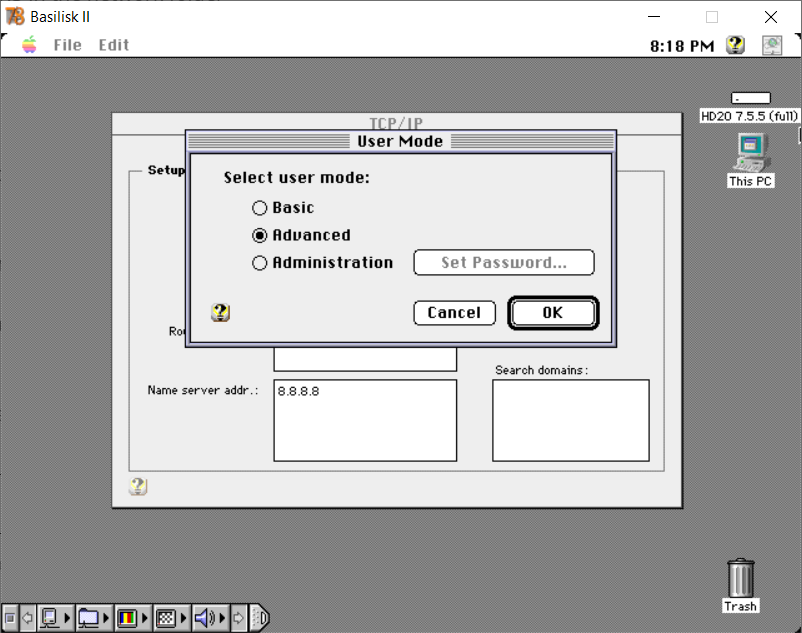
- Select Edit -> User model (figure 57)
- Select Advanced and press OK (figure 58)
- Press Options… (figure 59)
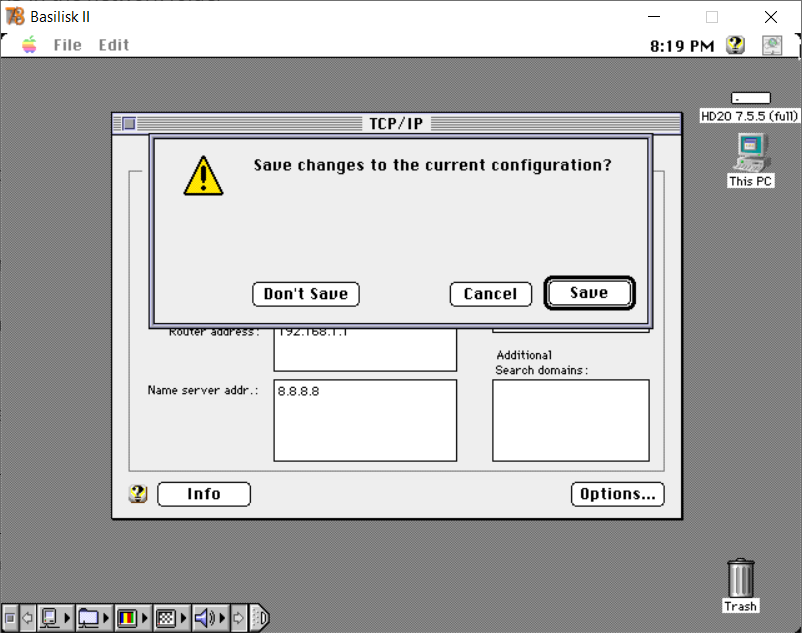
- Uncheck: Load only when needed and press OK (figure 60)
- Close the TCP/IP windows and save the configuration (figure 61)

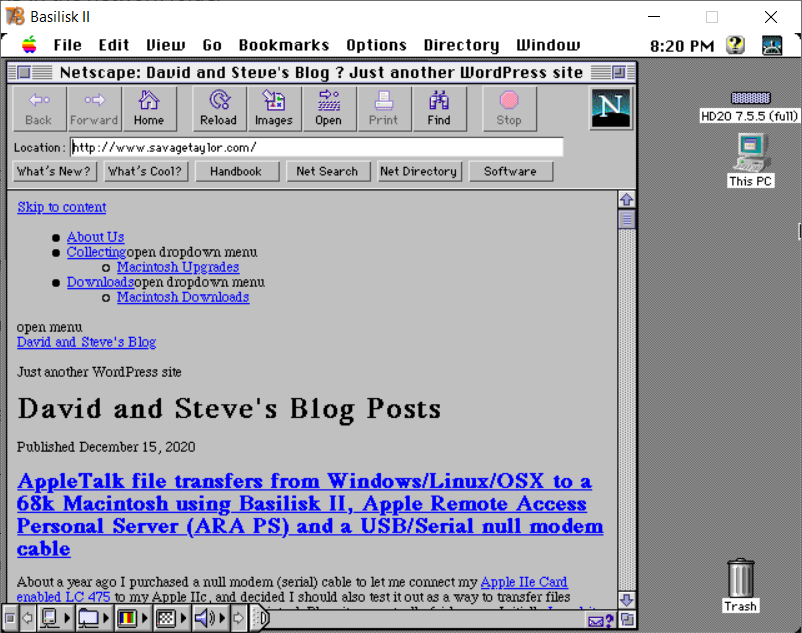
6.3 Testing your MacTCP or Open Transport connection
I strongly suggest you test your connection at this point to verify that your settings are correct. I used Netscape 2.02 to test my connection. You can find the installation file on my System 7.5.5 drive and partitions images under the Network -> Browsers folder.
- Open the network folder
- Open the browser sub folder
- Run the Netscape 2.02 installer
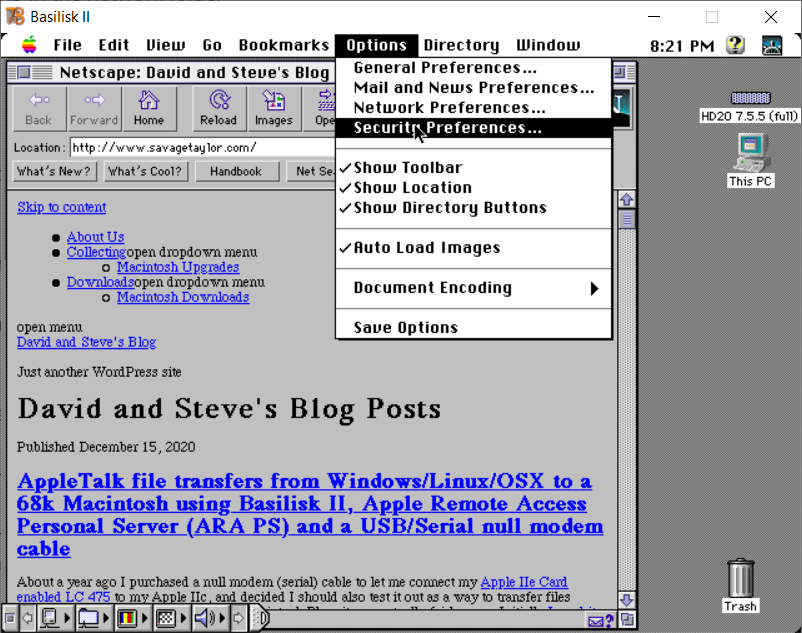
- Run Netscape 2.02
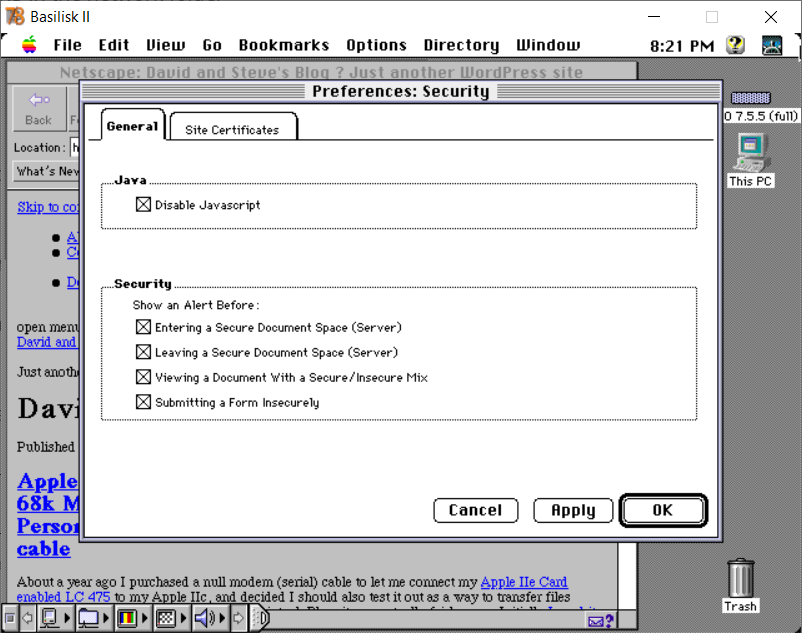
- Once Netscape is loaded select Options -> Security Preferences (figure 62)
- On the Preferences: Security window (figure 63)
- Check: Disable JavaScript, this will prevent JavaScript errors when you try to surf the web.
- Press the OK button
- Enter https://www.savagetaylor.com in the location browser and press return/enter
- You should see the entry page for my site (figure 64)
Hi, i need to backup the working internal SCSI of my Macintosh IIVX to an SD card via using SCSI2SD and use as an bootdisk but i don’t know how. Can some one give me step by step instructions please…?
Hi deniz, you should be able to:
– config your SCSI2SD drive so drive 1 is the same size or greater than your current drive, and so it has a scsi ID of something other than your current boot disk, see step 3.1 https://www.savagetaylor.com/2018/01/05/setting-up-your-vintage-classic-68k-macintosh-using-a-scsi2sd-adapter/#comment-6031
– connect your SCSI2SD to the external scsi port on your Macintosh IIVX
– initialize the disk using LIDO or a patched version of HD SC Setup 7.3.5 (if you don’t have these, they are on my images, you can initialize your SCSI2SD with one of my images first, so you can copy the file off on to your old drive, then repeat these steps with the setup you want)
– once initialized copy everything from your current drive to the SCSI2SD drive(s) (I say drives because you may have setup multiple partitions for yourself)
– turn off your computer, disconnect your old drive.
– config your SCSI2SD drive with the SCSI ID your old drive had
– connect your SCSI2SD drive internally (in place of your old drive)
– turn on your Mac.
First of all your SCSI2SD articles and accompanying images are invaluable, thank you! I don’t have trouble booting your 7.5.5 images with either V6 or V5.5 SCSI2SDs in either an LC 575 or SE/30. However I’d like to update them to full versions and have been running into trouble with the SCSI2SD CD emulation scheme that’s prevented me from going that route.
Thus, I thought this article would be just up my alley. Unfortunately, I can’t get Basilisk II on my windows machine to boot from either your 2GB or 100MB 7.5.5 images. I just immediately get a flashing question mark. All the settings are the same as what you describe (model to IIci, 32MB RAM, LCIII ROM file, only your image selected in the disk panel). It boots fine from other images, though.
I think I’m using a much newer version of Basilisk II than you did when you wrote this article, so I wanted to check and see if these images still boot for you in the newest version and if not what old version I need to find to get this working. Thanks again!
Hi Charlie, I just downloaded the 22-09-2020 release and installed it and was able to boot without any issues on my Windows 10 machine. I’m using the ROM file: ECBBC41C – Mac LCIII.ROM, Mac IIci, CPU type 68030 etc.
Tested with both my SCSI2SD and my FloppyEMU images.
Did you follow the instructions on https://www.emaculation.com/forum/viewtopic.php?f=6&t=52821. download the original https://surfdrive.surf.nl/files/index.php/s/g3bHyqOg1326AXF/download
2. update that copy with the latest files https://surfdrive.surf.nl/files/index.php/s/7aKvCqrAiuB5XAj/download
Never mind, for the new 22-09-2020 version you don’t need the original version anymore and upgrade. I just read the latest information on https://www.emaculation.com/doku.php/basilisk_ii_setup. I’ll update my BasiliskII entry with the new install information
I used this method to boot your minimal 7.5.5 system to install on an SCSI2SD for a Macintosh Classic. I used “I Wish I Were” along with the Easy Install option. This resulted in a bootable system, but there were some errors on startup. The one that prevented boot was “Sorry, a system error occurred. illegal instruction To temporarily turn off extensions, restart and hold down the shift key.” Holding down the shift key allowed the system to boot, but would need to be done each time. Setting extensions to all off in the Extension Manager control panel did not work. What did work, was removing all extension files from the Extensions folder located in the System folder. I then put the extension files back a few at a time until I found the offending one. It turned out to be “Color SW 2000 Series CMM”. With this removed, the system boots without the illegal instruction error. Additionally I removed “Apple Photo Access”, and “QuickTime”, both of which caused non fatal boot errors as they are not compatible. Hopefully this is helpful to someone. Thanks for documenting this process, it’s much faster than from floppies.
Good to know, I didn’t have that issue, but I mainly use 7.5.5 on my LC 475 and LC III, for my 4MB machines I typically use 7.1
Hi! Thanks for all your helpful guides! I just have a question: why is it ok to use the minimal versions and not ok to use the full versions? Thanks and best regards, Michael
You can use and install the full versions, but legally I can’t offer images with the full versions pre-installed. Now, I’m not sure apple actually cares anymore, but I’d prefer not to find out.
Thanks for your reply! Sure I get that and it makes sense, but the question actually was why the Minimal Versions are OK to use?
Ah, sorry, I misread. Apple’s licensing allowed the minimal versions of the system software to be included on bootable floppies and later for bootable CDs, initially to support disk based applications, and later to simplify installing software. I’ll see if I can track down an official statement and link to it. It was in a book on software development and distribution.
That would be really awesome! I couldn’t find anything regarding this online…
Any way, thanks for your help! You‘re amazing!
Cheers,
Michael
The blank drive seemingly updated to 7.6.1, is thir normal if I dont have the 7.5.5 image in the correct order on basilisk?
Hi Zack, I need more info on what steps you followed to end up with 7.6.1 installed.
Hi,
I think https://www.savagetaylor.com/wp-content/uploads/68k_Macintosh/Bootdisks/OS_755_HD20.zip is not working anymore.
Cheers!
I am having some trouble getting my Cockatrice emulator set up. Because it loads into the 7.1 operating system, and not the 8.1 color Powerpc version. So I need some help with setting up this Cockatrice emulator. So do you have any tutorials or guides on your site about this? Because I cannot seem to get the 8.1 operating system to boot at all. And the operating system is running 7.1 on my Cockatrice emulator right now. And I am not sure on what rom image to use, or what .iso image either. So i am confused and stuck on this. But what I wanted to know is how do i start running the 8.1 operating system? So can you let me know on how to get the 8.1 operating system running on my Cockatrice emulator/ And my 7.1 operatinf system is in black and white, But I want to install the color 8.1 68K version instead, actually. Okay, so I need some help from you, to get this 8.1 operating system to run on my Cockateice emulator. Okay, so please get back to me as soon as possible. And just let me know on how to start running this 8.1 operating system on my cockatrice emulator. But i don’t need a tutorial for the BasiliskII emulator, because I already have that set up. So instead i need to install the Mac 8.1 operating system onto my Cockatrice emulator. And maybe you have a tutorial about this. Okay, so just let me know on how to get this 8.1 running on my emulator, So thank you very much.
I haven’t experimented very much with the Cockatrice emulator, and I also haven’t seen many tutorials for it. Most people run Basilisk II for 32-bit 68k Macintosh Emulation, and SheepShaver for PPC emulation. I need to look at Cockatrice again and see what it does that Basilisk and SheepShaver don’t.