Last updated on December 8, 2025
I recently purchased a MacSD adapter to try out and see if it’s easier to use than my SCSI2SD adapters, after some experimentation I can say that it is definitely more flexible than the SCSI2SD, specifically the ability to assemble a set of volume images in a directory on your SD card as a drive. You can directly edit the volume files on your SD card using Basilisk II and other emulators and tools for quicker updates. It also allowed me to increase the number of ProDOS volumes for my Apple IIe card, unlike HD SC Setup which limited me to 2 ProDOS portions per drive, I was able to create 6 on a MacSD composite drive (likely more, but 6 is enough for now). You can also use the MacSD with Drive images (similar to SCSI2SD), floppy images and CD-ROM images.

What you need
- Your classic 68k Macintosh turns on, and is prompting you to insert a disk. If your 68k Macintosh does not turn on, or does not show the insert disk icon, you may need to do some repair work before you proceed.
- Your classic 68k Macintosh supports an internal SCSI hard drive, and/or an external SCSI hard drive, I use a 50pin IDC female to SCSI-1 DB25 Adapter with my MacSD so I can use it as an external drive. So the MacSD will work on all 68k Macintosh computers except: The 128K, 512K*, 512Ke*. These three 68k systems do not support internal or external SCSI. You will need to use one of the other setup methods I’ve previously identified, with the best option being buying and using Floppy-Emu to boot from 400KB SS SD floppy disk images. * There are some rare 3rd party upgrades that add a SCSI port to 512K systems.
- You have a MacSD adapter running Firmware v0.10.0 or higher
- You have a SD or MicroSD card (tested and working) you plan to use with your MacSD adaptor.
Quick Start
These steps describe how to use the MacSD composite drive feature that lets you combine a set of volume image files together as a single drive:
- Update your MacSD adapter with the latest firmware
- Use my volume/partition image files to setup your Mac SD
- Download my 2GB System 6.0.8 or System 7.5.5 volume images (compressed to around 50Megs), remember not all 68k Macs support all system versions, System 7.5.5 is the most supported but requires 2MB ram minimum.
- Optional: Download my blank 2GB HFS formatted image file for use as additional partitions (you can make copies of this for extra HFS partitions)
- Optional: Download my blank 32MB ProDOS formatted image files for use with your Apple IIe card (you can make copies of this for extra ProDOS partitions)
- Download my 2GB System 6.0.8 or System 7.5.5 volume images (compressed to around 50Megs), remember not all 68k Macs support all system versions, System 7.5.5 is the most supported but requires 2MB ram minimum.
- Getting the volume files ready
- Create a temporary folder on your system (NOT on your SD card)
- In the temporary folder create a sub-folder to represent your drive, e.g. SCSI_0 or SCSI_1 etc.
- Setup your volume files in the sub-folder, I named my V1_{name}, V2_{name} etc.
- Format your SD card (to prevent file fragmentation)
- Copy the sub-folder to your SD card
- Create your MacSD ini file and copy to your SD card.
- (Optional) Editing the contents of your composite drive: this is where the MacSD really shines compared to the SCSI2SD, you can directly edit the volume files on your SD card
- Insert the SD card in to your MacSD, connect to your Mac and boot, NOTE: for the Plus the MacSD needs to be connected to a power source to work, USB power is the easiest.
1. Updating to the latest Firmware
Before you begin, you should download and install the latest firmware from the MacSD site, this guide was written with Firmware v0.10.0 that added support for multiple partition images under a single SCSI ID and support for ProDos Volumes. You can do this process with image files on your SD card.
- Download the latest firmware
- Copy the firmware file on to your SD card.
macsd_0.10.0.fwifor this guide. - Ensure there are no other .fwi files on your SD card.
- Insert the SD card in to you MacSD
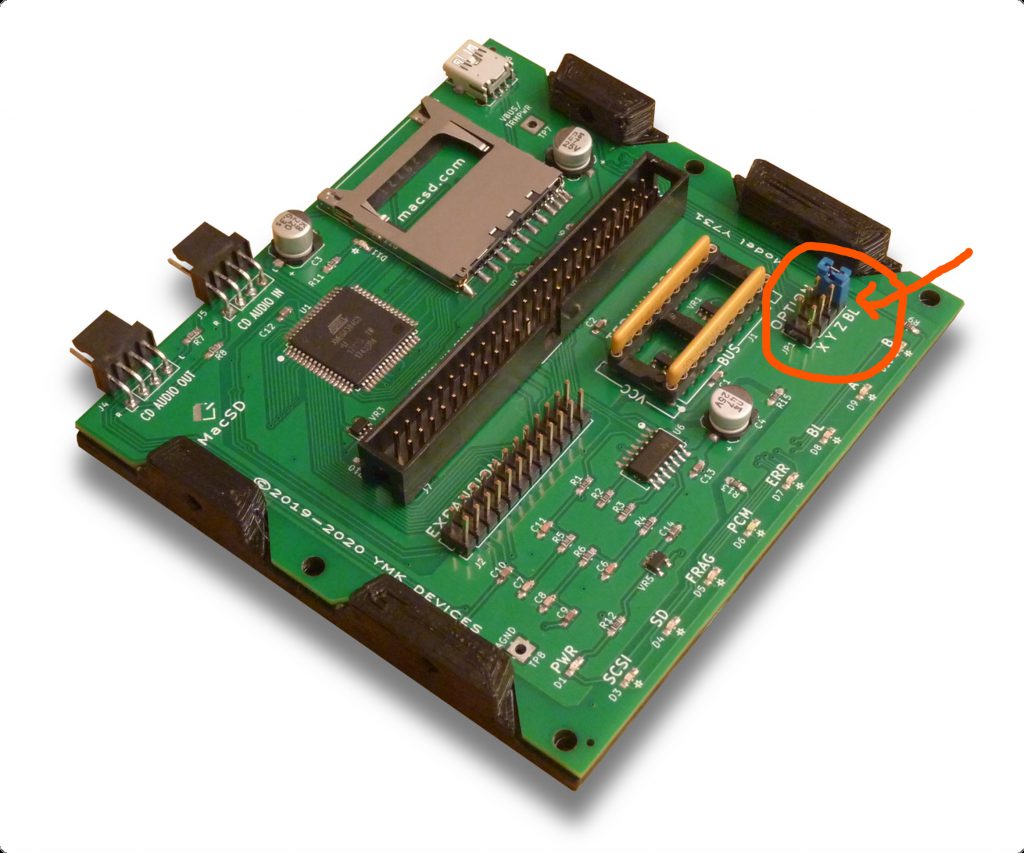
- Close/short the BL jumper pins (the blue jumper, see figure 1)
- Connect the MacSD to your Macintosh if you haven’t already.
- Turn on your Macintosh and look at the status LEDs on your MacSD
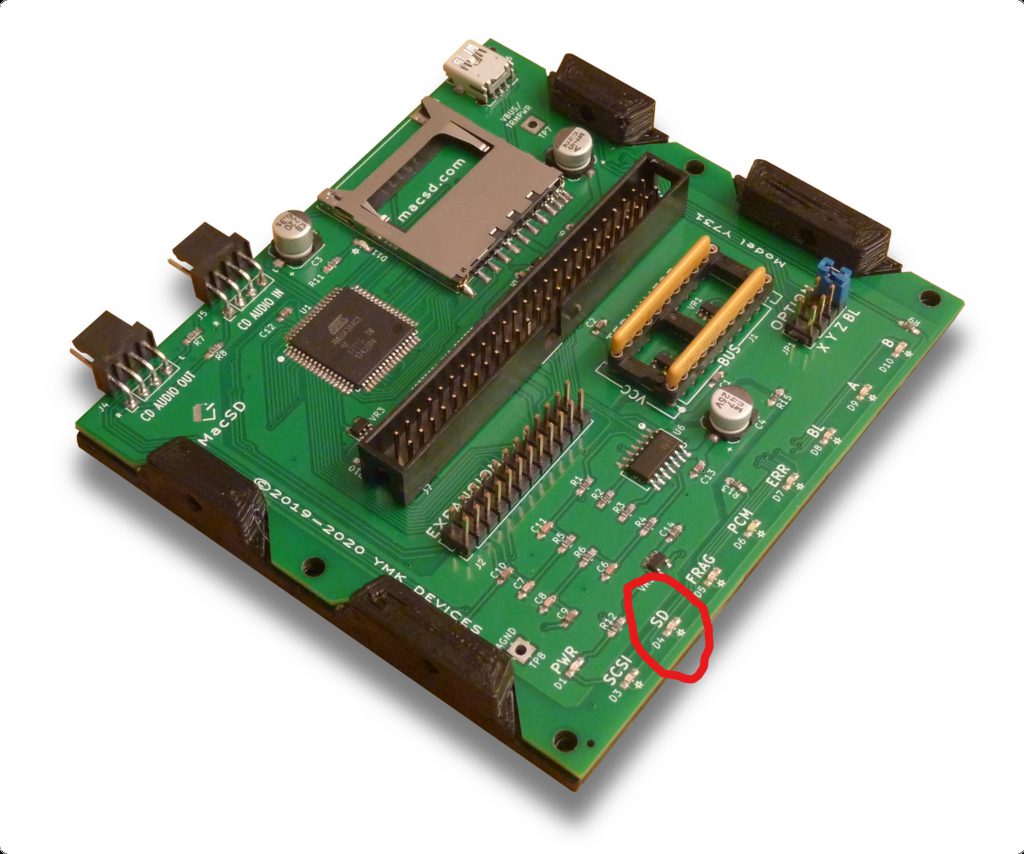
- The SD LED (figure 2) will flash rapidly until the verification and installation process is complete (about 15 seconds)
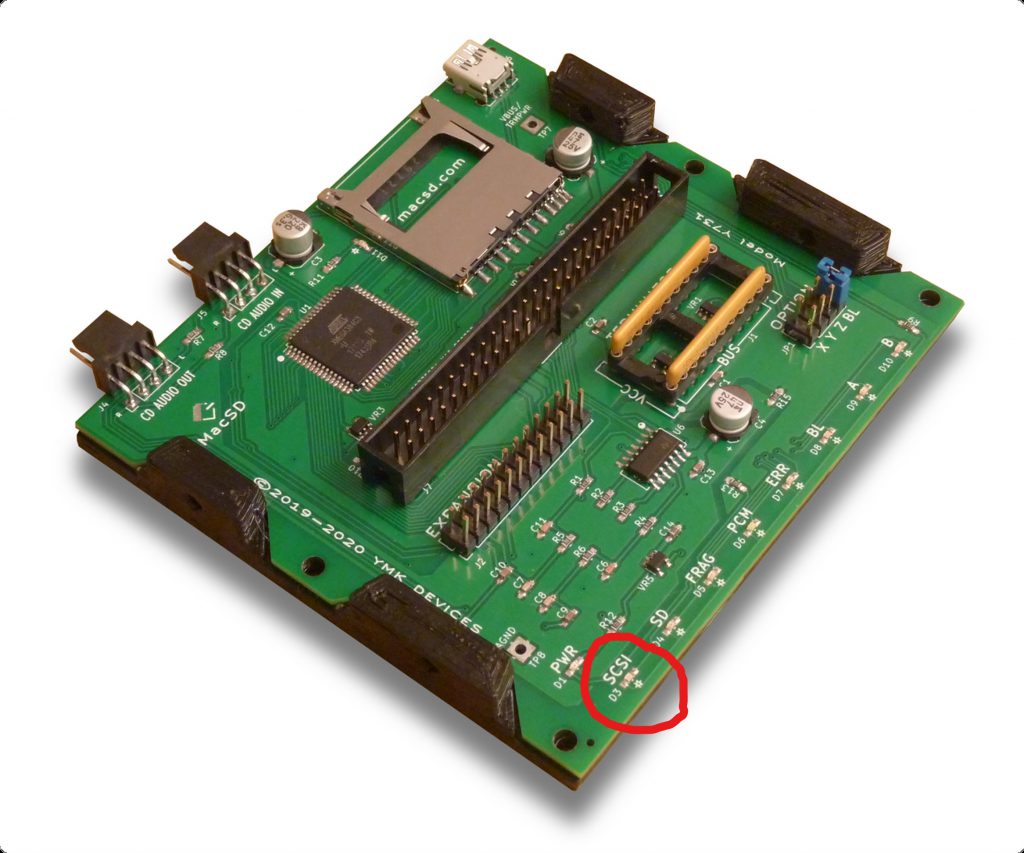
- On success, the SCSI LED (figure 3) will pulse slowly
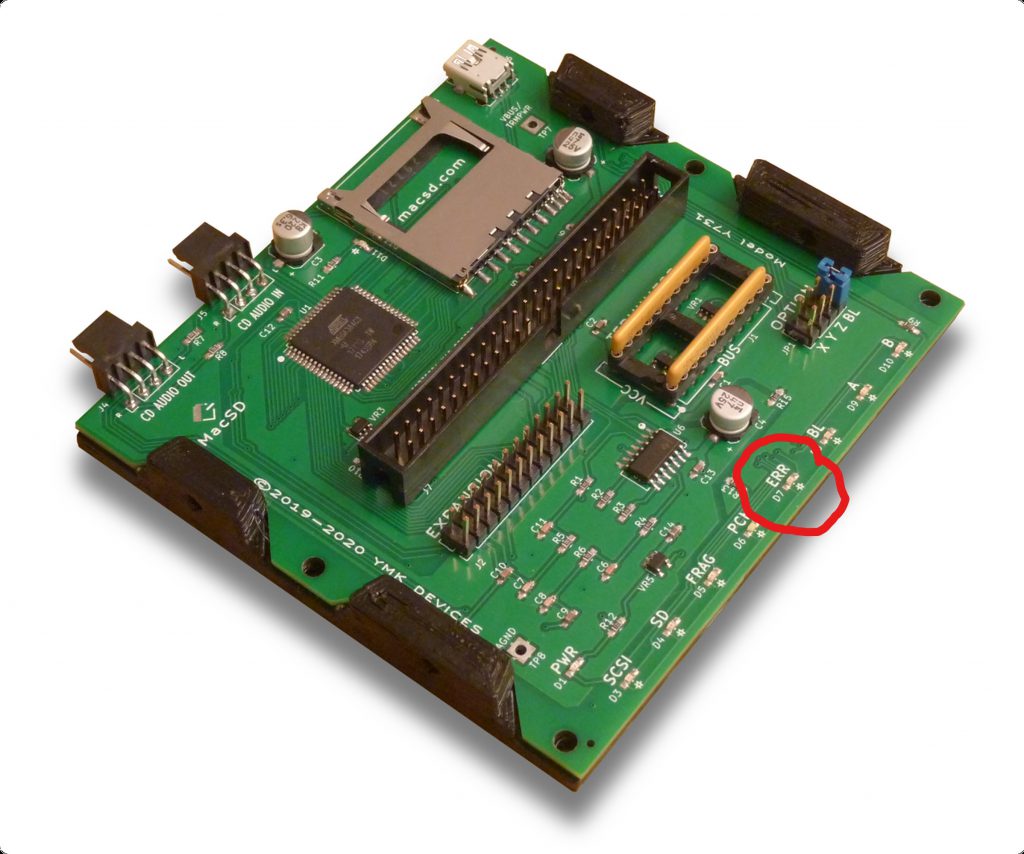
- IF the update fails, the Error LED (figure 4) will indicate one or more error codes:
- 2 flashes: No macsd_x.x.x.fwi firmware update file found in the root directory
- 3 flashes: More than one macsd_x.x.x.fwi firmware update file found in the root directory
- 4 flashes: Unknown SD card format
- 6 flashes: Firmware update file is corrupt or has been renamed
- 7 flashes: Unable to initialize SD card
- Turn off your Macintosh
- Open / Remove the BL jumper
2. Use my volume/partition image files
Firmware v0.10.0 for the MacSD introduced support for composite devices that allows you to combine multiple partition images as a single drive with a single SCSI ID. The main focus of this blog entry is how to use this new feature using my volume/partition image files containing the minimum versions* of System 6.0.8 and System 7.5.5, and several utilities and drivers. Since I only play around with 68k Macintosh Systems, I haven’t bothered to create any volume/partition image files larger than 2GB, since 2GB was the maximum size limit for a volume until System 7.5.
You will need to:
- decide which System version you want to work with, I’ve created another entry that lists which System Versions are support by which 68k Macintosh Computers
- download my latest 2GB (~50MB compressed) System 6.0.8 volume image or System 7.5.5 volume image , or use/create your own bootable volume image
- Optional: Download my blank 2GB HFS formatted image file for use as additional partitions (you can make copies of this for extra HFS partitions)
- Optional: Download my blank 32MB ProDOS formatted image files for use with your Apple IIe card (you can make copies of this for extra ProDOS partitions)
Optional steps:
You can do these steps now or after the volume files are copied to your SD card (Section 6 below) and you’ve confirmed everything is working with your MacSD
- upgrade the minimal System 6.0.8 and/or System 7.5.5. installations on my images to the full version, I can’t include the full versions on my images due to copyrights held by Apple. Note, you can skip this step, the minimal versions will boot, but if you do it now you won’t have to do it later.
- add any other applications/games you want to my image using the same method as what you used to get the full versions of System 6.0.8 and/or 7.5.5. on to the image.
3. Getting the volume files ready
To prevent your volume files from getting fragmented I strongly suggest you get everything setup in a folder on your hard drive and then copy the volume files over as a set to your SD card. I decided to do my initial test with 2 x 2GB HFS volumes, and 6 x 32MB ProDOS volumes to test compatibility with my Apple IIe card (my Apple IIe card could see all 6 and mount any 4 of them at a time).
Here’s what I did:
- I formatted my SD card to prevent file fragmentation on the SD card when I copied the volume images over to the SD card.
- I created a folder on my hard drive called
MacSD - I created a sub-folder called
SCSI_0, this will be my composite drive that I’ll assign to SCSI ID 0, note you can make multiple subfolders and have multiple composite drives. - Inside of
SCSI_0subfolder I created the following files (you can create whatever structure you want):V1_HFS_boot.dsk: this is a renamed copy of my 2GB System 7.5.5 volume image,HD20_755.dskV2_HFS.dsk: this is a renamed copy of my blank 2GB HFS formatted image file,HFS_blank_2GB.dskV3_ProDOS.dsk: this is a renamed copy of my blank 32MB ProDOS formatted image files,ProDOS_1.dskV4_ProDOS.dsk: this is a renamed copy of my blank 32MB ProDOS formatted image files,ProDOS_2.dskV5_ProDOS.dsk: this is a renamed copy of my blank 32MB ProDOS formatted image files,ProDOS_3.dskV6_ProDOS.dsk: this is a renamed copy of my blank 32MB ProDOS formatted image files,ProDOS_4.dskV7_ProDOS.dsk: this is a renamed copy of my blank 32MB ProDOS formatted image files,ProDOS_5.dskV8_ProDOS.dsk: this is a renamed copy of my blank 32MB ProDOS formatted image files,ProDOS_6.dsk- Note: if you copy and rename one of my ProDOS images you will run in to an issue where two ProDOS volumes with the same name can’t mount at the same time. Only 1 will mount (the last one), you’ll need to erase the mounted one, and give it a new name and then reboot, the missing ProDOS volume will appear (if there are more than 2 with the same name you’ll have to repeat, one at a time until there are no duplicates). My 6 ProDOS images are each uniquely named, e.g. ProDOS_1 is named ProDOS 1.
- Copy the sub-folder (e.g.
SCSI_0) to the root of your SD Card - (Optional) Repeat for SCSI_1 etc.
Warning: you cannot use the patched version of HD SC Setup or other software to modify the partitions of a composite drive, trying to do so will throw an error. But you can erase (reformat) a volume when ever you want. If you want to add new volumes follow the steps in this section.
4. Configuring your MacSD adapter
All of the configuration information used by the MacSD is stored in the root of your SD card in a file called in a file called macsd.ini, the MacSD site has a detailed description of all of ini settings, but for this guide I’m focusing only on the setting for using a composite drive, I plan to cover the other options in future entries.
To setup a composite drive you simply need to specify the SCSI ID you want to assign (in this example, SCSI ID = 0), specify that this is a composite drive :composite and specify the name of the directory the volume files are in, in this example image_directory=SCSI_0:
; SCSI drive configuration ====================
[0:composite]
image_directory=SCSI_0

; If I wanted a 2nd drive
[1:composite]
image_directory=SCSI_1
; etc.
; make sure to leave a blank line at the end of your INI file
Once you’ve finished editing your macsd.ini file, then copy it to the root of your SD card.
5. Editing the contents of your composite drive
This is where I’m really liking the MacSD vs. the SCSI2SD, especially when using it as an external device where I can easily access the SD card. I can directly edit the image files on the card using any tool that lets me edit volume files. Note for Basilisk II under Windows 10: I had to manually edit my BasiliskII_prefs since BasiliskIIGUI wouldn’t let select my SD card as a drive. So I used BasiliskIIGUI to point to the files in the SCSI0 folder on my hard drive (drive D:), exited BasiliskIIGUI and then edited the disk entries in BasiliskII_prefs to point to my SD Reader (drive G:)
disk G:\SCSI_0\V1_HFS_boot.dsk
disk G:\SCSI_0\V2_HFS.dsk
disk G:\SCSI_0\V5_ProDOS.dsk
disk G:\SCSI_0\V6_ProDOS.dsk
disk G:\SCSI_0\V7_ProDOS.dsk
disk G:\SCSI_0\V8_ProDOS.dsk
I can now quickly and easily make changes to my volumes using Basilisk II or mini Vmac, making this much quicker to edit than my SCSI2SD that required me to use DD to extract my volumes from my SD card for editing.
6. Use your MacSD adapter
If you plan to use your MacSD adapter as your only hard drive you can use the instructions above without any issues, but if you plan to use it as an external device you’ll likely need to change the SCSI ID to one that isn’t already in use, e.g. most internal drives use SCSI ID 0, so you will likely need to use SCSI ID 1 or greater.
Connect your MacSD to your internal or external SCSI connector and if you are using a Macintosh Plus, connect your MacSD to an USB power source. Note, if you are having issues where the MacSD isn’t being powered, or being unreliable, try connecting it to a USB power source. Like the SCSI2SD the MacSD draws it’s power from the SCSI connection, but if there is an issue with your system where not enough power (or in the Macintosh Plus’s case, no power) is being provided the USB connection might get you working.
Thank you for your excellent article. If you don’t mind, I have 4 questions…
1. When you have multiple images as a single “Composite” drive, do you see a single drive icon on the Desktop, and then when you double-click it, do you see a window containing multiple folders, with each folder containing the contents of each image stored inside that composite? (There is no screenshot of a composite drive in your article and is why I ask.)
2. You said the Mac Plus requires external power for the MacSD, but couldn’t that be eliminated merely by adding a CR1 diode on the Mac+ motherboard? If so, which of the 3 termination choices should be used in the INI file?
3. The MacSD manual talks about the need for “MBR (Master Boot Record) partitioning” to get volumes larger than 4GB. Do you know how this is accomplished using a modern Mac?
4. To avoid fragmentation, you say to write all files at once on a newly formatted SD card. But let’s say you do that and later want to change your INI file. Do you need to backup the contents, reformat and then copy everything back to the SD card? Or does changing the INI file (making the file size longer or short) not cause fragmentation?
Thank you!
1. Each file is seen by your Macintosh as a sperate partition/volume so yes, each file gets it’s own icon on the desktop.
2. Yes you could likely do the modification you mention to your macplus so terminator power is provided, but I haven’t tried that, I just use a usb power source instead.
3. The 4GB file size limit is due to the use of FAT32, the MBR partition sets up the MacSD the same way as a SCSI2SD where you are directly formatting the SD card instead of copying files to a FAT32 card. I haven’t tried this feature yet since I arleady have a SCSI2SD adapter. I was more interested in the MacSD for the composite drive feature.
4. you only have to worry about fragmentation if you delete volumes files and add new files of different sizes and by doing so the volume files get “broken up”, I typically write the ini file to the SD card last, so if I want to add new volumes I can delete the ini file, add the new volumes and then add the edited ini back.