Last updated on March 11, 2023
One of the most popular features of my site is my ready made System 6.0.8 or System 7.5.5 bootable images for use with 68k Macintosh systems. This entry describes how you can edit my images on Windows 10 using Basilisk II. You probably know what Basilisk II is, but if not, a quick summary: Basilisk II (manual) is an open source emulator of 68k-based Macintosh computers that support 32 bit memory (see section 2) that runs on Windows, OS X and Linux (also works on some other platforms).
Because Basilisk II is already well documented on sites like Emaculation, I’m only going to describe the basics of how to setup Basilisk II and focus on how you can use it to add or remove files from the System 6.0.8 or System 7.5.5 bootable images available to download on my site.
Quick Start
- Download and install Basilisk II (tested with release 29-05-2021 for Windows)
- Create or download a 32bit clean Macintosh 68k ROM file, e.g. the LCIII ROM rom from the internet archive.
- Download one of my System 7.5.5 drive images or partition/volume images
- Use
BasiliskIIGUI.exeto configure BasiliskII to point to you ROM file, use the drive/partition/volume image(s) you want to edit, and allow access to the host systems drives (the Enable “My Computer” icon option) - Load Basilisk II, and copy files from your host system on to the drive image using Basilisk.
- WARNING: Drive images with multiple partitions can not be edited with Basilisk II
1. Download and install Basilisk II
The latest versions for Windows, OS X and Linux can be found on the E-Maculation Forum.
- Download the latest windows build from the E-Maculation Forum, for this example I’m using the 22-09-2020 build
- Create a destination folder on your system that you will install Basilisk II in. E.g.
Basilisk II 2020-09-22 - Unzip the contents of the latest build to your destination folder
- Basilisk II is now installed, but not quite ready to run.
2. Download and select a ROM file
To run Basilisk II you’ll need a file containing a copy of the ROM from a 32 bit clean 68k Macintosh System the bios for any Macintosh System released after System 7 should be fine.
Luckily these ROM files are now available on the internet archive and can be used for personal/research purposes. I personally use the Macintosh LCIII bios from my physical system, but you can also find the Macintosh LCIII rom, and other 68k rom files on the internet archive. I suggest putting the ROM file in to the same installation folder as the Basilisk II application but it’s up to you, just remember where you put it, you’ll need to know for Step 4 below. If you are having issues with a download ROM file try renaming it to remove any spaces, dashes or special characters, e.g. to LCIII.ROM etc.
3. Selecting an image file
Basilisk II typically is used with files containing a binary image of a hard drive partition/volume, it can also be used with drive images as long as the drive image only contains a single partition, or CD-ROM image files.
You can boot from any of my single partition System 7.5.5 Images (Basilisk II will NOT boot System 6.0.8 or earlier), or create your own from an existing drive, or create a new image. If you are using your own Drive Images, CAUTION, Basilisk II MUST NOT be used to edit Disk Images that contain multiple partitions, if you try to edit a Drive Image that contains multiple partitions you will corrupt your Drive Image. A Drive Image is a bit for bit copy of a bootable drive that is prepended with the apple drive and partition table information, vs. a Partition File that contains only the a single partition.
4. Configure Basilisk II
Basilisk II includes a program called BasiliskIIGUI.exe that can be used to configure Basilisk II, run BasiliskIIGUI.exe now.
For most users you’ll only have to worry about 3 of the tabs shown in the Basilisk II Settings window:
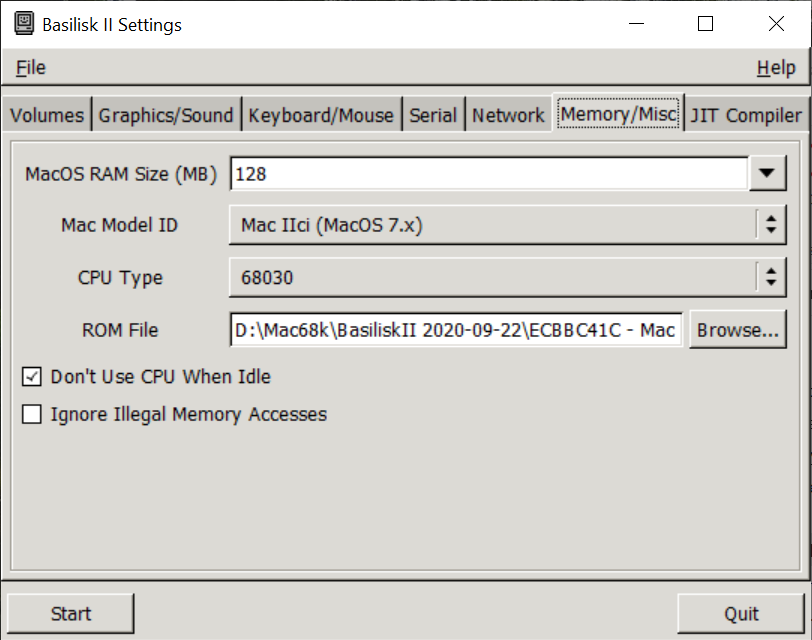
- The Memory/Misc Tab (Figure 1) where you specify:
- Set the RAM size for your emulated Macintosh System, I suggest 128MB as a good size for most needs.
- Set your Mac Model ID. Select Mac IIci. Note the bios you’ve download does NOT have to match the Mac Model ID. In general I suggest:
- Use a bios from a 68030 system with the Mac IIci Mac Model ID. (I personally use a LCIII rom image with this option with no issues, I had issues enabling AppleTalk when I tired using the Mac IIci rom, those issues stopped when I switched back to my LCIII rom)
- Use a bios from a 60040 system for the Quadra 900 Mac Model ID
- Set the location of the ROM file you plan to use
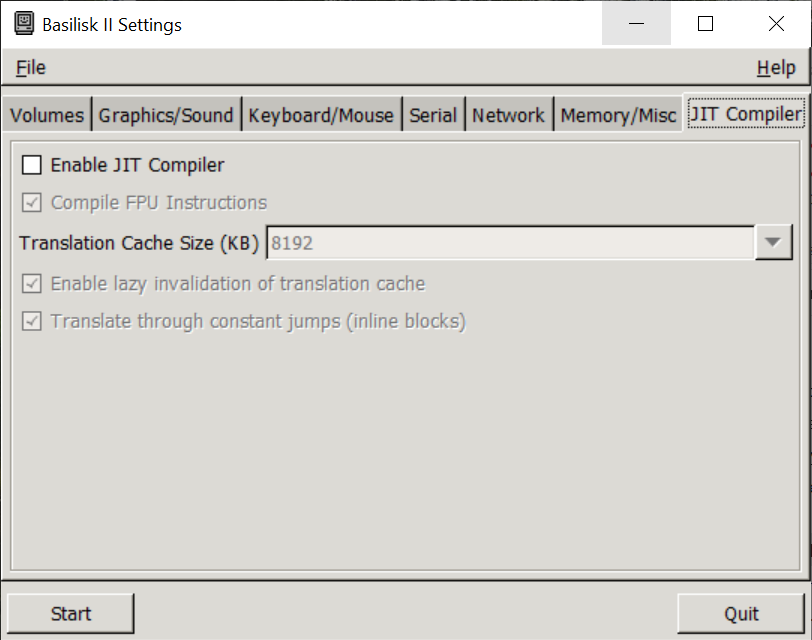
- The JIT Complier Tab (Figure 2): I disabled the JIT Complier for my Windows System. I was getting random errors when copying large numbers of files, those problems went away once I disabled the JIT Complier
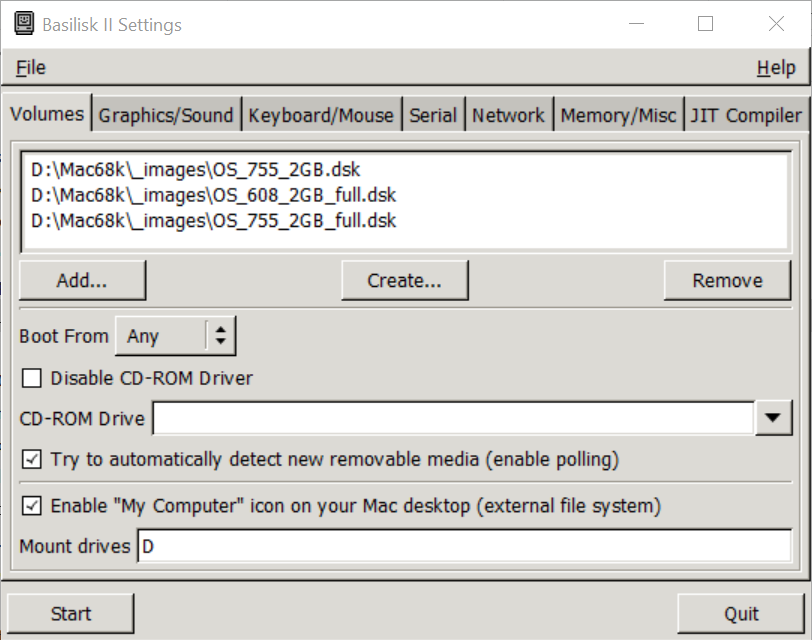
- The Volume Tab (Figure 3) where you specify the location of the file(s) representing the hard drive(s) for your emulated system:
- Use the Add button to select one or more image files as your virtual drives. The first on the list will be the “boot” drive by default.
- The “boot” drive must be running System 7.x, e.g. my System 7.5.5 images (OS_755_2GB.dsk in this example), you can set images that boot older System files as your secondary or subsequent drives (the two _full.dsk files in this example)
- I select you enable the “My Computer” icon option (check box at the bottom of Figure 4), this will drastically simplify moving files on to your Hard Drive image files
- Optional: The Graphics/Sound Tab, increase the width and height to 640×480, 800×600, or 1024×768 etc. I usually use 640×480.
- Press the Start Button to begin using Basilisk II (bottom left of Figure 3 and 4).
Note for figure 3 / volumes tab: unfortunately the BasiliskIIGUI.exe interface that lets you configure Basilisk II will not let you select volume/drive images on a removable drive. You will need to manually edit the BasiliskII_prefs file to add the volumes from the SD card to the list of drives for Basilisk II. E.g. add the line disk F:\drive1\D1HFS_01.dsk
5. Using Basilisk II to edit image files
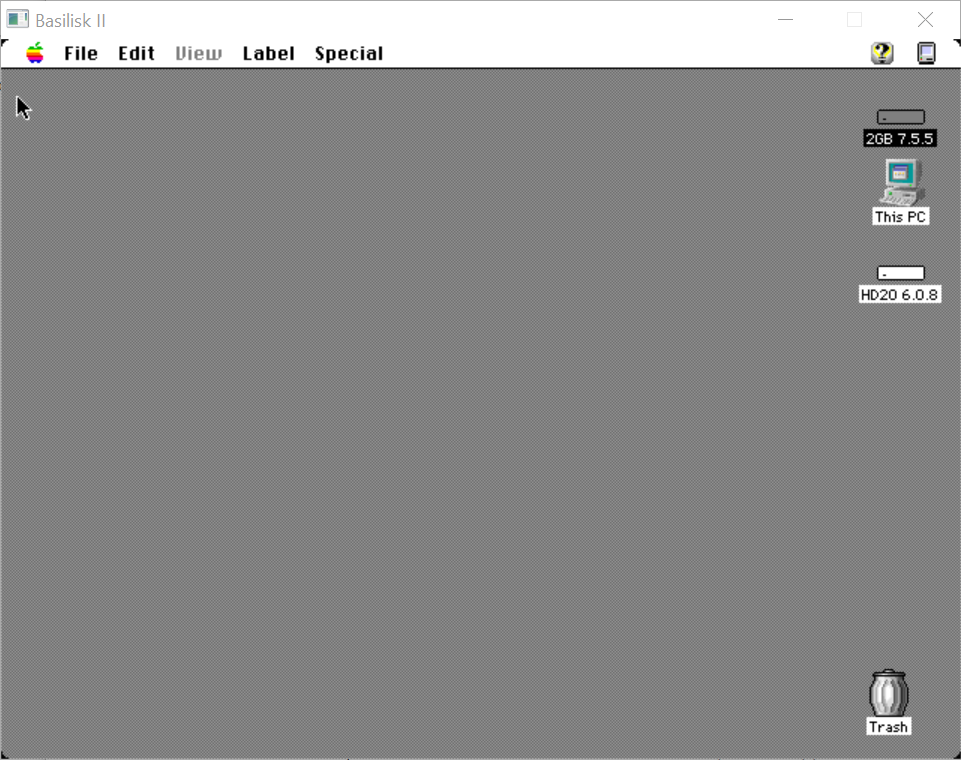
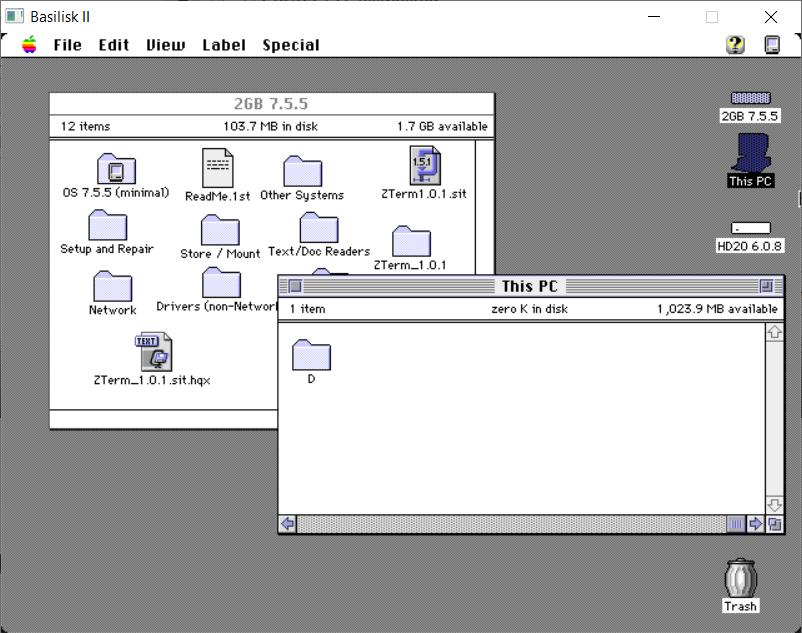
If everything worked the way it should you should see an icon called “This PC” on your Macintosh desktop in Basilisk (Figure 4), clicking on that icon will let you browse the contents of your host machines drive(s) (Figure 5) that you setup on your Volumes tab in the previous section (see bottom of Figure 3 above).
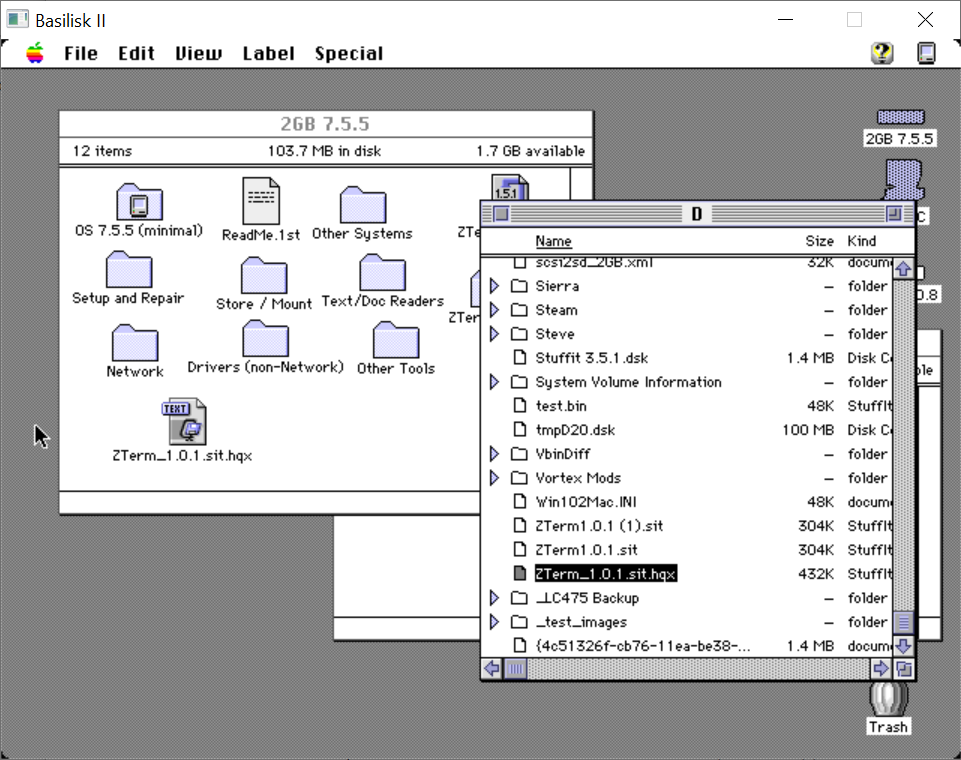
Simply select one of the drives in the This PC windows, e.g. drive D (Figure 4), which will open a new window listing the files and folders on that drive, you can select one or more files and drag them on to one of the Macintosh drives shown on the desktop (Figure 6), in Figure 4 and 5 I have my 2GB 7.5.5 drive open and have copied the ZTerm_1.0.1.sit.hqx, file on to the drive, which I can then unencode and uncompress using Stuffit Expander 4.0.2 found on my image files in the Store / Mount folder.
Once you have edited either the primary or secondary or other image file to contain the files you want, you can write or copy the image file to the device that you will connect to your real world Macintosh such as a SCSI2SD, MacSD, FloppyEMU, ZipDisk, etc.
For a more detailed examples of how to use Basilisk II to edit image files see my entries for:
- Installing the full version of System 6.0.8 (can be installed using Basilisk II, but you can’t run it under Basilisk II)
- Installing the full version of System 7.0.1
- Installing the full version of System 7.1.3
- Installing the full version of System 7.5.5
6. Drive Images with Multiple Partitions/Volumes
You can not use Basilisk to directly edit a drive image that contains multiple partitions/volumes, trying to do so will corrupt the drive image. If you want to edit a drive image that contains multiple partitions/volumes, or in the case of SCSI2SD perhaps even multiple drives and partitions, you will have to extract each partition/volume to a separate file. I describe how I use the program DD on my Windows 10 machine (also available on Linux and Mac) to create a set of partition files from my 32GB SD card that I use with my LC 475 so I can edit their contents and then write them back to my SD card.
7. Macintosh and Linux
I’ve read that some Basilisk users have been able to directly mount their formatted SD in Basilisk II, I haven’t been able to do so, perhaps because I’m using Windows. If you have been able to and are using Linux or Macintosh please feel free to share the steps in the comments section.
Very curious, I’m having problems on my SE. Is this because it’s not a 32bit? Is it because it runs a 68000 Instead of a 68030? I need to use a 32bit rom I understand but then the rom does not match my machines rom. How could I solve this issue?
What problems? Will it not boot? Before you try using any of the images I created you’ll need to open the image in Basilisk and then change the memory setting to 24bit and shut down the emulator.
After you make this change the image will NOT boot in Basilisk, but should boot under your SE.
My Mac SE30uses system 6, and I haven’t had luck yet getting system 6 working in Basilisk using your image. Am I missing something? For example when I try all I get is a warning about 24bit vs 32bit and have to restart Basilisk…
OK, I figured it out!! It was difficult to understand, but basically, you need to follow the instructions EXACTLY as outlined on this page: https://www.emaculation.com/doku.php/basilisk_ii_setup
Even if you, in the end, want system 6 on your Classic Mac, you must follow the above steps to simply get Basilisk II working. I was wrongly using different files and roms because I thought I needed those to make a system 6 image: nope. The point is, you get that running in Basilisk II, then you can actually run that emulator which is step one.
Then, since the emulator now works, you remove the boot image, and add your image (with System 6 or whatever) but keep the install.hfv disk in Basilisk GUI. And once that is all done you can run Basilisk, and you’ll see your System 6 image and can now transfer files to it. When done, you can then write the image to an SD card and boom… put it in your old MacSE30 and you’re all good!
Even more amazing, you can add sit files if you check the box that allows the GUI to see into your PC’s contents. I LOVE IT.
And thanks bigtime to the writer of this blog… you’ve really helped me get this all working, though it wasn’t clear cut at first. Now that I read it again, I wonder, how I could have not understood it…hehe. Thanks!!
Using VMware Fusion with OSX 10.5 Server as the guest OS I was able to mount and add files to my SCSI2SD micro sd card.