This page contains a list of all the files that can be downloaded from my site for use with 68k and PPC Macintosh systems, specifically the bootable image files I’ve created for use with:
- Emulators such as Basilisk II, mini vMac, or SoftMac
- Modern storage options such as SCSI2SD, MacSD, ZuluSCSI, BlueSCSI, RaSCSI, CF2IDE, SC2IDE, and FloppyEMU
- Real drives such as: Zipdrives, Jaz Drives, Floppy drives and CD-ROM drives.
Quick start
- Choose what System software you want, you can read my blog entry for which System versions can be run on which Macintosh Computers
- Determine which type of image file you need to/want to use, drive, volume, floppy, or CD?
- Review the contents of my images (last updated 2021/01/21)
- Add or remove content from my images using an emulator or some other tool
- Copy (Volume/Partition image) or Write (Drive image) to your target media
- Creating a drive image using an emulator, or from a physical disk
- Transfer files files to your running system
1. Choose your System Software
When setting up your real or emulated 68k Macintosh or PPC system you need to first select the System Software (operation system) version that will work on your system. I’ve written a separate blog entry that lists all of the different Macintosh 68k systems and which System versions they support.
Once you know what System Software versions your system can support, it’s really a personal preference for which one of those you want to use, typically based on a balance between features, memory usage, and stability. For myself, for systems with 68000 CPUs such as the Plus, SE, or Classic I use system 6.0.8 or 7.1.2. For my other 68k systems, I typically use 7.5.5.
2. Image Files for booting you Macintosh
To help you get started, I am providing Drive, Volume/Partition, Floppy, CD-ROM and other files that contain minimal versions of Systems: 3.2, 4.1, 5.1, 6.0.8, 6.0.8L, 6.0.8P, and 7.5.5 that you can use to test out your 68k or PPC system and hardware without investing too much time. Which image you need will depend on what device you plan to use it with.
After you’ve done your tests with my initial images I also provide guides describing how you can use emulators such Basilisk II, mini vMac or SoftMac on modern machines to edit my images, with detailed instructions on how you can use Basilisk II (the emulator I use the most) to replace the minimal versions of the System Software on my image files with the full (English) versions of systems: 3.2, 4.1, 5.1, 6.0.3, 6.0.5, 6.0.8, 7.0, 7.0.1, 7.1, 7.1.1, 7.1.2, 7.5, 7.5.1, 7.5.2, 7.5.3, 7.5.5, 7.6, 7.6.1, 8, and 8.1 from an ISO image file created from Apple’s Legacy Software Recovery CD. You can also install non-english versions from the Mac OS Anthology CD, or install from the restoration CD for you system if one exists.
The following table maps my image files to various devices that can be used with your 68k or PPC system, this is not a complete list, so please feel free to leave comment on this page if you would like me to add an image for a device that you use.
| Device | Supported image files and instructions |
|---|---|
| BlueSCSI | Drive image: 3.2 (32MB), 2GB: 4.1, 5.1, 6.0.8, 6.0.8L1, 6.0.8P2, 7.1, 7.5.53, blank Steps: Download, rename (e.g. HD1.hda or CD3.iso), then copy to an exFAT or FAT32 formatted SD card |
| CD-ROM | CD-ROM image (650MB): 7.5.5 (currently not working, trying to determine why) Steps: Download, write (burn) to a CD-R/RW disk. For Windows systems I suggest using MacDisk for windows if your software of choice doesn’t recognize bootable HFS images. I have created a guide for using editing and using my CD-ROM image file. |
| Floppy | Floppy image: 6.0.8, 7.5.5 Steps: Download, then write to a floppy using balenaEtcher, or some other RAW-write application. I have created a guide for setting up using a USB floppy drive. |
| FloppyEMU | Volume image: 3.2 (32MB), 2GB: 4.1, 5.1, 6.0.8, 6.0.8L1, 6.0.8P2, 7.1, 7.5.53, blank Floppy image: 6.0.8 (1.44), 7.5.5 (1.44) Steps: Download, rename (e.g. HD20.dsk), then copy to a FAT32 formatted SD card (suggest a newly formatted card). I have created a guide for using my Volume image files to emulate a HD20 drive on my Mac Plus and SE. |
| Iomega | Iomega Zip 100MB: blank, Iomega Jaz 1GB: blank, Iomega Jaz 2GB: 4.1, 5.1, 6.0.8, 6.0.8L1, 6.0.8P2, 7.1, 7.5.53, blank Steps: Download, write to the zip or jazz drive using balenaEtcher (usb zip drive), or DD (scsi attatched zip or jazz drive). I have created a guide for 100MB zip drives. Note: For the blank images, use Basilisk II or SoftMac to copy files on to these from one of the 2GB drive images. |
| MacSD | Drive image: 3.2 (32MB), 2GB: 4.1, 5.1, 6.0.8, 6.0.8L1, 6.0.8P2, 7.5.53, blank Volume image: 3.2 (32MB), 2GB: 4.1, 5.1, 6.0.8, 6.0.8L1, 6.0.8P2, 7.5.53, blank Steps: Download, then copy to a FAT32 formatted SD card (suggest a newly formatted card). I have created a guide for using my Volume image files and MacSD’s composite feature. |
| piSCSI/raSCSI | Drive image: 3.2 (32MB), 2GB: 4.1, 5.1, 6.0.8, 6.0.8L1, 6.0.8P2, 7.1, 7.5.53, blank Steps: Download, then follow the guide for copying over file and setting up. |
| SCSI2SD | Drive image: 3.2 (32MB), 2GB: 4.1, 5.1, 6.0.8, 6.0.8L1, 6.0.8P2, 7.1, 7.5.53, blank Easy edit FAT32 32GB: 7.5.53 Steps: Download, write to an SD card using balenaEtcher or DD, the contents of the SD card will be erased. I have created a guide for using one of my 2GB Drive images with a SCSI2SD I have created a guide for my 32GB FAT32 version contains 10 HFS volume/partition image files and 4 proDOS formatted volume/partition files |
| ZuluSCSI | Drive image: 3.2 (32MB), 2GB: 4.1, 5.1, 6.0.8, 6.0.8L1, 6.0.8P2, 7.1, 7.5.53, blank Steps: Download, rename (e.g. HD1.hda or CD3.iso), then copy to an exFAT or FAT32 formatted SD card |
- System 6.0.8L: shipped on a limited run of computers for the Asia Pacific Market due to a delay in System 7 localization, supports the: Classic, Classic II, LC, LC II, Powerbook 100
- System 6.0.8M: a community created release based on a 6.0.7 release created for Japan, supports the: powerbook 140, 145, 145B, 170 (perhaps more, let me know)
- My System 7.5.5 Drive, Volume and CD images: contain the applications listed in Section 3 below. I also suggest you download the ISO image files for Apple’s Applications Recovery CD, Apple’s Legacy Software Recovery CD, Apple’s System Recovery CD. I use the applications found on my System 7.5.5 drive and partition images, and the listed Apple’s CDs for many of the guides found on this site.
I do not provide the full set of system software for four reasons:
- The size of the image files. The hosting service I use has unlimited bandwidth for downloads, but limited storage space.
- To prevent incompatibilities and bloat. There are many enablers that are system specific, by providing these minimum versions none of that “bloat” is loaded.
- Copyright. Years ago Apple used to send cease-and-desist to anyone who shared the full versions of the system files on their sites. Those days may or may not be gone.
- You can download Apple’s Legacy Software Recovery CD, or Apple’s Developer CD Series from the internet archive as a source for the system installation files, or download the floppy disk images from the internet archive’s snapshot of Apple’s FTP site (good for international versions of the software).
2.1. What is a Drive Image
A Drive Image (Hard Drive or Removable Drive) contains a binary copy of the complete contents of an initialized drive including the drive’s boot driver and partition information in the first 48KB of the image file and one or more partitions/volumes (see 2.2). Example: Figure 1 is the contents of a Drive Image viewed in my patched version of HD SC Setup 7.3.5 in SoftMac.
See the table above These files typically must be written as bits using balenaEtcher or DD or some other similar software. As part of writing these images, everything is erased on the target media and it is reformatted as HFS.
- Tools that can be used to edit these images: Basilisk II (but only for Drive Images with a single partition/volume), SoftMac (but only for Drive images under 3GB)
- Tools that can be used to create these images: SoftMac (but only Drive images under 3GB)
2.2. What is a Volume / Partition Image
A Volume or Partition Image (I’ve seen the term volume and partition used interchangeably) contains a binary copy of a single Macintosh volume/partition from a hard drive or removable drive. These images lack both the boot sector and partition map. These files are copied to the target media as files (the target media is not reformatted as HFS). When most emulators refer to a hard drive file they are typically referring to a volume/partition image NOT a drive file.
- Tools that can be used to edit these images: Basilisk II, HFVExplorer, SoftMac, Mini vMac
- Tools that can be used to create these images (pre-formatted HFS): Basilisk II, CiderPress, HFVExplorer, SoftMac
Converting a Drive image file in to one or more Volume/Partition images
You can manually copy files from one of my drive images to a volume image by mounting both under Basilisk II and copying between them, or you can use programs like DD to extract volume/partitions from a drive image to one or more separate files. Doing so can be tricky and requires that you know exactly where each partition/volume starts and ends in the drive image, I have a fairly complex example for how to do this in my entry for how I setup my LC475 with my SCSI2SD. For my drive images you can use the following commands to copy the volume/partition section of the drive image to a separate file:
| Image Size | DD commands (Windows Examples) |
|---|---|
| 100 MB (Zip drive) | dd if=d:\OS_755_100MB.dsk of=d:\volume.dsk bs=49152 skip=1 –-progress Total image size: 94,371,840 bytes, need to skip the first 48KB |
| 1GB (Jaz drive, SCSISD) | dd if=d:\OS_755_1GB.dsk of=d:\volume.dsk bs=16384 skip=3 –-progress Total image size: 985,661,440 bytes, need to skip the first 48KB, and the block size must be a number that can divide both, so 16k. |
| 2GB (Jaz drive, SCSISD) | dd if=d:\OS_755_2GB.dsk of=d:\volume.dsk bs=16384 skip=3 –-progress Total image size: 1,971,322,880 need to skip the first 48k, and the block size must be a number that can divide both, so 16k. |
Converting a Volume/Partition image back in to a drive image
You can manually copy files from one of my volume images to a drive image by mounting both under Basilisk II and copying between them, or you can use programs like DD to merge volume/partitions files back in to a drive image file. To do so can be tricky, I have a fairly complex example for how to do this in my entry for how I setup my LC475 with my SCSI2SD. For my drive images you can use the following commands to merge the volume/partition file back in to the drive image:
| Image Size | DD commands (Windows Examples) |
|---|---|
| 100 MB (Zip drive) | dd of=d:\OS_755_100MB.dsk if=d:\volume.dsk bs=49152 seek=1 conv=notrunc –-progress Need to skip the first 48KB (seek 1, bs=48k) |
| 1GB (Jaz drive, SCSISD) | dd of=d:\OS_755_1GB.dsk if=d:\volume.dsk bs=49152 seek=1 conv=notrunc –-progress Need to skip the first 48KB (seek 1, bs=48k) |
| 2GB (Jaz drive, SCSISD) | dd of=d:\OS_755_2GB.dsk if=d:\volume.dsk bs=49152 seek=1 conv=notrunc –-progress Need to skip the first 48KB (seek 1, bs=48k) |
2.3. Floppy Images
A floppy image contains a binary copy of the complete contents of a floppy disk. For a 68k Macintosh there are 3 sizes:
- 400k (single sided, single density, SS) for the 128k and 512k Macintosh
- 800k (double sided, single density, DS) for the 512k (with an external drive and enabler in ram), 512ke, Plus, SE (unless upgraded to SE FDHD), and Macintosh II (unless upgraded)
- 1440k (double sided, double density, HD) for the rest, you can use a modern USB 3.5 inch floppy drive to write a 1440k image files to a floppy to use with your 68k Macintosh, but NOT the 400k or 800k images :-(, you will need a pre-iMac Macintosh to create 400k or 800k floppies from image files.
Disk images can come in the following formats:
- RAW, this are exact binary copies of the contents of the floppy with no header information. You can tell if a file is a RAW image by its size: 400k, 800k or 1440k.
- DART format, this was mainly used internally to Apple and supported compression.
- Diskcopy 4.2 format, this is the most common format for SS and DS images, and often used for HD images , it adds a 1k header to the file, so the sizes are: 401k, 801k, 1441k.
- Diskcopy 6.3.3 format, requires System 7.0.1 or better, added support for creating self-mounting images.
- DiskDup format, can overcome mild forms of copy protection.
- ShrinkWrap format
The creator of FloppyEMU has a handy image conversion tool that will strip off the header from DiskCopy 4.2 images so they can be used as RAW images on modern systems and with emulators.
2.4. CD-ROM Images
A CD-ROM image contains a binary copy of the complete contents of an CD-ROM disk, and may include a boot driver if the CD-ROM is bootable.
I have more information on my guide for working with my bootable CD-ROM image files.
3. Contents of my images
This section lists the contents of my System 7.5.5 drive and partition images, see my blog entry on working with floppy disk image files to see their contents. I used to include more on my images but decided to remove any files that can be found on Apple’s Applications Recovery CD, Apple’s Legacy Software Recovery CD, or Apple’s System Recovery CD to reduce the size of my files. See section 4 for information on how to copy applications off a Recovery CD on to the drive/partition image you plan to use with your system.
Note: for the list below * indicates applications that run under System 6.0.8
3.1. Other Systems
- The other systems folder allows you to copy multiple Systems on to the same image and then use System Picker by Kevin Aitken to select which System Folder is active (blessed) on restart, e.g. you can boot with 7.5.5 then switch to 6.0.8 to reduce the memory overhead.
3.2. Setup & Repair
- Unmodified and patched (to support non-Apple SCSI drives) versions of:
- HD SC Setup 7.3.5* for formatting your SCSI drive, device or equivalent once you’ve booted your Macintosh
- Drive Setup 1.5
- Drive Setup 1.7.3
- Burn 2.5 by Next Wave Software that allows you to fully erase deleted files. This can drastically improve the compression of drive images when you want to make backups.
- Creator Changer 2.8.4 and Type Resolve 2.0.1 both let you change the file type association for files
- Lido 7.56* by Surfcity Software, an alternative utility for initializing and formatting drives.
- Disinfectant 3.7.1* by John Norstad a virus scan software for checking files you’ve been downloading off the web. All files on this drive image have been scanned.
- Disk First Aid 7.2.2* by Apple a tool to verify and repair issues with your hard drive
- ResEdit 2.1.3* lets you change creator/type codes
- SCSIProbe 4.3 by Robert Polic will tell you the device type, vendor, product and version for any device connected to your SCSI bus.
- TattleTech 2.59 and 2.17* by Decision Maker’s Software, Inc that provides detailed information on your system’s configuration.
- Wish I Were v2.0 by Martin Blitz, allows your Macintosh to “pretend” to be another model, I used
- Year 2040 *date patches for System 6.0.8, 7.0, and 7.1+ by Glen Anderson, fixes an issue with older Macintosh Systems that don’t allow for dates past 2019 (pushes the issue to 2040)
- SoftMac transfer utility, only for use under SoftMac emulator, used to transfer files between the host system and the emulator.
- MiniVMac transfer utilities, only for use under Mini VMac, used to transfer files between the host system and the emulator
3.3. Store & Mount
- DiskDup Pro 1.0.3* by Roger D. Bates for creating and mounting image files from floppy disks. The only application I’ve found so far that can mount Disk Copy images under System 6 without the risk of corrupting the images.
- Disk Copy 4.2* by Steve Christensen (for Apple) for creating image files from floppy disks, or writing images back to floppy disks
- Disk Copy 6.3.2 from Apple for creating disk images, and mounting them under System 7 (doesn’t work under System 6)
- Drop Disk by Mike Wiese and Chris Cotton that allows you to mount disk images created with Disk Copy or ShrinkWrap by dragging image on to Drop Disk’s icon)
- RamDisk+ v3.2.4* by Roger D.Bates for creating a RamDisk, useful for working on Systems that don’t have a hard drive
- ShrinkWrap Version 2.1 (last release before becoming an Aladdin product) by Chad Magendanz, for creating files that you can mount that emulate a floppy disk or hard disk. I use this program to create 32MB ProDos image files that I can use to transport and backup the contents of my ProDos partitions I use with my Apple IIe card.
- StuffIt 1.5.1* by Raymond Lau (the last shareware release before becoming an Aladdin product)
- StuffIt Expander 4.0.2* and 5.5 by Aladdin Systems, for opening StuffIt and other archive files (.arc, .bzip, .bin, .cpt, .dd, .gz, .hqx, .lha, .img, .lhz, .pkg, .sea, .sit, .smi, .tar, taz, .uu, .Z, .zip)
- Virtual CD/DVD-ROM 1.0d3 by Mike TomTom allows you to mount a CD/DVD iso images (you’ll want to install the CD ROM extensions found in the Drivers (non-Network) folder
3.4. Text & Doc Reader
- Adobe Reader v1.0* and v3.0.2 installers
- Apple DocViewer v.1.1.1
- SimpleText v1.1.1
- TeachText*
3.5. Drivers (non-Network)
A subset of the drivers you may need, see Apple’s Applications Recovery CD, Apple’s Legacy Software Recovery CD, Apple’s System Recovery CD from the internet archive for additional drivers for Apple devices.
- Apple IIe Card v2.2.2d1 the last release of the software for using an Apple IIe Card, includes a few utilities for using the card on a ProDOS formatted ShrinkWrap image file (the ProDos file extension will need to be installed first)
- CD-ROM drivers for Apple CD-ROMs, NEC CD-ROMs and the generic CD-Sunrise v2.2c driver that will work with a variety of brands. Also includes extensions for reading CDs formatted with different file formats.
- Iomega ZipTools v4.2* and v5.5.1, for use with Iomega Zip driver (you need to use 4.2 if you want to boot on the Macintosh Plus)
- MIDI Management Tools 2.0.2, what I use with my MacMan MidiMac to connect to my modern PC that I use to emulate a MT-32 midi module.
- Mode32 v7.5 fixes 32bit support for Macintosh SE/30, Macintosh II, Macintosh IIx, Macintosh IIcx, for System 7+
- Optima 32 v.2.0.0*, same as Mode32 but for System 6
3.6. Other Tools (non-network)
- GifConverter 2.4.3 can be used to convert the Flash-it .pic images to .gif files.
- Flash-it 3.0.2* by Nubu Toge for creating screen captures
- Finder Options 1.0 by Rolf Braun let’s you edit hidden features of System 7+
- PDFWriter 1.0 by Adobe, an extension let’s you “print” to PDF, you need to install Adobe Reader first, place in your extension folder for 7+, or system folder for 6, then use chooser to select it as your printer.
3.7. Network and Serial
A subset of the drivers you may need, see Apple’s Applications Recovery CD, Apple’s Legacy Software Recovery CD, Apple’s System Recovery CD from the internet archive for additional drivers for Apple devices.
- Asante Network Drivers:
- EtherTalk Installer v5.6.1 August 1997 for Asante 10Mbps Ethernet products including NuBus cards, NetDock, LC II cards, LC III cards, MacCon-i LC cards, ComStot Cards, FriendlyNet PC (PCMCIO) cards and EN/SC SCSI Ethernet devices (once exception, the Asante 10 NIC PCI card has it’s own installer diskette). Device must be connected for the install to work.
- AsanteFAST Installer v3.4 for 10/100 NuBus cards, can be installed without the device being connected.
- Fetch 2.1.2* by Dartmouth College a very simple FTP client. I use this and my Asanté EN/SC to move files to and from my Windows PC. Note you can buy Fetch 4.0.3 for use on System 7.
- Free PPP 1.0.5 and 2.6
- IPNetMonitor
- IPNetRouter for 68k and PPC
- Protocols:
- Internet Config 1.3* and 2.0.2 by Peter Lewis and Quinn centralizes a number of your Internet preferences, such as your email address and preferred Web browser
- InterSLIP 1.0.2.d2
- MacPing
- MacPPP 1.0, 1.1.3, 2.0.1, 2.1.1SD
- MacTCP 2.1 a patched version of the MacTCP 2.0.6 extension, the patch was created by Glenn Anderson, works on my Macintosh Plus with my Asante Desktop EN/SC
4. Add or remove content from my images
The table below lists the different tools I’ve assessed and indicates if they can be used to edit drive and/or partition files. Personally I mainly use Basilisk II to edit my image files, and use DD to split larger drive images in to a set of partition/volume images then merge them back together after I edit them.
- P: can read/write Partition files (also called Volume files)
- D: can read/write Drive files, D(1) indicates the software can only work with a drive file with a single partition
- I: can initialize new Drive files, these are files
- R: can read but not be used to add new files to an image
- E: can be used to edit the contents of an image file
| Emulator/Tools | Features | Windows | Linux | Mac OS |
|---|---|---|---|---|
| Basilisk II | P, D(1), E | Yes | Yes | Yes |
| Cockatrice III | ? | ? | ? | ? |
| Executor | ? | ? | ? | ? |
| HFSExplorer | P, D, R | Yes | Yes | Yes |
| HFVExplorer | P, E | Yes | No | No |
| MAME | D, I, R | Yes | Yes | Yes |
| Mini vMac | P, E | Yes | Yes | Yes |
| SheepShaver | ? | ? | ? | ? |
| SoftMac | P, D, I, E | Yes | No | No |
| PCE / macplus | P, R | Yes | Yes | ? (untested) |
| PearPC | ? | > | ? | ? |
| Worm |
5. Write to target media
Whether you write or copy to your target media is now very dependent on what device you are using. For most modern “emulated” solutions where you use an SD card, you simply copy the drive or volume image to an FAT32 or exFAT formatted SD card. For older magnetic storage and the SCSI2SD you need to write a drive image to physical media such as ZipDrives, JazDrives etc, you can use balenaEtcher, DD, the portable version of the HDD Raw Copy Tool by HDDGuru, or some other similar tool.
6. Creating a drive image using an emulator, or from a physical disk
Some information on how you can create your own drive images. Note you can also then create volume/partition images from those drive images using dd, as long as you know the size of each volume/partition on the drive.
6.1. Creating a blank drive image
Currently I’ve only found 2 ways create a custom drive image under Windows: using SoftMac for smaller image files (3GB or less) or by using HFSTools under the linux subsystem.
6.2. Creating a drive image from a physical disk
Currently I use the portable version of the HDD Raw Copy Tool by HDDGuru on my Windows system to create image files from SCSI, IDE, and USB attached physical disks, SD cards, and CF cards.
6.3. Initializing a drive file using an emulator
Using one of the emulators that can initialize drive files, and assuming you’ve used one of my image files as your boot drive for that emulator:
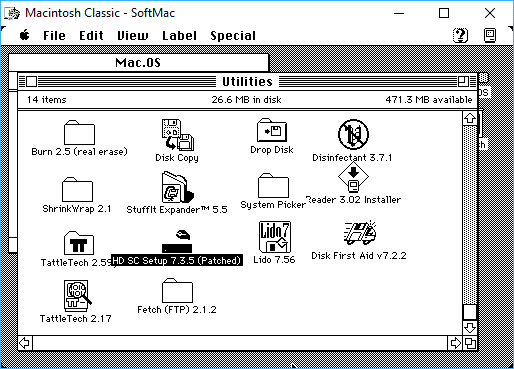
- Under Setup and Repair (was Utilities) folder you will find a copy of a patched version of HD SC setup 7.3.5 (Figure 2)
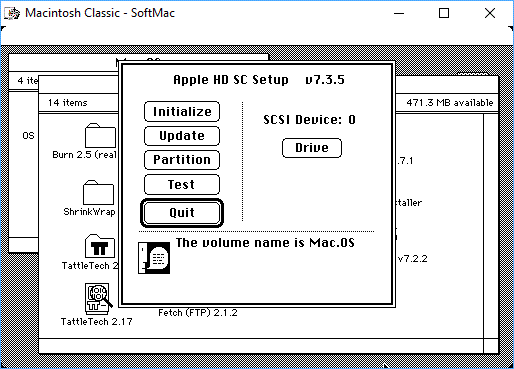
- Run HD SC setup 7.3.5 (Figure 3), SCSI Device 0 will be selected (Device 5 on MAME).
- Press the Drive button to select SCSI Device: 1 (or whichever Device you mounted your image under, likely Device 5 on MAME) (Figure 4)
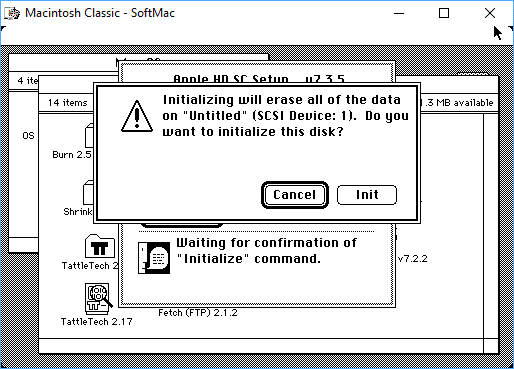
- Press the initialize button to initialize the device, a warning message will appear (Figure 5), followed by a prompt to provide a name for the drive
- Press the partition button to partition your initialized drive.
- Wait, may take some time depending on the size of the image file (especially for MAME)
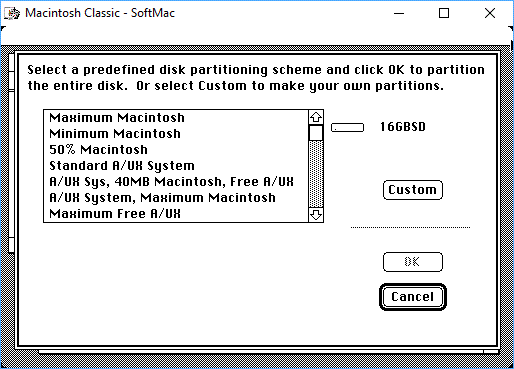
- Select custom (Figure 6)
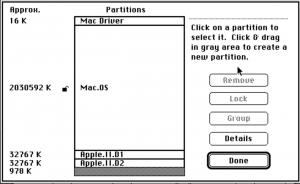
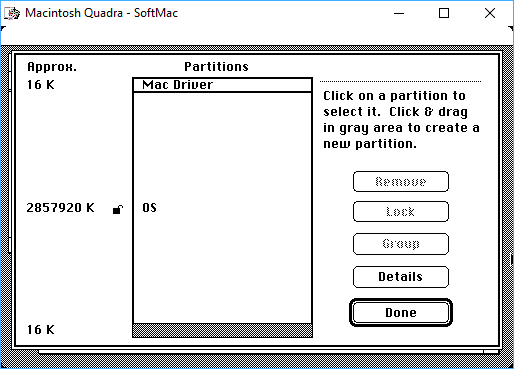
- HD SC setup will show you the default partitions it set up when it initialized the drive (Figure 7).
- Remove/edit the partitions as you see fit. If you plan to use an Apple IIe card I’d suggest setting up two 32Meg ProDOS partitions. Remember that System software before 7.5 has a 2GB size limit for partitions.

7. Transfer files to your 68k Macintosh
This section assumes that your 68k Macintosh is up and running, likely with some form of internal or external storage device and you want to copy files between your modern system and your 68k Macintosh without using one of the options in section 4 above to directly edit a drive image or partition/volume image.
7.1. Null Modem Serial Connection
If you don’t have a network card or adapter, and don’t want to use removable media, one of the least expensive options for connecting your 68k Macintosh to your modern computers is a Null Modem Serial Cable and USB Adapter for about $45 USD. This will give you a true “vintage” experience, with dial-up like speeds:
- Zterm by David Alverson: X/Y/Z modem transfers, works on any 68k Macintosh running System 4.x or greater with at least 512k of memory
- Basilisk II to a 68k Macintosh running ZTerm,
- TeraTerm (Windows 10) to a 68k Macintosh running ZTerm
- Apple Remote Access (ARA ) 1.0 to 3.0.2: Supports AppleShare transfers, TCP/IP over AppleTalk, and for ARA 3.0.2, TCP/IP over over PPP
- ARA 1.0 on your 68k Macintosh and ARA 2.1 running on Basilisk II, for any 68k Macintosh running System 7.0 and at least 2MB of memory
- ARA 2.1 on your 68k Macintosh and on Basilisk II, for any 68k Macintosh running System 7.1 to 7.5.5 and at least 4MB of memory
- IPNetRouter 1.54: Combined with ARA 2.1 lets you connect your 68k Macintosh to the internet through Basilisk II using TCP/IP over AppleTalk
- IPNetRouter 1.54 and ARA 2.1 running on Basilisk II and your 68k Macintosh running ARA 2.1, for any 68k Macintosh running System 7.1 to 7.5.5 and at least 4MB of memory
7.2. Wifi Modem
I haven’t personally tested this yet, but others have.
- Windows 10 to a 68k Macintosh via FTP, using FileZilla FTP server on your Windows 10 PC and Fetch 2.1.2 by Dartmouth College on your 68k Macintosh with an attached WifiModem
7.3. SCSI to Ethernet / Ethernet Card
Windows 10 to a 68k Macintosh via FTP, using FileZilla FTP server on your Windows 10 PC and Fetch 2.1.2 by Dartmouth College on your 68k Macintosh with an Asante SCSI to Ethernet adapter
7.4. Removable Media / Emulated Storage
Using floppy drives, FloppyEMU, CD-ROMs, Zip Drives, Jaz Drives and other removable media to transfer files typically requires that you work with image files as described in section 1 above, although I think you can directly work with the contents of floppy drives in HFVExplorer.
Thanks so much for these resources for the classic Mac community!!
This page is now even more useful as you collected here all the instructions and files. Just a note: BalenaEtcher is now available for Mac too and I am using it on my Mac to flash your images 😉
The main issue I have with the “creation” of Drive Images is the fact that SoftMac only runs on Windows. We are a Mac-only household. It would certainly be nice if there was a Mac solution to create Drive Images, not just edit them.
It looks like you can with QEMU booting System 9.2.2, I’m experimenting now and will create a guide if it works.
Hi, Steve.
There are 2 misspellings on this page which you can find by searching for “foppy.”
Next, in your “Latest Image files” table in the “Volume” & “Floppy” sections, you should add Mini vMac since it works with those images.
I also see “2.3 Floppy Images” says “to do.” But perhaps you can just say there that Volume images and Floppy images are basically the same thing. For example, your Volume & Floppy images work fine with both the FloppyEMU & Mini vMac (and Basilisk II).
Thanks, I’ll fix the typos, for the floppy images I need to write an entry that describes working with raw HFS (same as volume) vs. Disk Copy 4.2 and Disk Copy 6 formats.
I have some information on my floppy drive entry that I need to review and update.
These images have been a lifesaver setting up my collection 🙂
Thank you so much!
So, I tried booting several of these drive images on an emulated Macintosh Plus and none functioned; so I opened a hex editor and checked out the partition map. All of them include a SCSI Manager 4.3 driver, which the Macintosh Plus ROM appears to reject. Manually patching in an earlier version of the SCSI driver made them all bootable.
Which Macintoshes do you intend these to be compatible with?
What emulator did you try my images with?
I have 3 physical Mac Plus systems and I’ve tested my drive images on a Zip Drive, Jaz Drive and SCSI2SD with all of them. I’ve also used my partition image with a FloppyEMU for them.
So the issue may be the emulator or the bios file you are using with.
Hi Steve,
I’ve been trying for days to get this working on my Mac Plus with 4 MB of memory. I’m not sure if I understand the instructions correctly or if I’m missing something.
Would you be willing to contact me? I’d like to inquire about paying for your services.
Thank you!
Did you remove Open Transport from System 7.5.5 image?
I’m sure it used to be in there…
Thanks,
Matt
I’ve removed software from my 7.5.5 image that can be found on the Apple’s Applications Recovery, Apple’s Legacy Software Recovery, Apple’s System Recovery CDs.
Also it should get installed if you update my image from the basic version to the full version of 7.5.5.
Thanks for doing this. You can see that a lot of work has gone into this.
Thank you so much for the effort you’ve put in here. It’s been a great help getting SCSI2SD working with my old SE/30. I’m still getting my head around a lot of it, but at least I’ve been managed to get it booted with your minimal 7.5.5 image.
I have BasiliskII running on my MacBook (10.15.7) using both your images as well as a blank image that I created using mkfile and then formatted while booted from the Apple Recovery CD image. What I am finding hard to understand is why the image file that I formatted in the Finder (when prompted after booting from the recovery image) seems to be only a volume file and not a disk file. When I flash that to my SD card it is not recognised by the Mac as a valid startup disk once it’s been inserted into the SCSI2SD unit. Examining the first few hundred lines using xxd I have found that it is very different to the image files that you provide. My image appears to be missing any hard drive drivers or partition map, so it’s no wonder that it doesn’t work when placed into the SCSI2SD. I will keep trying!
There’s a lot of information to digest!
Thank you very much for putting in the effort to put these disk images together! saves me a TON of time setting stuff up on my Macintosh Plus and SE’s
Would you please consider posting a disk image for use with MacSD that has 1GB capacity and is initialized with 7.3.5 drivers? I can’t figure out how to do it. I use DD to create an image ( dd if=/dev/zero of=my_new_disk1m.img bs=1m count=1024 ), but when I try to do anything to it with HD SC 7.3.5 patched, it fails. I’ve tried initializing with LIDO, but that doesn’t result in an image that shows up as having 7.3.5 drivers. Also, the LIDO image yields unstable results when I put 6.0.8 on it. I am able to initialize my image with Disk Setup on MacOS 8.0 CD. Those images work fine for System 7+, but they are not bootable for 6.0.8.
Thanks for any help you can provide, and thanks for the effort you’ve put into your website. It is very helpful.
Hi Dennis, how are you using your MacSD? I only used mine with Volume images, not drive images. When using volume images you don’t need to use HD SC 7.3.5 etc, the MacSD dynamically creates the partition table based on the set of volume images you have in the folder on your SD card.
Thanks Steve & David
Your resources are very helpful.
I purchased a ZuluSCSCI and was able to boot my recently gifted Mac SE to 7.5 first try!
Unfortunately my ADB mouse will not scroll vertical despite desperate attempts to clean. I’ve ordered a new one on eBay so will have to wait a few days to explore the classic OS!
My next step is to build out a wifi modem (which I did for a Z80 project) and try and get PPP working!
Really appreciate the effort you’ve put into these resources. cheers.
Something I discovered may help you to get fewer help requests from Mac owners:
On older versions of Mac OS, using Disk Utility to format your SD cards offers too many options. When formatting in ExFAT, you are given the options of using 1 of 2 ‘Schemes’, Master Boot Record or GUID partition map. At least on my BlueSCSI, only Master Boot Record is recognized by the BlueSCSI board. I hope that helps.
Thanks Jeff, I’ll add a not about exFAT needing to be the old MBR vs GUID. I need to do several updates on my site now that there are so many new option that replaced SCSI2SD.
Thank you for posting all these useful resources! Unfortunately, many links are now 404. For example, I was trying to download the CD-ROM version of system 7.5.5 from https://www.savagetaylor.com/wp-content/uploads/68k_Macintosh/Bootdisks/OS_755_650MBCD.zip .
Some of the links you have to Apple’s TIL/TA can be replaced with the Internet Archive. For example, TIL11905 (Mac 128K to SE/30 cannot boot from CD-ROM) can be found here: https://archive.org/download/APPLE_TIL_ARTICLES/TIL00001_to_TIL60496.zip/TIL11905-Macintosh-Which_Models_Can_Start_Up_from_CD-ROM_4-93.pdf
Hi Ben, I’m actually the one who uploaded the TIL/TA articles to the Internet Archive, as I have time I plan to fix the broken links. For the CD-ROM image, thanks for letting me know, I’ll get that fixed.
Thank you. By the way, I notice the ZIP files here expand to large, slow files when they don’t need to. You could create sparse files and pack them up with `tar`.
For example, 7.5.5_savagetaylor_2GB_drive.zip creates a file which has 2 GB of zeros. UNIX systems like MacOS and GNU/Linux can represent that run of zeros as a “hole”.
For example, on GNU/Linux, I did this:
$ fallocate –dig-holes 7.5.5_savagetaylor_2GB_drive/755_2GB_drive.dsk
$ ls -sl 7.5.5_savagetaylor_2GB_drive
total 74M
74M -rw-rw-r– 1 ben ben 1971322880 Oct 6 13:34 755_2GB_drive.dsk
As you can see, even though the file is 2 GB (1971322880), it uses only 74 MB on the disk. Then you can tar it up like so:
tar -Szcvf foo.tar.gz 7.5.5_savagetaylor_2GB_drive
The .tar.gz file is the same size as the zip file, but it unpacks to a sparse file.
Thank you for these comprehensive notes! There is another method of transferring files that you might want to include.
HFS support comes builtin to the Linux kernel, so you can directly mount the volume and access it like any normal drive. If your Linux box has SCSI, just plug in an external HFS drive and it should automatically be detected. Otherwise, you can mount an .img or .iso file as if it was a hard drive using the “loopback” filesystem. There are GUIs for that nowadays, but the command line always works for me:
mkdir mnt
sudo mount -t hfs -o loop,uid=$(id -u) System7_5_3.iso mnt
THANK YOU!
Clear. Concise. Precise. Why don’t most tech writers write as you do??
Steve, I’m blown away by all the work you’ve done here. I want to say thank you even though I don’t understand everything you’ve done yet. I have a weird situation that perhaps you can help with. I have three Macs on my local network, an SE/30, LC475 and a PM6500. The 6500 and 475 both have network cards and are attached to my local network via ethernet. My SE/30 connects to my network via WiFi using a BlueSCSI v2 PicoW board and works fine for getting to the internet. The 6500 and 475 ‘see’ each other through Open Transport and the TCP/IP control panel using DHCP and both identify their connection in TCP/IP as ‘Ethernet’. The SE/30 in the TCP/IP control panel identifies its connection as ‘Alternate Ethernet’ and sees nothing else on the local network except the internet. What’s going on and how can I get the SE/30 FTPing files to and from the 475 and 6500 and they seeing the SE/30 for file sharing? I’ve been asking but either there’s confusion or a non-answer. Thank you, Gerry
Hi Gerry, try hard coding in the TCP/IP configuration information instead of using DHCP. There may be something going on where your WiFi connected SE/30 is being placed on a different sub-net or some other network configuration difference. I find manually setting up all my TCP/IP settings to make sure if have fixed IP address for my Macintosh Systems solve most of my networking problem. One thing to check, if you connect a modern system via a physical connection and a second modern system via wifi can they see each other on the network? If not, the issue could be a configuration setting in your router/switch.
So, I’m seeing two 6.0.8 versions – I know the Portable has its own pieces of software. Being from all other Classic platforms, and all of this being new to me with Classic Mac (I do know about current BSD based Mac), what do I need to do to get the Portable 6.0.8 working on a BlueSCSI? Do I start with one of your 6.0.8 and go from there? If so, which one?
You can start with the 6.0.8 version, the L and the M versions are special releases for specific computers. The image is bootable so should work with your BlueSCSI, just name the file something like HD0.img and it should work.
System 6.0.8L: shipped on a limited run of computers for the Asia Pacific Market due to a delay in System 7 localization, supports the: Classic, Classic II, LC, LC II, Powerbook 100
System 6.0.8M: a community created release based on a 6.0.7 release created for Japan, supports the: powerbook 140, 145, 145B, 170